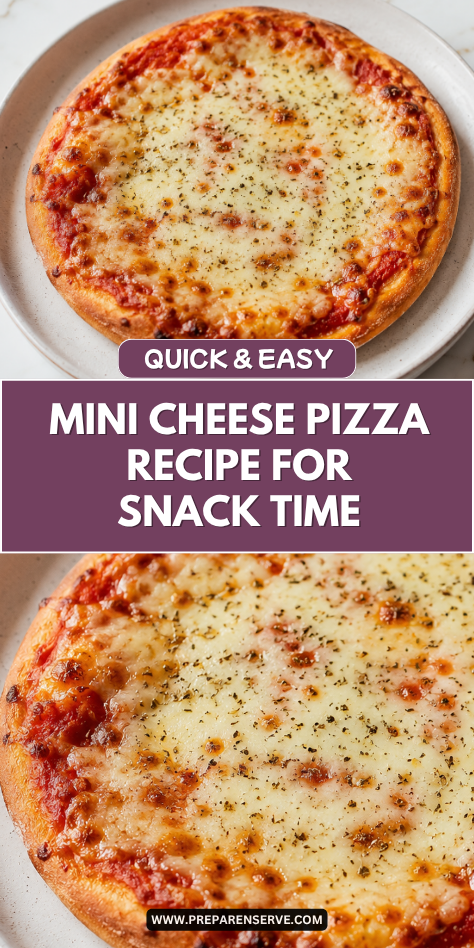
I make mini cheese pizza when I want a simple meal that feels fun without making the kitchen too busy. These little pizzas are warm, cheesy, and easy for kids and adults to enjoy, especially on nights when everyone wants something familiar.
What I like most is how easy they are to personalize. Each person can have their own small pizza, which makes dinner feel more relaxed and helps avoid arguments over toppings.
Mini pizzas are also helpful when time is short. Using small rounds of dough, English muffins, pita bread, or naan makes the base easy, and the sauce and cheese come together quickly.
This is the kind of recipe I like for after-school snacks, quick lunches, easy dinners, or casual family movie nights. It gives you all the comfort of pizza in a smaller, faster, and more manageable way.
Why You’ll Love This Recipe
Mini cheese pizza is simple, cozy, and very family-friendly. Each little pizza has a crisp base, a layer of tomato sauce, and melty cheese that bubbles in the oven.
This recipe is great for kids because the size feels fun and easy to hold. It is also a good way to let them help in the kitchen by spreading sauce, sprinkling cheese, and building their own pizzas.
It works well for busy days because you can use ready-made bases and pantry staples. Whether you use English muffins, pita bread, naan, or small pizza dough rounds, the result is quick, comforting, and dependable.
Serves: 4 people
This recipe makes 8 mini cheese pizzas, which serves about 4 people with 2 mini pizzas each. For younger kids, one mini pizza with fruit or vegetables on the side may be enough, while bigger appetites may want an extra piece or two.
Ingredients You’ll Need
- 4 English muffins, split in half, or 8 small mini pizza crusts
- 1 cup pizza sauce or marinara sauce
- 2 cups shredded low-moisture mozzarella cheese
- 1/4 cup grated Parmesan cheese
- 1 tablespoon olive oil, optional for brushing the edges
- 1 teaspoon dried Italian seasoning
- 1/2 teaspoon garlic powder
- 1/4 teaspoon fine sea salt
- 1/8 teaspoon black pepper
- 2 tablespoons chopped fresh basil or parsley, optional for serving
- Red pepper flakes, optional for serving
Pro Tips
Toast the English muffins or pizza bases before adding sauce if you like a crisper bottom. This helps keep the sauce from soaking into the bread too quickly.
Use low-moisture mozzarella for the best melt. Fresh mozzarella tastes great, but it can release extra water and make mini pizzas softer.
Do not add too much sauce to each mini pizza. A thin, even layer gives good flavor without making the base soggy.
Place the pizzas on a preheated baking sheet for a crispier bottom. The hot pan helps the crust start cooking right away.
Let kids add the cheese and seasoning themselves if they want to help. It is a simple job that makes them feel involved without needing sharp tools.
Cool the mini pizzas for a few minutes before serving. The cheese gets very hot and can burn little mouths if served straight from the oven.
Tools You’ll Need
- Baking sheet
- Parchment paper
- Spoon for spreading sauce
- Measuring cups
- Measuring spoons
- Pastry brush, optional
- Small bowl, optional for olive oil
- Cheese grater, optional
- Oven mitts
- Cooling rack or cutting board
- Pizza cutter or sharp knife
Substitutions and Variations
Change the Base
Use English muffins, pita bread, naan, bagels, tortillas, or small pizza dough rounds. Choose a base that is sturdy enough to hold the sauce and cheese without getting too soft.
Make It Gluten-Free
Use gluten-free English muffins, gluten-free pita, or gluten-free mini pizza crusts. Check the sauce and seasoning labels too, especially if cooking for someone with a strict gluten-free diet.
Add More Protein
Top the mini pizzas with pepperoni, cooked sausage, shredded chicken, turkey, or diced ham. Keep the pieces small so the pizzas cook evenly and are easy for kids to eat.
Add Vegetables
Use finely chopped bell peppers, mushrooms, spinach, olives, tomatoes, or broccoli. Smaller pieces work best because mini pizzas bake quickly and need toppings that soften fast.
Make It Extra Cheesy
Use a mix of mozzarella, cheddar, provolone, or Monterey Jack. The pizza will still taste classic, but the blend gives it a richer, meltier topping.

Make Ahead Tips
Mini cheese pizza is a helpful make-ahead recipe because the parts can be prepared before the busy part of the day. You can split the English muffins, grate the cheese, measure the seasonings, and portion the sauce into a small container.
If you want to prep the pizzas ahead, assemble them without baking and place them on a parchment-lined baking sheet. Cover the sheet tightly and refrigerate for up to 6 hours, then bake when ready.
For freezer prep, assemble the mini pizzas on a baking sheet and freeze until firm. Once frozen, transfer them to a freezer-safe bag or container, then bake straight from frozen with a few extra minutes added to the cooking time.
Instructions
Step 1: Preheat the Oven
Preheat the oven to 400°F. Line a baking sheet with parchment paper for easier cleanup.
If you want crispier mini pizzas, place the empty baking sheet in the oven while it preheats. A hot pan helps the bottoms cook faster and keeps the bases from getting too soft.
Step 2: Prepare the Pizza Bases
Split the English muffins in half if using them. Place the halves cut-side up on the prepared baking sheet.
If using mini pizza crusts, pita, naan, or bagels, arrange them in a single layer. Leave a little space between each piece so the heat can move around them.
Step 3: Toast the Bases
Bake the plain bases for 4 to 5 minutes before adding toppings. This step is optional, but it helps create a firmer, crispier texture.
The bases should feel lightly toasted but not browned too much. They will go back into the oven after the sauce and cheese are added.
Step 4: Add the Sauce
Spoon about 2 tablespoons of pizza sauce or marinara sauce onto each mini pizza base. Spread it gently with the back of the spoon, leaving a small edge uncovered.
Try not to overload the pizzas with sauce. A thin layer gives good flavor while helping the base stay crisp.
Step 5: Add the Cheese
Sprinkle the shredded mozzarella evenly over the sauce. Add a small pinch of Parmesan cheese to each mini pizza.
Make sure the cheese reaches close to the edges so every bite tastes cheesy. If kids are helping, place the cheese in a bowl so they can sprinkle it easily.
Step 6: Season the Pizzas
Sprinkle the dried Italian seasoning, garlic powder, salt, and black pepper evenly over the pizzas. Use a light hand so the flavor stays mild and kid-friendly.
Brush the edges with olive oil if you want them a little more golden. This is especially nice if you are using mini pizza dough or pita bread.
Step 7: Bake Until Melted
Bake the mini pizzas at 400°F for 8 to 10 minutes. They are ready when the cheese is melted, bubbly, and lightly golden in spots.
If using thicker bases, they may need 1 to 3 extra minutes. Watch the edges so they crisp without burning.
Step 8: Cool Briefly
Remove the baking sheet from the oven carefully. Let the mini pizzas cool for 3 to 5 minutes before serving.
The cheese will be very hot right away. A short rest helps the toppings settle and makes the pizzas easier for kids to eat.
Step 9: Add Fresh Toppings and Serve
Sprinkle the mini pizzas with chopped fresh basil or parsley if using. Add red pepper flakes only to servings for those who like a little heat.
Serve the pizzas whole or cut them into halves or quarters. Smaller pieces are easier for young kids to pick up and enjoy.
Serving Suggestions
Serve mini cheese pizzas with fresh fruit for a simple lunch or after-school snack. Apple slices, grapes, berries, or orange wedges add a cool, sweet side to the warm pizza.
A small salad makes the meal feel more balanced for dinner. Lettuce, cucumber, carrots, and a light dressing keep the plate fresh without much work.
Raw vegetables with ranch or hummus are another easy side. Carrot sticks, celery, bell pepper strips, and cucumbers pair well with the cheesy pizza flavor.
For a cozy family night, serve mini pizzas with tomato soup. The flavors feel familiar and comforting, and kids can dip the pizza edges into the soup.
You can also make a mini pizza bar with small bowls of toppings. Keep the cheese pizza base simple, then let everyone add pepperoni, vegetables, herbs, or extra cheese.
For lunch boxes, pack cooled mini pizzas with fruit, vegetables, and a small treat. They can be eaten cold or at room temperature if your child enjoys pizza that way.
Leftovers and Storage
Let leftover mini cheese pizzas cool completely before storing them. Place them in an airtight container and refrigerate for up to 3 days.
For the best texture, reheat the pizzas in a toaster oven, air fryer, or regular oven. Warm them at 350°F for 5 to 8 minutes, or until the cheese is melted and the base is crisp again.
You can also reheat them in the microwave, but the base will be softer. Heat in short bursts so the cheese warms without becoming rubbery.
Mini pizzas freeze well after baking or before baking. Freeze them in a single layer first, then transfer them to a freezer-safe bag or container for up to 2 months.
Bake frozen unbaked mini pizzas at 400°F until hot and bubbly. Reheat baked frozen pizzas at 350°F until warmed through.
Nutrition and Benefits
- Mini cheese pizzas can be portioned easily, which helps make serving simple for kids and adults. Their small size also makes it easier to pair them with fruit, vegetables, or soup.
- Mozzarella cheese adds protein and calcium while giving the pizzas their classic melty texture. Using low-moisture mozzarella helps keep the topping smooth and not watery.
- Tomato sauce adds flavor, color, and a little natural sweetness. Choosing a sauce with simple ingredients can help keep the recipe balanced and family-friendly.
- English muffins, pita, naan, or mini crusts make this recipe quick and practical. Whole grain options can add more fiber if your family likes them.
- Adding vegetables as toppings or sides can make the meal more colorful and balanced. Small chopped vegetables work best because the pizzas bake quickly.
Recipe FAQ
Can I use English muffins for mini pizzas?
Yes, English muffins work very well for mini pizzas. They toast nicely and hold sauce and cheese without needing homemade dough. Toasting them first helps keep the bottom crisp.
How do I keep mini pizzas from getting soggy?
Use a thin layer of sauce and toast the bases before adding toppings. Low-moisture mozzarella also helps because it releases less liquid than fresh mozzarella. Baking on a hot sheet pan can make the bottoms crispier.
Can I freeze mini cheese pizzas?
Yes, mini cheese pizzas freeze well before or after baking. Freeze them in a single layer first, then move them to a freezer-safe bag. Bake or reheat from frozen until the cheese is melted and the centers are hot.
What cheese works best?
Low-moisture mozzarella is the best choice for classic mini cheese pizza. It melts smoothly and does not make the crust too wet. You can mix in cheddar, provolone, or Monterey Jack for extra flavor.
Can kids help make this recipe?
Yes, this is a great recipe for kids to help with. They can spread sauce, sprinkle cheese, and add mild toppings. Adults should handle the oven and any cutting.
Can I make these with tortillas?
Yes, tortillas can be used for a thin and crispy version. Bake them for a few minutes before adding sauce so they firm up. Keep the toppings light because tortillas are thinner than English muffins or pita.
What toppings can I add?
Pepperoni, cooked sausage, mushrooms, bell peppers, olives, spinach, tomatoes, or extra cheese all work well. Chop toppings small so they heat quickly. Avoid adding too many toppings at once so the mini pizzas stay crisp.
A Cheesy Little Pizza Night Everyone Can Enjoy
Mini cheese pizza is simple, cozy, and easy to bring to the table on busy days. The crisp base, warm sauce, and melted cheese make each little pizza feel comforting without needing a lot of prep.
I love this recipe for snacks, lunches, quick dinners, and family movie nights because it is fun but still dependable. It is easy to make again, simple for kids to help with, and always welcome when everyone wants something warm and familiar.