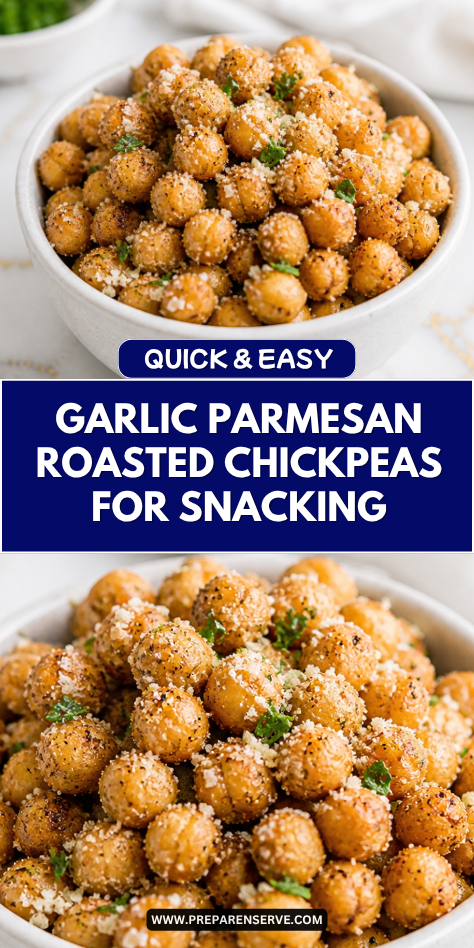
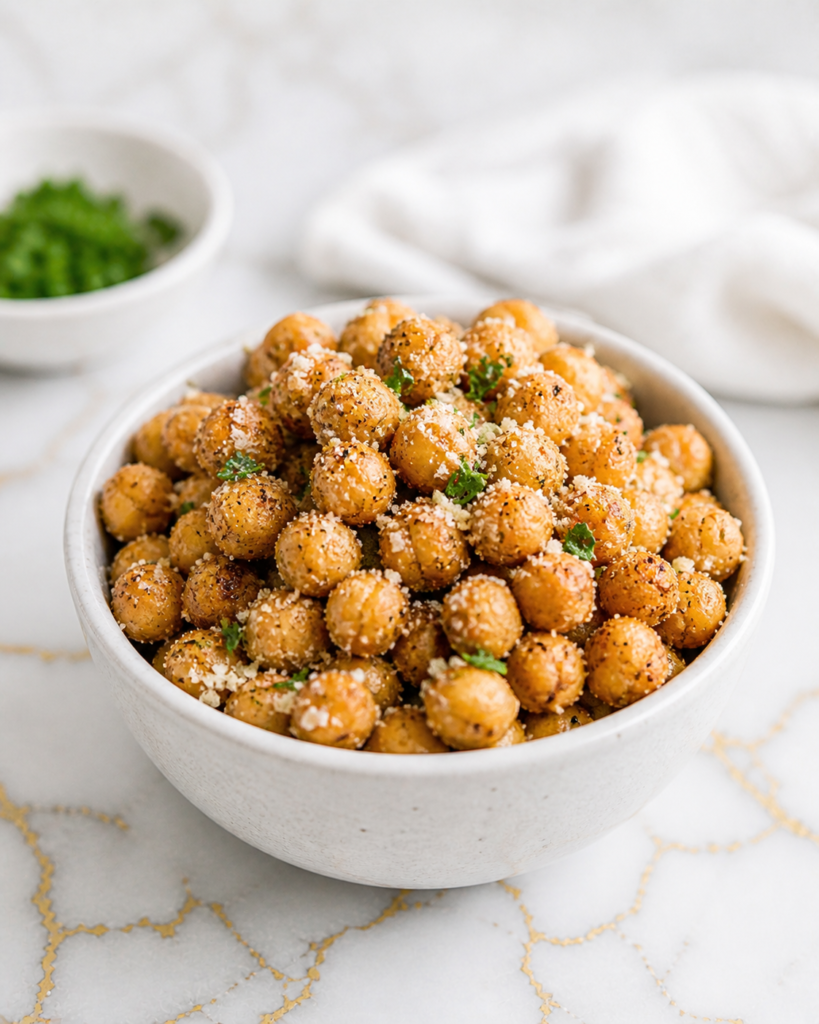
I make Garlic Parmesan Roasted Chickpeas when I want a snack that feels crunchy, savory, and simple without reaching for something from a bag. They start with canned chickpeas, a little oil, garlic, Parmesan, and a few pantry seasonings, then roast until they turn golden and crisp.
I like keeping a batch around for after-school snacks, lunch boxes, salad toppings, or quick bites while dinner is cooking. They have that salty, garlicky flavor my family enjoys, and they are easy enough to make on a regular day without much planning.
Why You’ll Love This Recipe
Garlic Parmesan Roasted Chickpeas are crisp, flavorful, and made with simple ingredients you may already have in your kitchen. The outside gets lightly crunchy in the oven, while the inside stays a little tender, giving each bite a nice balance.
They are also a helpful snack when you want something savory but still wholesome. Chickpeas are filling, and the garlic Parmesan coating gives them the kind of flavor that works for both adults and kids.
This recipe is easy to adjust, too. You can make the chickpeas extra crisp, keep the seasoning mild, or add a little spice for older kids and adults who like more flavor.
Serves: 4 people
This recipe makes about 4 snack-size servings, depending on how you plan to use the roasted chickpeas. It is enough for a small bowl at snack time, a crunchy topping for salads, or a simple side to serve with sandwiches and wraps.
If your family loves crunchy snacks, you may want to double the batch. Roasted chickpeas tend to disappear quickly once they cool, especially when they are warm, garlicky, and fresh from the oven.
Ingredients You’ll Need
- 2 cans chickpeas, 15 ounces each, drained and rinsed
- 2 tablespoons olive oil
- 1/2 cup finely grated Parmesan cheese
- 1 teaspoon garlic powder
- 1/2 teaspoon onion powder
- 1/2 teaspoon Italian seasoning
- 1/2 teaspoon fine salt
- 1/4 teaspoon black pepper
- 1/4 teaspoon smoked paprika, optional
- 1 tablespoon chopped fresh parsley, optional for serving
Pro Tips
Dry the chickpeas very well. Moisture is the biggest thing that keeps chickpeas from roasting properly. After rinsing them, spread them on a clean towel and pat them dry until they no longer feel wet.
Remove loose skins when you see them. You do not need to peel every chickpea, but removing the skins that fall off helps the texture. Loose skins can burn faster than the chickpeas and may make the pan look messy.
Use finely grated Parmesan. Finely grated Parmesan sticks better to the chickpeas than large shreds. It also melts and browns more evenly, giving the roasted chickpeas a better coating.
Do not crowd the pan. Spread the chickpeas in a single layer with a little room between them. If they are piled together, they will steam instead of roast, and they will not get as crisp.
Stir halfway through roasting. Turning the chickpeas helps them brown evenly on all sides. It also keeps the Parmesan and seasonings from sticking too much in one spot.
Let them cool before judging the crunch. Roasted chickpeas crisp up more as they cool. They may seem a little soft when they first come out of the oven, but the texture improves after a few minutes on the pan.
Tools You’ll Need
- Large rimmed baking sheet
- Parchment paper
- Colander or fine mesh strainer
- Clean kitchen towel or paper towels
- Medium mixing bowl
- Measuring spoons
- Measuring cup
- Rubber spatula or spoon
- Small bowl, optional for mixing seasonings
- Oven mitts
- Airtight container for storing leftovers
Substitutions and Variations
Use a Different Cheese
Swap Parmesan for Pecorino Romano or Asiago if that is what you have. Both give the chickpeas a salty, savory flavor while keeping the same roasted snack feel.
Make It Dairy-Free
Leave out the Parmesan and add 1 to 2 tablespoons of nutritional yeast after roasting. It gives a cheesy flavor without dairy and keeps the chickpeas easy to snack on.
Add a Little Heat
Stir in a pinch of cayenne pepper or red pepper flakes with the garlic powder. This adds gentle warmth while still keeping the garlic Parmesan flavor at the center.
Try a Lemon Herb Flavor
Add 1 teaspoon lemon zest and extra parsley after the chickpeas come out of the oven. The lemon makes the snack taste brighter and works well with the garlic and Parmesan.
Make Them Extra Hearty
Serve the roasted chickpeas over grain bowls, pasta, soup, or Caesar salad. This turns them from a simple snack into a crunchy topping that adds flavor and texture to a meal.
Make Ahead Tips
Garlic Parmesan Roasted Chickpeas are best when eaten the day they are roasted, but you can still prep ahead to make the process faster. Drain and rinse the chickpeas up to 1 day ahead, then spread them on a clean towel and let them dry well. Once dry, store them in a container lined with paper towels in the refrigerator.
You can also mix the dry seasonings ahead of time. Combine the garlic powder, onion powder, Italian seasoning, salt, black pepper, and smoked paprika in a small covered jar or bowl. This makes it easy to toss everything together quickly when you are ready to roast.
For the crispiest texture, wait to add the olive oil, Parmesan, and seasonings until right before baking. Chickpeas can soften if they sit coated for too long. If you are making these for lunch boxes or snacks, roast them earlier in the day and let them cool fully before packing.
Instructions
Step 1: Preheat the Oven
Preheat the oven to 400°F. Line a large rimmed baking sheet with parchment paper so the chickpeas do not stick and cleanup stays easy.
A hot oven helps the chickpeas roast instead of dry out slowly. Give the oven enough time to fully preheat before adding the pan.
Step 2: Drain and Rinse the Chickpeas
Pour 2 cans of chickpeas into a colander or fine mesh strainer. Rinse them well under cool water to remove the liquid from the can.
Shake the strainer gently to remove extra water. The chickpeas do not need to be handled roughly, but they should be well drained before drying.
Step 3: Dry the Chickpeas Well
Spread the rinsed chickpeas on a clean kitchen towel or several layers of paper towels. Pat them dry until they no longer feel wet on the outside.
This step makes a big difference in how crisp they become. If any loose skins come off while drying, pick them out and discard them.
Step 4: Season the Chickpeas
Place the dried chickpeas in a medium mixing bowl. Add 2 tablespoons olive oil, 1 teaspoon garlic powder, 1/2 teaspoon onion powder, 1/2 teaspoon Italian seasoning, 1/2 teaspoon fine salt, 1/4 teaspoon black pepper, and 1/4 teaspoon smoked paprika if using.
Stir gently until the chickpeas are evenly coated. The oil should lightly cover them so the seasonings and Parmesan can stick.
Step 5: Add the Parmesan
Add 1/2 cup finely grated Parmesan cheese to the seasoned chickpeas. Toss again until the cheese is spread evenly over the chickpeas.
Some Parmesan may collect at the bottom of the bowl, and that is fine. Scrape it onto the baking sheet with the chickpeas so it can roast into small crispy bits.
Step 6: Spread on the Baking Sheet
Pour the chickpeas onto the prepared baking sheet. Spread them into a single layer with a little space between them.
Do not pile the chickpeas on top of each other. A single layer helps the heat reach all sides and gives them a better chance to turn golden and crisp.
Step 7: Roast Until Golden
Roast the chickpeas at 400°F for 25 to 35 minutes. Stir them halfway through so they brown evenly and do not stick in one spot.
The chickpeas are ready when they look golden, dry on the outside, and lightly crisp. A few may split open, which is normal and often means they are roasting well.
Step 8: Cool and Finish
Remove the baking sheet from the oven and let the chickpeas cool on the pan for 5 to 10 minutes. They will continue to firm up as they sit.
Sprinkle with 1 tablespoon chopped fresh parsley if using. Taste and add a small pinch of salt or extra Parmesan if you want a stronger savory finish.
Serving Suggestions
Garlic Parmesan Roasted Chickpeas are easy to serve as a simple snack in a small bowl. They are especially good when they are still a little warm from the oven and the Parmesan is crisp around the edges.
They also make a great topping for salads. Sprinkle them over Caesar salad, chopped romaine, or a simple cucumber and tomato salad for extra crunch and savory flavor.
For lunch boxes, pack them in a small container once they are fully cool. They are a nice change from chips or crackers and pair well with sandwiches, wraps, cheese cubes, or sliced fruit.
You can also add them to grain bowls for texture. They work well with rice, quinoa, roasted vegetables, hummus, grilled chicken, or a drizzle of lemon dressing.
Try serving them with soup for a crunchy topping. They are especially nice over tomato soup, vegetable soup, creamy potato soup, or a simple broth-based bowl.
For a snack board, place the chickpeas in a small dish with fresh vegetables, pita wedges, cheese, olives, and a mild dip. This makes an easy family-style option for afternoons, game nights, or casual lunches.
Leftovers and Storage
Let the roasted chickpeas cool completely before storing them. If they are sealed while still warm, steam can build up and make them soft. Once cooled, store them in a loosely covered container at room temperature for up to 2 days.
For the best texture, avoid refrigerating roasted chickpeas. The fridge can add moisture and make them chewy instead of crisp. A container with the lid slightly loose or a paper towel inside can help manage extra moisture.
If the chickpeas soften, spread them back on a baking sheet and warm them in a 350°F oven for 5 to 8 minutes. Let them cool again before serving so they can crisp back up. Freezing is not recommended because the texture becomes soft after thawing.
Nutrition and Benefits
- Good plant-based protein: Chickpeas provide plant-based protein, which helps make this snack more filling than many simple crunchy snacks. They are a helpful option for lunch boxes, after-school snacks, or topping lighter meals.
- A source of fiber: Chickpeas naturally contain fiber, which helps them feel satisfying. This makes them a smart choice when you want something savory that does not leave everyone hungry right away.
- Simple pantry ingredients: This recipe uses canned chickpeas, olive oil, Parmesan, and common seasonings. It is easy to make without a special grocery trip, which is helpful for busy families.
- Oven-roasted instead of fried: The chickpeas get crisp in the oven with just a small amount of oil. They still taste crunchy and snackable without needing deep frying.
- Easy to use in meals: These roasted chickpeas are more than a snack. They add texture to salads, bowls, soups, and wraps, making everyday meals feel a little more flavorful.
Recipe FAQ
Why are my roasted chickpeas not crispy?
The chickpeas may have had too much moisture before roasting. Dry them very well after rinsing, and spread them in a single layer on the baking sheet. They also crisp more as they cool, so give them a few minutes before serving.
Do I need to peel the chickpeas?
No, you do not need to peel every chickpea. Just remove any loose skins that come off while drying them. This helps prevent small skins from burning and gives the roasted chickpeas a cleaner texture.
Can I use dried chickpeas instead of canned?
Yes, but they need to be cooked first. Soak and cook the dried chickpeas until tender, then drain and dry them very well before roasting. Canned chickpeas are quicker and work nicely for this recipe.
Can I make these without Parmesan?
Yes, you can leave out the Parmesan for a simpler garlic roasted chickpea. For a dairy-free cheesy flavor, add nutritional yeast after roasting. This keeps the flavor savory without using cheese.
How long do roasted chickpeas stay crunchy?
They are crunchiest the day they are made. They can be stored for up to 2 days, but they may soften slightly over time. Reheating them in the oven can help bring back some crispness.
Can I use fresh garlic instead of garlic powder?
Garlic powder works better because it coats the chickpeas evenly and is less likely to burn. Fresh minced garlic can burn during the long roasting time and taste bitter. If you want fresh garlic flavor, add a little garlic-infused oil or toss with fresh garlic after roasting.
Are these good for meal prep?
Yes, they can be useful for meal prep if you know they are best within the first day or two. Make a batch for salads, bowls, soups, or snacks, and store them once fully cooled. Keep them separate from wet ingredients until serving so they stay as crisp as possible.
A Crunchy Homemade Snack to Keep Around
Garlic Parmesan Roasted Chickpeas are a simple way to turn pantry staples into something crisp, savory, and satisfying. They are easy to season, quick to roast, and full of the garlic Parmesan flavor that makes snack time feel a little more homemade.
I like keeping this recipe close for lunch boxes, salad toppings, and busy afternoons when everyone wants something crunchy. The results are dependable, the ingredients are simple, and the flavor is comforting enough to make again whenever a salty snack sounds good.