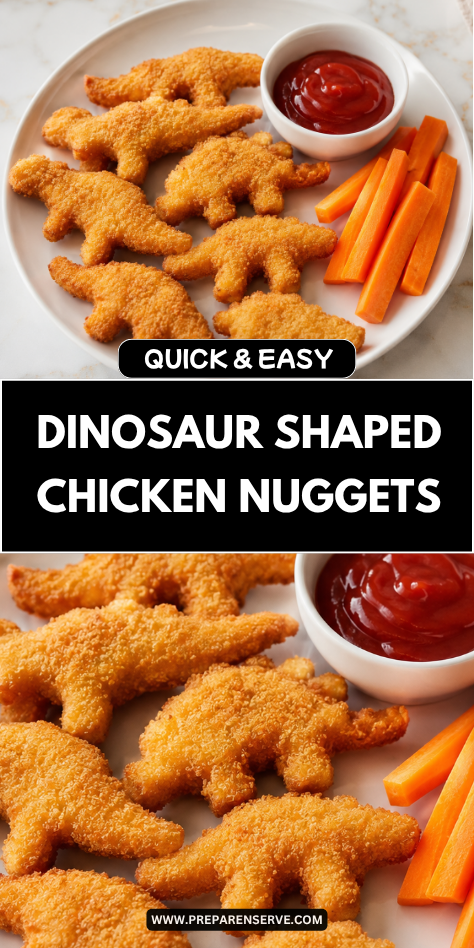
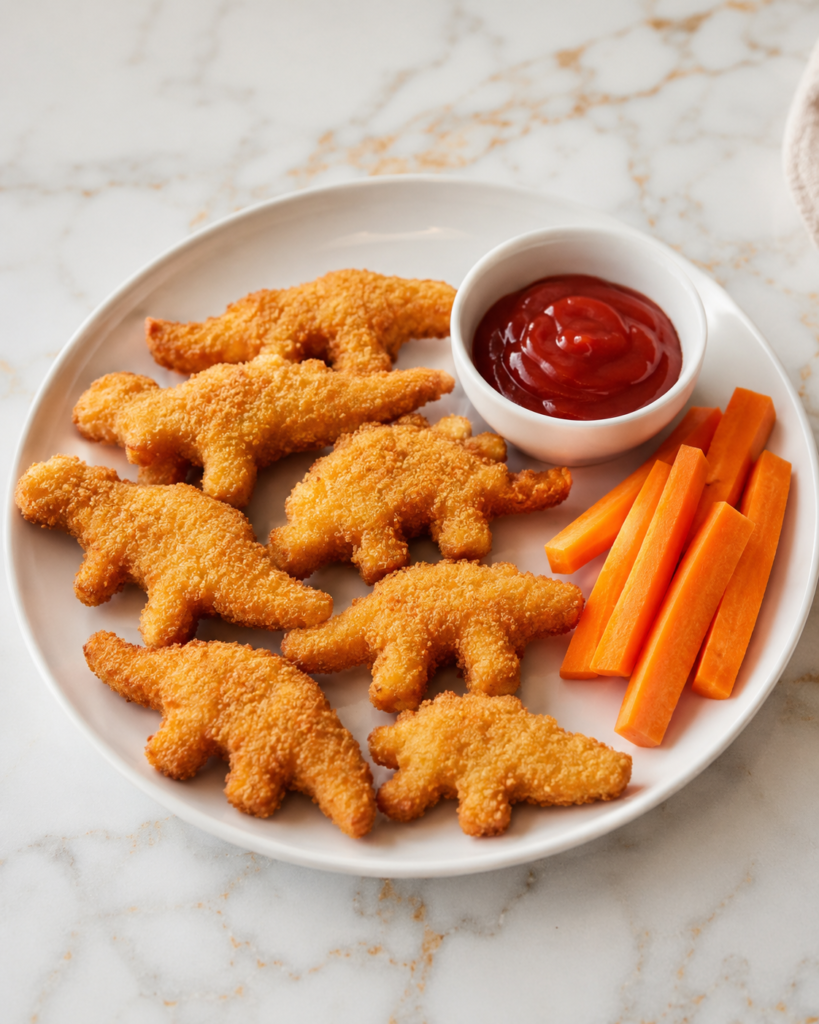
I make Dinosaur Shaped Chicken Nuggets when I want a kid-friendly meal that feels fun but still tastes homemade. They are crispy on the outside, tender in the middle, and shaped in a way that makes lunch or dinner feel a little more playful.
I like this recipe because it takes a familiar favorite and makes it feel special without using hard steps. The chicken mixture is simple, the coating bakes up golden, and the dinosaur shapes make these nuggets perfect for picky eaters, lunch boxes, parties, or easy family dinners.
Why You’ll Love This Recipe
Dinosaur Shaped Chicken Nuggets are fun for kids, but they are also practical for parents. They use simple ingredients, bake in the oven, and can be made ahead for quick meals during the week.
The flavor is mild, savory, and familiar, which makes them easy for the whole family to enjoy. The inside stays tender, while the breadcrumb coating gives each nugget a crisp bite that works well with favorite dipping sauces.
This recipe is also flexible and helpful for busy homes. You can freeze the nuggets, change the seasonings, make them gluten-free, or serve them with fruit, vegetables, fries, or a simple salad for a complete meal.
Serves: 6 people
This recipe makes about 24 small to medium dinosaur chicken nuggets, depending on the size of your cookie cutters. It serves about 6 people with 4 nuggets each, which is a good portion for kids or a lighter family meal.
If you are feeding older kids or adults, you may want to serve a few extra nuggets per person. You can also double the batch and freeze half, which makes future lunches and dinners much easier.
Ingredients You’ll Need
For the Chicken Nugget Mixture
- 1 1/2 pounds ground chicken
- 1 large egg
- 1/3 cup plain breadcrumbs
- 1/4 cup grated Parmesan cheese, optional
- 1 teaspoon kosher salt
- 1/2 teaspoon garlic powder
- 1/2 teaspoon onion powder
- 1/2 teaspoon paprika
- 1/4 teaspoon black pepper
- 1 tablespoon mayonnaise or plain Greek yogurt
- 1 teaspoon Dijon mustard, optional
For the Crispy Coating
- 1 cup panko breadcrumbs
- 1/2 cup plain breadcrumbs
- 1/2 teaspoon kosher salt
- 1/2 teaspoon paprika
- 1/4 teaspoon garlic powder
- 2 tablespoons olive oil or melted butter
For Shaping and Baking
- 2 tablespoons all-purpose flour, for dusting hands and cutters
- Cooking spray, for the baking sheet
- 1 tablespoon olive oil, for brushing or spraying tops if needed
For Serving
- 1/2 cup ketchup
- 1/2 cup honey mustard
- 1/2 cup ranch dressing
- 1 cup carrot sticks
- 1 cup cucumber slices
- 2 cups fresh fruit, such as grapes, apple slices, or berries
Pro Tips
Chill the chicken mixture before shaping if it feels too sticky. Even 15 to 20 minutes in the refrigerator can make it easier to press out and cut into dinosaur shapes.
Lightly flour the cookie cutters before cutting each nugget. This helps the chicken mixture release more easily and keeps the dinosaur shapes from tearing.
Use simple dinosaur cookie cutters with clear outlines. Cutters with too many tiny details can be harder to use with soft chicken mixture, especially when you are cooking with kids.
Do not make the nuggets too thick. A thickness of about 1/2 inch works well because the nuggets cook through evenly while still staying tender inside.
Press the coating gently onto each nugget. This helps the breadcrumbs stick and gives the baked nuggets a crisp, golden outside.
Let kids help with safe steps like mixing the coating or choosing dipping sauces. Keep raw chicken handling for adults, but the fun parts can still make the meal feel special for kids.
Tools You’ll Need
- Large mixing bowl
- Medium mixing bowl
- Measuring cups
- Measuring spoons
- Baking sheet
- Parchment paper
- Dinosaur-shaped cookie cutters
- Rolling pin or clean hands for flattening
- Cutting board or clean work surface
- Rubber spatula or spoon
- Pastry brush, optional
- Cooking spray
- Instant-read thermometer
- Small bowls for dipping sauces
- Serving plate or platter
Substitutions and Variations
Use Ground Turkey
Ground turkey can be used instead of ground chicken if that is what you have. Choose a blend that is not too lean so the nuggets stay moist and tender after baking.
Make It Gluten-Free
Use gluten-free breadcrumbs and gluten-free panko in both the nugget mixture and the coating. Dust the cutters with a little gluten-free flour or cornstarch so the shapes release easily.
Change the Seasoning
Keep the seasonings mild for younger kids, or add a pinch of Italian seasoning, ranch seasoning, or smoked paprika for more flavor. Small changes can make the nuggets taste a little different while still keeping them familiar.
Add a Hidden Veggie
Mix in 1/4 cup very finely grated carrot or zucchini, but squeeze out extra moisture first. This keeps the nuggets tender without making the chicken mixture too wet or changing the flavor too much.
Make Them Crispier or Lighter
For crispier nuggets, spray the tops with cooking spray before baking or cook them in an air fryer. For a lighter version, use less oil in the breadcrumb coating and serve them with fresh fruit and vegetables instead of fries.
Make Ahead Tips
Dinosaur Shaped Chicken Nuggets are a great make-ahead recipe because they freeze and reheat well. You can shape and coat the nuggets earlier in the day, then keep them covered in the refrigerator until it is time to bake.
You can also bake the nuggets fully, let them cool, and store them for quick lunches or dinners. Once cooled, place them in an airtight container in the refrigerator for up to 3 days.
For freezer prep, arrange the shaped and coated uncooked nuggets on a parchment-lined baking sheet. Freeze until firm, then move them to a freezer-safe bag or container so they do not stick together.
Cooked nuggets can also be frozen for easy meals later. Reheat them in the oven or air fryer so the coating becomes crisp again instead of soft.
Instructions
Step 1: Prepare the Baking Sheet
Preheat the oven to 400°F. Line a large baking sheet with parchment paper and lightly coat it with cooking spray.
This helps the nuggets release easily after baking. It also makes cleanup much easier, which is always helpful when working with a breaded recipe.
Step 2: Mix the Chicken Nugget Base
In a large mixing bowl, combine 1 1/2 pounds ground chicken, 1 large egg, 1/3 cup plain breadcrumbs, 1/4 cup grated Parmesan cheese if using, 1 teaspoon kosher salt, 1/2 teaspoon garlic powder, 1/2 teaspoon onion powder, 1/2 teaspoon paprika, and 1/4 teaspoon black pepper.
Add 1 tablespoon mayonnaise or plain Greek yogurt and 1 teaspoon Dijon mustard if using. Mix gently with a spoon or clean hands until everything is combined, but do not overmix or the nuggets may become too firm.
Step 3: Chill the Mixture
Cover the bowl and place the chicken mixture in the refrigerator for 15 to 20 minutes. This makes the mixture easier to shape and helps it hold the dinosaur outlines better.
If you are short on time, you can still shape the nuggets right away. Just keep a little flour nearby for your hands and the cookie cutters.
Step 4: Make the Crispy Coating
In a medium mixing bowl, stir together 1 cup panko breadcrumbs, 1/2 cup plain breadcrumbs, 1/2 teaspoon kosher salt, 1/2 teaspoon paprika, and 1/4 teaspoon garlic powder.
Drizzle in 2 tablespoons olive oil or melted butter. Stir until the crumbs are lightly coated, which helps them turn golden in the oven.
Step 5: Flatten the Chicken Mixture
Lightly dust a clean work surface, cutting board, or piece of parchment paper with 2 tablespoons all-purpose flour. Place the chilled chicken mixture on top and gently press it into an even layer about 1/2 inch thick.
You can use clean hands or a rolling pin covered with a piece of parchment paper. Try to keep the thickness even so all the nuggets bake at the same pace.
Step 6: Cut the Dinosaur Shapes
Lightly dust the dinosaur-shaped cookie cutters with flour. Press the cutters into the chicken mixture to make dinosaur shapes, then carefully lift each nugget away from the surface.
If the chicken sticks, use a small spatula to help lift the shapes. Gather the scraps, press them back together, and keep cutting until all the mixture is used.
Step 7: Coat the Nuggets
Place each dinosaur-shaped nugget into the breadcrumb mixture. Press the coating gently onto the top, bottom, and sides so each piece is covered.
Move the coated nuggets to the prepared baking sheet. Leave a little space between them so the heat can move around each nugget and crisp the coating.
Step 8: Add a Little Extra Oil
Lightly spray the tops of the nuggets with cooking spray or brush them with 1 tablespoon olive oil if needed. This helps the coating become more golden while baking.
You do not need to soak the nuggets in oil. A light coating is enough to help the breadcrumbs crisp.
Step 9: Bake the Nuggets
Bake the nuggets at 400°F for 15 to 18 minutes. Flip them carefully halfway through baking so both sides become golden.
The exact time may depend on the size of your dinosaur cutters and the thickness of the nuggets. The chicken should reach 165°F in the center on an instant-read thermometer.
Step 10: Rest and Serve
Let the nuggets rest on the baking sheet for 3 to 5 minutes before serving. This helps the juices settle and makes the nuggets easier for kids to pick up.
Serve warm with ketchup, honey mustard, ranch dressing, carrot sticks, cucumber slices, and fresh fruit. The nuggets should be crisp on the outside, tender in the center, and fun to dip.
Serving Suggestions
Dinosaur Shaped Chicken Nuggets are perfect with classic kid-friendly sides like carrot sticks, cucumber slices, grapes, apple slices, or berries. The fresh sides keep the plate colorful and balance the crispy nuggets.
They also work well with oven fries, sweet potato fries, or roasted potato wedges. This makes the meal feel like a fun dinner plate while still being homemade.
For lunch boxes, pack the nuggets with a small dipping sauce container. Add fruit, crackers, cheese cubes, or sliced vegetables to make the meal easy to eat.
You can serve them on a snack board for playdates or birthday lunches. Add several dipping sauces, fresh vegetables, pretzels, and fruit so kids can choose what they like.
For a lighter meal, serve the nuggets over a simple salad or with steamed broccoli and rice. This keeps the dinosaur shapes fun while making the plate more filling for adults.
They are also great for a movie night dinner. Set out the warm nuggets with dipping sauces and simple sides so everyone can grab what they want.
Leftovers and Storage
Store leftover Dinosaur Shaped Chicken Nuggets in an airtight container in the refrigerator for up to 3 days. Let them cool before storing so extra steam does not make the coating soggy.
To reheat, place the nuggets on a baking sheet and warm them in a 375°F oven until hot and crisp. This usually takes about 8 to 10 minutes, depending on their size.
An air fryer also works very well for reheating. Heat the nuggets at 350°F for 4 to 6 minutes, or until the coating crisps again and the centers are warm.
You can microwave them if needed, but the coating will be softer. This is fine for a quick lunch, but the oven or air fryer gives the best texture.
To freeze cooked nuggets, let them cool completely and place them in a freezer-safe bag or container. Freeze for up to 2 months, then reheat from frozen in the oven or air fryer until hot.
Nutrition and Benefits
- Ground chicken provides protein that helps make these nuggets filling and satisfying. It also has a mild flavor that works well for kids and simple seasonings.
- Baking the nuggets instead of deep-frying keeps the recipe practical for home cooking. The breadcrumb coating still turns crisp with a little oil or cooking spray.
- Using panko breadcrumbs gives the outside a light crunch. The finer breadcrumbs in the mixture help hold the nuggets together and keep the inside tender.
- Adding a simple fruit or vegetable side makes the meal feel more balanced. Carrots, cucumbers, berries, apple slices, or grapes all pair well with the mild chicken flavor.
- Homemade nuggets let you control the seasoning, size, and ingredients. This is helpful for families who want a familiar meal with a little more care put into it.
Recipe FAQ
Can I make these nuggets without dinosaur cookie cutters?
Yes, you can shape the chicken mixture into simple rounds, squares, or strips. The flavor and texture will be the same, even without the dinosaur shapes. Cookie cutters just make the meal more playful for kids.
Can I use whole chicken breast instead of ground chicken?
This recipe is designed for ground chicken so it can be shaped easily. If you only have chicken breast, you can pulse it in a food processor until it becomes finely ground. Be careful not to overprocess it into a paste.
How do I keep the chicken mixture from sticking?
Chill the mixture before shaping and lightly flour your hands and cookie cutters. You can also shape the mixture on parchment paper. If it gets too soft, place it back in the refrigerator for a few minutes.
Can I cook these in an air fryer?
Yes, these nuggets cook well in an air fryer. Spray the basket and nuggets lightly with cooking spray, then air fry at 375°F for about 10 to 12 minutes, flipping halfway through. Make sure the centers reach 165°F.
Can I freeze them before baking?
Yes, freeze the shaped and coated nuggets on a parchment-lined baking sheet until firm. Then transfer them to a freezer-safe bag or container. Bake from frozen, adding a few extra minutes to the cooking time.
What dips go best with these nuggets?
Ketchup, honey mustard, ranch, barbecue sauce, and mild buffalo ranch all work well. For younger kids, simple dips are usually best. You can serve a few choices to make the meal feel fun.
How do I know the nuggets are fully cooked?
Use an instant-read thermometer to check the center of the thickest nugget. The chicken should reach 165°F. The outside should be golden, and the inside should be tender with no pink remaining.
A Playful Nugget Dinner Kids Will Remember
Dinosaur Shaped Chicken Nuggets are a fun way to make a simple meal feel special without adding a lot of extra work. The crispy coating, tender chicken center, and familiar flavor make them easy for kids to enjoy and simple for parents to serve.
I love this recipe for lunches, freezer meals, birthday plates, and busy weeknight dinners. It is dependable, easy to reheat, and flexible enough to pair with fruit, vegetables, fries, or favorite dips.