I started making this when I wanted fried chicken at home that had that genuinely crispy, golden crust and juicy interior that is so hard to find even at a good restaurant.
Getting it right took some testing, but once I figured out the coating, the seasoning, and the oil temperature the results were consistently better than anything I had been ordering out.
I’ll show you how to brine the chicken, build the coating, and fry it so every piece comes out with that satisfying crunch and stays juicy all the way to the bone.
It’s a recipe that takes a little more effort than a weeknight dinner but delivers the kind of fried chicken that makes the whole process completely worth it.
Why You’ll Love This Recipe
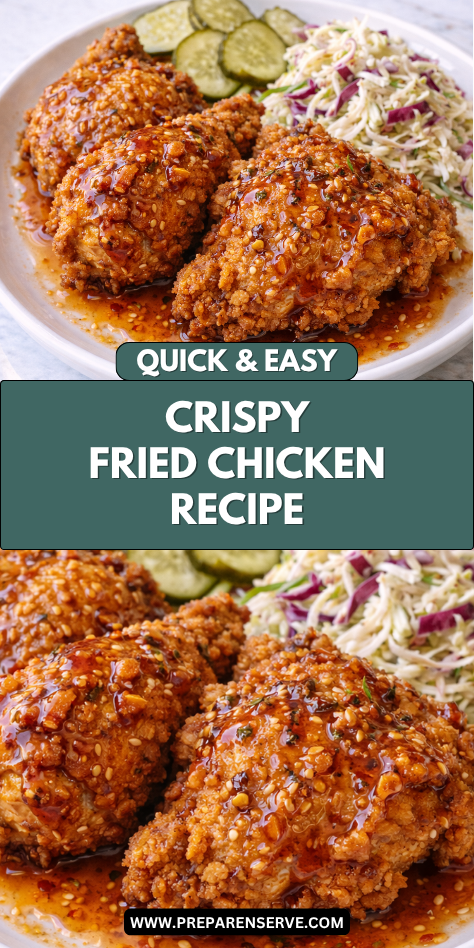
Crispy Fried Chicken Recipe is beloved for its perfect combination of flavor, texture, and comfort. Each piece is crispy on the outside, juicy on the inside, and bursting with seasoning that complements the natural taste of chicken.
This recipe is adaptable for different cuts of chicken, including drumsticks, thighs, wings, or breasts. You can adjust seasoning levels, cooking times, and breading techniques to create a version tailored to your family’s preferences.
Families love this recipe because it’s familiar, comforting, and universally appealing. Kids enjoy the crunchy coating, while adults appreciate the flavor depth and golden-brown finish. It’s perfect for weeknight meals, family dinners, or special occasions like picnics and game days.
Serves: 4–6 people
This recipe is designed to serve four to six people, with each person receiving a generous portion of crispy fried chicken. The recipe can easily be doubled for larger gatherings. Leftover fried chicken can be stored and repurposed for sandwiches, wraps, or a quick snack the next day.
Ingredients You’ll Need
Chicken and Seasoning
- 4–6 chicken pieces (breasts, thighs, drumsticks, or wings)
- 2 cups buttermilk
- 1 teaspoon salt
- 1/2 teaspoon black pepper
- 1 teaspoon paprika
- 1 teaspoon garlic powder
- 1 teaspoon onion powder
- 1/4 teaspoon cayenne pepper (optional for heat)
Coating
- 2 cups all-purpose flour
- 1 teaspoon salt
- 1/2 teaspoon black pepper
- 1 teaspoon paprika
- 1/2 teaspoon garlic powder
- 1/2 teaspoon onion powder
- Optional: 1/4 teaspoon cayenne pepper for extra spice
Frying
- Vegetable oil, canola oil, or peanut oil (enough for deep or shallow frying)
Optional Garnishes and Serving Suggestions
- Fresh parsley or thyme for garnish
- Lemon wedges for serving
- Classic sides: mashed potatoes, coleslaw, corn on the cob, or biscuits
Pro Tips
Marinate the chicken in buttermilk for at least 2 hours, or overnight, to ensure tender, flavorful meat. The acidity in buttermilk helps break down proteins, resulting in juicier chicken.
Pat the chicken dry before dredging to ensure the coating adheres properly and remains crispy after frying.
Do not overcrowd the frying pan; cook in batches if necessary. Overcrowding lowers the oil temperature and results in soggy chicken.
Maintain a consistent frying temperature (around 350°F) to ensure even cooking and a golden-brown crust. Use a thermometer to monitor the oil temperature.
Allow fried chicken to rest on a wire rack instead of paper towels. This keeps the coating crispy while draining excess oil.
Optional: Add herbs or spices to the flour mixture to customize flavor. Smoked paprika, cayenne, or dried thyme can enhance the depth of the crust.
Tools You’ll Need
- Large skillet, Dutch oven, or deep fryer
- Tongs for flipping chicken
- Meat thermometer for checking doneness
- Mixing bowls for marinating and dredging
- Wire rack and baking sheet for resting cooked chicken
- Whisk for mixing seasoning and flour
Substitutions and Variations
Chicken cuts: Drumsticks, thighs, wings, or breasts all work. Adjust cooking time based on size and bone-in or boneless cuts.
Marinade alternatives: Buttermilk can be substituted with plain yogurt, milk mixed with lemon juice, or kefir for tenderizing.
Flour coating: Use a combination of all-purpose flour and cornstarch for extra crispiness. Gluten-free flour blends can also be used.
Seasoning variations: Add herbs such as thyme, oregano, or rosemary to the flour mixture. Adjust garlic, paprika, and cayenne levels to taste.
Cooking methods: Pan-fry, deep-fry, or oven-bake for a slightly lighter version. Oven-baked versions yield a crispy crust with less oil.
Serving options: Pair with mashed potatoes, rice, pasta, coleslaw, roasted vegetables, or fresh salad. Leftover chicken can be used in sandwiches or wraps.
Crispy Fried Chicken Recipe is versatile, flavorful, and universally loved. It’s perfect for weeknight dinners, family gatherings, or casual entertaining. Preparing ingredients ahead of time ensures a smooth cooking process and consistently crispy results.

Make Ahead Tips
Crispy Fried Chicken Recipe is perfect for make-ahead preparation, making it ideal for busy weeknights, picnics, or family gatherings. You can marinate the chicken in buttermilk for several hours or overnight in the refrigerator. This step tenderizes the meat and infuses it with flavor, ensuring juicy, flavorful chicken every time.
The seasoned flour mixture can also be prepared ahead of time. Combine the flour, salt, pepper, paprika, garlic powder, onion powder, and optional cayenne pepper in a large bowl or resealable bag. Store in a cool, dry place until ready to coat the chicken.
Vegetables for sides, such as corn on the cob, coleslaw ingredients, or roasted potatoes, can be prepped ahead. Wash, chop, and store them in airtight containers in the refrigerator. Cooking them just before serving ensures freshness, crispness, and vibrant color.
If using biscuits or rolls as a side, dough can be prepared in advance or bought pre-made for convenience. Assemble any cold sides like coleslaw or salads ahead of time to streamline serving.
For gatherings, you can portion marinated chicken and set up a dredging station with the flour mixture. This allows you to quickly coat chicken and fry in batches without hassle. Prepping in advance ensures consistent, evenly coated chicken and a stress-free cooking process.
Instructions
Step 1: Prepare the Chicken
Remove chicken from the refrigerator and pat dry with paper towels to remove excess buttermilk. This helps the flour coating adhere properly and ensures a crisp crust.
Season the chicken with additional salt, pepper, and paprika if desired. Allow it to rest at room temperature for 10–15 minutes before dredging.
Step 2: Dredge the Chicken
Place the seasoned flour mixture in a large bowl or shallow dish. Coat each piece of chicken thoroughly, pressing lightly to adhere the flour. Shake off excess flour to prevent clumping.
Optional double-dredging: For extra-crispy crust, dip the coated chicken back into the buttermilk and then dredge again in the seasoned flour.
Step 3: Heat the Oil
Pour enough oil into a deep skillet, Dutch oven, or fryer to cover at least half the chicken pieces. Heat to 350°F using a thermometer to monitor the temperature. Maintaining a steady heat is key for even cooking and a golden crust.
Do not overcrowd the pan; cook in batches if necessary. Overcrowding lowers the oil temperature and results in soggy chicken.
Step 4: Fry the Chicken
Carefully add the chicken pieces to the hot oil. Fry for 12–15 minutes for medium-sized drumsticks and thighs, turning occasionally to ensure even browning. Adjust cooking times for larger or smaller pieces.
Check doneness by inserting a meat thermometer; chicken should reach an internal temperature of 165°F. The juices should run clear when pierced.
Step 5: Drain and Rest
Remove chicken from the oil using tongs and place on a wire rack set over a baking sheet. This allows excess oil to drain and prevents the crust from becoming soggy.
Rest the chicken for 5–10 minutes before serving. Resting helps the juices redistribute and maintains a tender, juicy interior.
Step 6: Serve Immediately
Serve the crispy fried chicken hot, accompanied by classic sides such as mashed potatoes, coleslaw, roasted vegetables, or biscuits. Garnish with fresh parsley, thyme, or a squeeze of lemon for added freshness and presentation.
Step 7: Storing Leftovers
Store leftover fried chicken in an airtight container in the refrigerator for up to three days. Keep any sides separate until ready to serve.
To reheat, place chicken on a wire rack in a preheated oven at 375°F for 10–15 minutes to restore crispiness. Avoid microwaving, which can make the crust soggy.
Leftover fried chicken can also be repurposed:
- Slice and use in sandwiches or wraps.
- Chop into salads or grain bowls.
- Dice and incorporate into casseroles or fried rice for extra flavor.
- Enjoy cold as a quick snack or picnic option.
Serving Suggestions
Crispy Fried Chicken Recipe pairs well with a variety of classic sides:
- Mashed potatoes with gravy or roasted potatoes.
- Steamed or roasted vegetables such as green beans, carrots, or corn.
- Fresh coleslaw or cabbage salad for a refreshing contrast.
- Biscuits, dinner rolls, or garlic bread to soak up juices and add richness.
Optional garnishes and enhancements:
- Fresh herbs such as parsley, thyme, or rosemary for aroma and color.
- Lemon wedges to cut through richness and add brightness.
- Hot sauce or honey for added flavor and versatility.
This Crispy Fried Chicken Recipe is perfect for weeknight dinners, weekend gatherings, picnics, or family celebrations. Prepping chicken and coating ingredients ahead of time ensures a smooth, stress-free cooking process while delivering tender, juicy, and golden-brown fried chicken every time.
Leftovers and Storage
Crispy Fried Chicken Recipe is best enjoyed fresh, but leftovers can be stored and repurposed effectively. Allow the chicken to cool completely before placing it in an airtight container. Store the chicken separately from sides such as mashed potatoes, rice, or coleslaw to maintain freshness and prevent sogginess.
Refrigerated fried chicken lasts up to three days when stored properly. To reheat while maintaining the crispy crust, place the chicken on a wire rack in a preheated oven at 375°F for 10–15 minutes. Avoid microwaving fully cooked chicken, as it can soften the crust and make it chewy.
Fried chicken can also be frozen for longer storage. Wrap each piece individually in plastic wrap or foil, then place in a freezer-safe container or bag for up to two months. Thaw overnight in the refrigerator and reheat in the oven to restore crispiness.
Leftover chicken can be repurposed creatively:
- Slice or shred for sandwiches, wraps, or sliders.
- Chop and add to salads or grain bowls for a protein-packed meal.
- Dice and incorporate into casseroles, fried rice, or pasta dishes.
- Enjoy cold for a picnic, lunchbox, or quick snack.
Proper storage and reheating techniques ensure that leftover crispy fried chicken remains flavorful, tender, and versatile.
Nutrition and Benefits
Crispy Fried Chicken Recipe provides a satisfying combination of protein, fat, and carbohydrates. Chicken is an excellent source of high-quality protein, supporting muscle repair, satiety, and overall wellness.
Using buttermilk for marinating adds tenderness and flavor without excessive fat. The seasoned flour coating provides the classic crunchy texture while delivering essential carbohydrates.
Frying in moderate amounts of oil contributes fat, which enhances flavor and keeps the meat juicy. For a slightly healthier variation, chicken can be oven-baked with a similar breading to reduce added fat while maintaining crispiness.
Serving fried chicken with vegetables such as steamed broccoli, green beans, or corn increases fiber, vitamins, and antioxidants. Optional sides like mashed potatoes or rice provide complex carbohydrates for energy, making the meal balanced and filling.
Herbs and spices such as paprika, garlic powder, onion powder, and cayenne pepper add flavor without increasing sodium significantly. You can customize the seasoning to suit taste preferences while keeping the dish wholesome.
Crispy Fried Chicken Recipe is a comforting, nutrient-rich dish when paired with balanced sides and prepared with fresh ingredients.
Recipe FAQ
Can I make Crispy Fried Chicken Recipe ahead of time?
Yes, marinate the chicken in buttermilk and prepare the seasoned flour in advance. Coat and fry the chicken just before serving for the best texture and flavor.
Can I use different cuts of chicken?
Absolutely. Drumsticks, thighs, wings, or breasts all work. Adjust frying time based on size and bone-in versus boneless pieces.
Can I bake the chicken instead of frying?
Yes, oven-baked chicken can be made by coating the chicken in the seasoned flour and baking at 400°F for 35–45 minutes, flipping halfway through. Use a wire rack for best crispiness.
How do I keep the crust crispy?
Do not overcrowd the pan during frying. Use a wire rack to drain the chicken after cooking instead of paper towels to prevent the crust from getting soggy.
Can I make this spicy?
Yes, add extra cayenne pepper, chili powder, or hot sauce to the marinade or flour mixture to achieve the desired level of heat.
Is this recipe kid-friendly?
Yes, the flavors are familiar and widely appealing. You can reduce spices or adjust seasoning for a milder version suitable for children.
What sides pair well with Crispy Fried Chicken?
Classic sides include mashed potatoes, coleslaw, corn on the cob, biscuits, roasted vegetables, or fresh salad. Optional garnishes such as lemon wedges, hot sauce, or fresh herbs add flavor and visual appeal.
A Crispy, Juicy, and Flavorful Classic
Crispy Fried Chicken Recipe is a timeless dish that delivers golden-brown, crunchy chicken with tender, juicy meat inside. Each bite offers a satisfying balance of texture and flavor, making it a favorite for families and gatherings alike.
Serve with mashed potatoes, coleslaw, vegetables, or biscuits for a complete and comforting meal. Perfect for weeknight dinners, weekend gatherings, or special occasions, this recipe is approachable, reliable, and universally loved.
This Crispy Fried Chicken Recipe combines simple ingredients, careful technique, and bold flavor, creating a classic dish that will remain a staple in your kitchen for years to come.