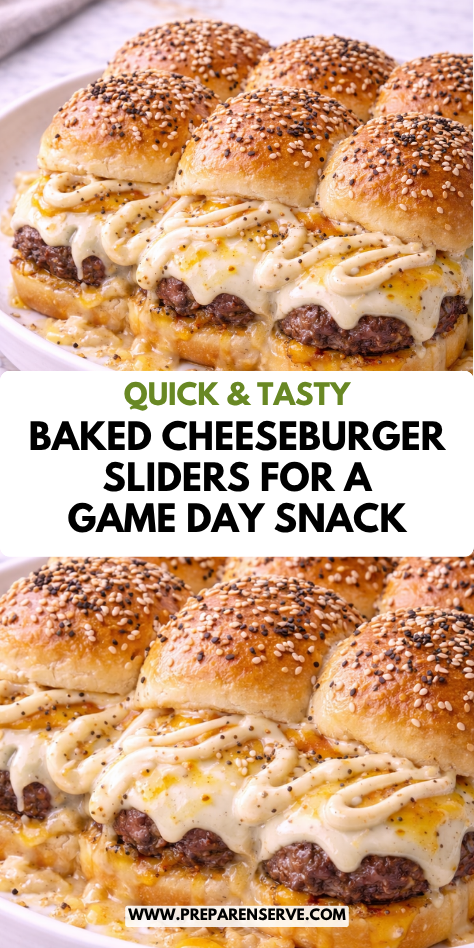
I started making these when I needed something easy and crowd-pleasing that could feed a group without a lot of hands-on cooking.
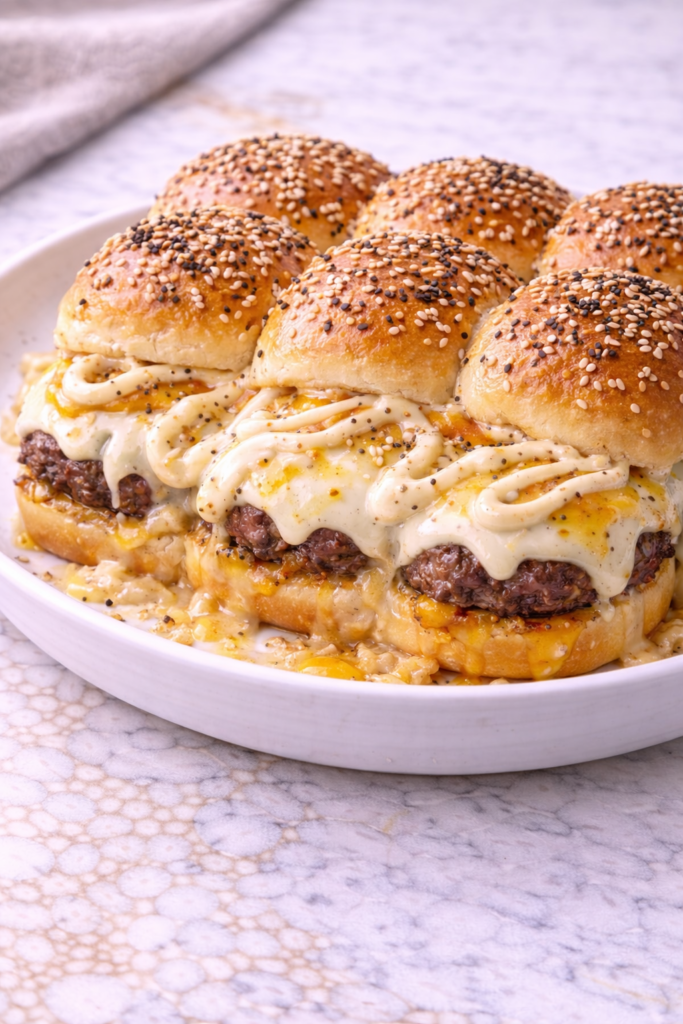
Juicy seasoned beef and melted cheese tucked into soft slider buns and baked together until golden is the kind of thing that makes everyone at the table happy.
The whole batch goes in the oven at once, which makes this so much easier than standing over a grill or skillet cooking burgers one at a time.
I’ll show you how to build the filling, assemble the sliders, and bake them so the tops are golden and the cheese melts all the way through. It’s a simple, satisfying recipe that works just as well for a weeknight dinner as it does for a party spread.
Why You’ll Love This Recipe
This Baked Cheeseburger Sliders Recipe gives you everything you love about a cheeseburger in a simple, oven-baked form. The beef stays juicy, the cheese melts evenly, and the buns absorb just enough flavor without becoming soggy.
It is also incredibly easy to make. Everything comes together in one baking dish, which means less prep, less cleanup, and less stress.
Another reason this recipe stands out is how adaptable it is. These sliders work just as well for a quiet dinner at home as they do for feeding a small group or doubling for guests.
Serves: 2 people
This recipe makes a small batch that is perfect for two generous servings. It can easily be doubled or tripled for family dinners, gatherings, or meal planning.
Ingredients You’ll Need
This Baked Cheeseburger Sliders Recipe uses simple, familiar ingredients that come together into a comforting and satisfying meal. Each ingredient plays an important role in building classic cheeseburger flavor.
Slider Filling
- ¾ pound ground beef
- ½ teaspoon salt
- ¼ teaspoon black pepper
The ground beef is the heart of the sliders. Using simple seasoning allows the natural beef flavor to shine through.
Buns and Cheese
- 4 slider buns
- 4 slices cheddar cheese
Soft slider buns hold everything together while staying tender during baking. Cheddar cheese adds that unmistakable cheeseburger flavor and melts beautifully over the beef.
Flavor Additions
- 1 tablespoon ketchup
- 1 teaspoon yellow mustard
- 1 tablespoon finely diced onion
These ingredients bring the familiar tangy and slightly sweet flavor of a classic cheeseburger. They add depth without overpowering the beef.
Optional Butter Topping
- 1 tablespoon unsalted butter, melted
- ½ teaspoon sesame seeds
This optional topping gives the buns a golden finish and a subtle crunch. It also adds a touch of extra flavor that makes the sliders feel complete.
All of these ingredients are easy to find and budget-friendly. Together, they create sliders that feel hearty, comforting, and dependable.
Pro Tips
Choose ground beef with a little fat for the juiciest sliders. Beef that is too lean can dry out during baking.
Season the beef evenly as it cooks. Consistent seasoning ensures every slider is flavorful from edge to edge.
Avoid overcooking the beef before baking. It will finish cooking in the oven and stay tender.
Place the cheese directly on the warm beef so it melts smoothly. This helps the sliders hold together when sliced.
Let the sliders rest briefly after baking. This makes them easier to cut and serve without falling apart.
Tools You’ll Need
- Skillet
- Baking dish
- Cutting board
- Sharp knife
- Spatula
- Measuring spoons
These basic kitchen tools are all you need to make this recipe. The process is straightforward and does not require any special equipment.
Substitutions and Variations
You can substitute ground turkey or ground chicken for a lighter version. Be sure to season well to maintain flavor.
American cheese can be used instead of cheddar for extra meltiness. Swiss or Colby Jack also work well.
Add diced pickles or relish to the beef mixture for extra tang. This creates a classic diner-style cheeseburger flavor.
Use Hawaiian rolls instead of standard slider buns for a slightly sweet contrast. This pairs especially well with the savory filling.
For extra richness, spread a thin layer of mayonnaise or burger sauce on the buns before assembling. This adds moisture and depth without overpowering the sliders.
Make Ahead Tips
This Baked Cheeseburger Sliders Recipe works very well for make-ahead preparation, which makes it especially helpful for busy days or casual entertaining. You can fully cook the ground beef mixture up to one day in advance and store it covered in the refrigerator.
Allow the beef to cool completely before storing so excess moisture does not collect. When ready to assemble, gently reheat the beef so it spreads easily over the buns.
The slider buns can be sliced ahead of time and kept covered at room temperature for several hours. Keeping the tops and bottoms together makes assembly quicker and neater.
Cheese slices can also be prepared ahead and stored in the refrigerator. Having all components ready allows you to assemble and bake the sliders with very little effort.
Once assembled, the sliders can be covered and refrigerated for a few hours before baking. Bake just before serving for the best texture and flavor.
Instructions
Step 1: Preheat the Oven
Preheat your oven to 350°F so it is fully heated before baking. Lightly grease a baking dish that fits the slider buns snugly.
Starting with a hot oven helps the sliders heat evenly. This ensures the cheese melts properly and the buns warm through without drying out.
Step 2: Cook the Ground Beef
Place a skillet over medium heat and add the ground beef. Break it apart with a spatula as it cooks.
Season the beef with salt and black pepper. Cook until fully browned and no longer pink, then drain off excess grease if needed.
Step 3: Add the Flavorings
Reduce the heat slightly and stir in the ketchup, mustard, and diced onion. Mix until evenly combined.
Cook for another minute to allow the flavors to blend together. Remove the skillet from the heat once everything is well mixed.
Step 4: Prepare the Slider Buns
Using a sharp knife, slice the slider buns in half horizontally, keeping the tops and bottoms intact. Place the bottom halves into the prepared baking dish.
Arrange them snugly so they form an even layer. This helps the sliders bake evenly and hold together once assembled.
Step 5: Assemble the Sliders
Spread the cooked beef mixture evenly over the bottom buns. Make sure the beef reaches all the edges so every slider is well filled.
Lay the cheese slices evenly over the warm beef. Slight overlap is fine and helps ensure complete coverage as the cheese melts.
Step 6: Add the Bun Tops
Place the top halves of the slider buns over the cheese layer. Press down gently so the layers settle together.
If using the butter topping, brush the tops of the buns with melted butter. Sprinkle with sesame seeds if desired.
Step 7: Bake the Sliders
Cover the baking dish loosely with foil and place it in the oven. Bake for about 10 minutes to allow the cheese to melt and the sliders to heat through.
Remove the foil and continue baking for another 8 to 10 minutes. The tops should be lightly golden and soft.
Step 8: Rest and Slice
Remove the sliders from the oven and let them rest for a few minutes. This helps the layers set and makes slicing easier.
Use a sharp knife to cut between each slider. Serve warm for the best flavor and texture.
Serving Suggestions
Serve this Baked Cheeseburger Sliders Recipe fresh from the oven while the cheese is melted and the buns are warm. The sliders are easiest to enjoy when served immediately.
These sliders pair well with classic sides like fries, tater tots, or potato chips. The familiar sides complement the rich, savory flavor.
For a lighter option, serve with a simple green salad or fresh vegetables. This helps balance the meal without taking away from the sliders.
They also work well as party food served on a platter. Guests can easily grab one or two without needing utensils.
For extra flavor, offer condiments like ketchup, mustard, or pickles on the side. This allows everyone to customize their sliders to taste.
Leftovers and Storage
Leftover Baked Cheeseburger Sliders Recipe should be allowed to cool completely before storing. Once cooled, place the sliders in an airtight container or wrap the entire baking dish tightly with foil to help keep the buns soft and the filling moist.
Store the sliders in the refrigerator for up to three days. Keeping them stored together rather than separating them helps maintain their structure and prevents the buns from drying out.
To reheat sliders in the oven, place them in a 300°F oven and cover loosely with foil. Heat for about 10 to 15 minutes, or until warmed through, removing the foil for the last few minutes if you want to lightly re-crisp the tops.
Individual sliders can also be reheated in the microwave for 20 to 30 seconds. Be careful not to overheat, as the buns can dry out quickly.
Freezing baked sliders is possible but not ideal. While the flavor will remain good, the bun texture may soften slightly once thawed and reheated.
Nutrition and Benefits
This Baked Cheeseburger Sliders Recipe is a filling and satisfying meal that provides a solid source of protein. Ground beef helps support fullness and energy, making these sliders especially satisfying for dinner.
Cheese contributes calcium and richness, adding both nutrition and flavor. Using real cheese and simple ingredients allows you to avoid overly processed alternatives.
Making sliders at home gives you more control over portion size and ingredient quality. This helps balance comfort food with more intentional eating.
Pairing the sliders with vegetables, salad, or fruit can help round out the meal. Balance is easy to achieve when the main dish is already hearty.
Because these sliders are rich and filling, smaller portions often feel enough. This supports mindful enjoyment without sacrificing comfort.
Recipe FAQ
Can I make baked cheeseburger sliders ahead of time?
Yes, these sliders can be assembled several hours ahead and stored covered in the refrigerator. Bake them just before serving for the best texture and flavor. This makes them great for entertaining or busy evenings.
How do I keep the buns from getting soggy?
Draining excess grease from the beef is key. Baking uncovered for part of the time also helps the tops stay lightly crisp while the inside stays soft.
What cheese works best for baked sliders?
Cheddar is a classic choice, but American cheese melts especially smoothly. Swiss, Colby Jack, or a blend also work well depending on your preference.
Can I add toppings inside the sliders?
Yes, diced pickles, cooked onions, or bacon bits can be added to the beef layer. Keep additions light so the sliders hold together and slice cleanly.
Are baked cheeseburger sliders kid-friendly?
Yes, this recipe is very kid-friendly. The familiar flavors, soft buns, and smaller size make them easy and enjoyable for kids.
Can I double this recipe?
Yes, this recipe doubles or triples easily. Use a larger baking dish and allow a few extra minutes of baking time if needed.
Can I use a different type of bun?
Yes, Hawaiian rolls, dinner rolls, or other soft slider buns all work well. Choose rolls that are sturdy enough to hold the filling without falling apart.
A Cozy, Oven-Baked Classic Everyone Loves
This Baked Cheeseburger Sliders Recipe brings all the comfort of a classic cheeseburger into an easy, oven-baked dish. Juicy beef, melted cheese, and soft buns come together in a way that feels familiar and satisfying.
Whether served for a family dinner, a casual gathering, or a relaxed weekend meal, these sliders always hit the spot. Simple, comforting, and dependable, this is a recipe you can return to again and again.