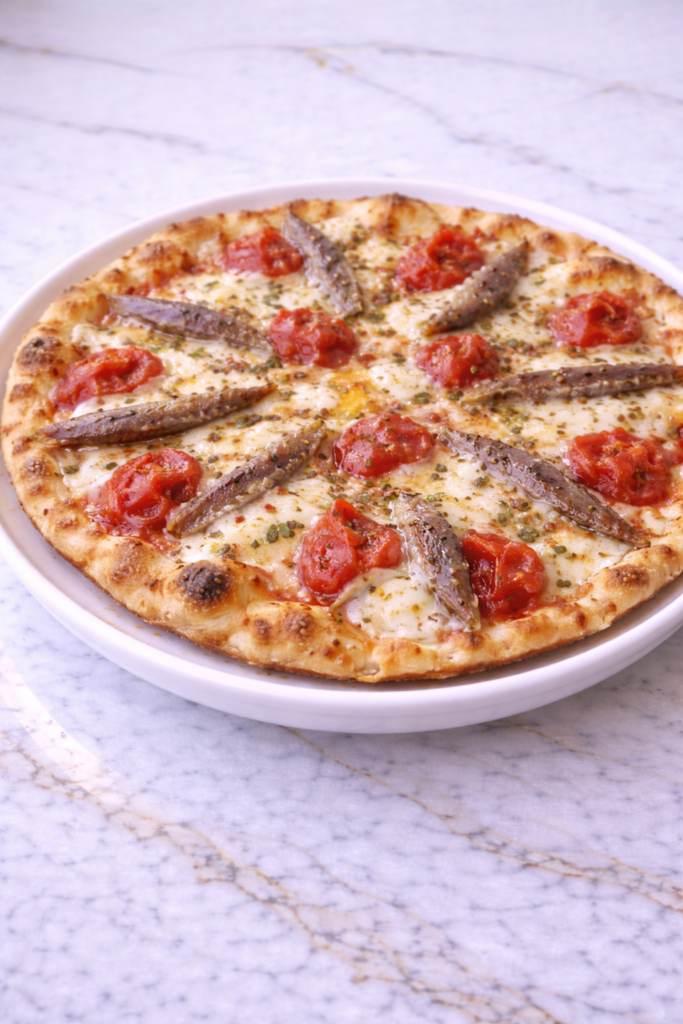
I started making thin crust at home when I wanted a pizza that was crispy all the way through rather than thick and bready in the middle.
Getting the dough right for a thin crust is mostly about hydration and how you handle it — too much flour and it gets tough, too little and it tears when you stretch it.
I’ve worked out the ratio and the resting time so yours rolls out easily and bakes into something with that satisfying snap and crispy base that makes thin crust so good.
I’ll walk you through the mixing, the resting, and the shaping so everything comes together without frustration. It’s a simple dough that makes homemade pizza night feel a little more like the real thing.

Why You’ll Love This Recipe
This thin crust pizza dough recipe creates a crisp base with just the right amount of structure. It bakes evenly and holds toppings without becoming soggy. The result is a pizza that feels light but still satisfying.
Another reason this recipe stands out is how predictable it is. The dough is easy to handle and rolls out smoothly without snapping back. That makes shaping quick and frustration-free.
Families love this recipe because it feels customizable and approachable. Everyone can choose their toppings without worrying about a heavy crust. Thin crust pizza keeps the meal balanced and enjoyable.
This dough also works well in standard home ovens. You don’t need special equipment to get great results. That accessibility makes it a practical favorite.
Serves: 2 people
This recipe makes enough dough for two personal thin crust pizzas or one medium pizza. The portions are light yet filling. If you’re serving more people, the recipe can be doubled easily.
Ingredients You’ll Need
Dough Ingredients
- 1 1/4 cups all-purpose flour
- 1 teaspoon instant yeast
- 1/2 teaspoon salt
- 1 tablespoon olive oil
- 1/2 cup warm water
Pro Tips
Roll the dough thinner than you think you need. Thin crust bakes best when evenly rolled. Aim for a uniform thickness across the surface.
Avoid adding too much flour while shaping. Excess flour can make the crust dry. Use just enough to prevent sticking.
Let the dough rest briefly if it resists rolling. Resting relaxes the gluten. This makes shaping much easier.
Bake the pizza on a hot surface if possible. A preheated baking sheet helps create crispness. Heat is key for thin crust success.
Use light toppings to maintain crisp texture. Heavy toppings can weigh the dough down. Balance keeps the crust firm.
If cooking for kids, cut pizzas into small slices. Thin crust slices are easy to handle. This makes mealtime smoother.
Tools You’ll Need
- Mixing bowl
- Measuring cups
- Measuring spoons
- Wooden spoon
- Rolling pin
- Baking sheet or pizza pan
Substitutions and Variations
Bread flour can be used for a slightly chewier thin crust. The dough may need a small splash of extra water. Adjust gradually.
You can replace up to one-third of the flour with whole wheat flour. This adds a subtle nutty flavor. The crust will still stay thin.
Active dry yeast can replace instant yeast if needed. Dissolve it in warm water before mixing. Allow it to foam slightly.
Olive oil can be swapped with another neutral oil. Avocado oil or vegetable oil both work well. The texture remains crisp.
You can add Italian seasoning to the dough for extra flavor. Mix it in with the dry ingredients. This adds depth without extra steps.
Make Ahead Tips
Thin crust pizza dough can be prepared ahead with great results if timed properly. After mixing and kneading, you can allow the dough to complete its first rise and then refrigerate it. Chilling the dough helps develop flavor while keeping the texture light.
If you plan to use the dough within 24 hours, lightly coat it with olive oil and store it in an airtight container. Refrigerated dough is often easier to roll thin without tearing. Let it rest at room temperature for about 30 minutes before shaping.
This dough also freezes well if you want to plan further ahead. After the first rise, divide it into portions and wrap each tightly. Freeze for up to three months for best quality.
When ready to use frozen dough, thaw it overnight in the refrigerator. Allow it to sit at room temperature before rolling. This helps the dough relax and prevents shrinking.
Instructions
Step 1: Mix the Dough
In a mixing bowl, combine the flour, instant yeast, and salt. Stir gently to distribute the ingredients evenly. This ensures consistent texture throughout the dough.
Add the olive oil and warm water to the bowl. Stir with a wooden spoon until a rough dough begins to form. The mixture should come together without excessive dryness.
If dry flour remains, add a small splash of water. Mix just until incorporated. Avoid overmixing at this stage.
Step 2: Knead the Dough
Transfer the dough to a lightly floured surface. Knead by pushing it away with the heel of your hand, folding it back, and rotating slightly. Continue this motion steadily.
Knead for about 6 to 8 minutes until the dough is smooth and elastic. It should feel soft and slightly tacky. Add flour only if necessary.
Proper kneading develops gluten, which helps the dough stretch thin without tearing. The dough should spring back slightly when pressed. This indicates it is ready.
Step 3: First Rise
Shape the dough into a smooth ball. Lightly oil the bowl and place the dough inside, turning once to coat. Cover loosely with a clean towel.
Set the bowl in a warm, draft-free area. Let the dough rise for about 60 minutes, or until nearly doubled in size. Thin crust dough does not need an aggressive rise.
During this time, the yeast creates light structure. Avoid over-proofing, which can make rolling difficult. The dough should feel airy but controlled.
Step 4: Punch Down and Rest
Gently punch down the risen dough to release excess air. This step evens out the internal structure. The dough should deflate slightly.
Transfer the dough to a floured surface. Knead gently for about one minute to smooth it out. This prepares it for rolling.
Cover the dough and let it rest for 10 minutes. Resting relaxes the gluten. This step is key for rolling thin crust evenly.
Step 5: Roll the Dough Thin
Divide the dough if making multiple pizzas. Roll each portion into a ball and flatten gently. Use a rolling pin to roll the dough thin.
Work from the center outward, rotating as you go. Aim for an even thickness across the surface. Thin crust performs best when uniform.
If the dough resists or shrinks back, let it rest briefly. Short rests relax the dough. This prevents tearing and frustration.
Step 6: Prepare for Baking
Place the rolled dough on a parchment-lined baking sheet or pizza pan. Adjust the shape as needed. Make sure the dough lies flat.
Dock the dough lightly with a fork if desired. This helps prevent large air bubbles. It keeps the crust flat and crisp.
Add sauce sparingly, spreading it evenly. Use a light hand with toppings. Thin crust benefits from balance.
Serving Suggestions
Thin crust pizza is ideal for classic combinations like cheese or pepperoni. The light base highlights simple flavors. This keeps the pizza crisp and clean.
Serve thin crust pizza sliced into smaller pieces. This makes it easy to handle and share. It works well for family meals.
Pair with a fresh salad to balance the crisp crust. Light greens complement the texture. A simple vinaigrette works best.
Thin crust pizza also works well for appetizer-style servings. Cut into squares for casual gatherings. This keeps the meal relaxed.
Leftover slices reheat well in a skillet. This restores crispness to the bottom. It’s an easy way to enjoy leftovers again.
Leftovers and Storage
Thin crust pizza dough stores well when handled correctly, making it easy to plan ahead. If you have unused dough, wrap it tightly in plastic wrap and place it in an airtight container. Stored in the refrigerator, it will keep for up to three days.
Before using refrigerated dough, allow it to sit at room temperature for about 30 minutes. This helps relax the gluten and makes rolling easier. Cold dough can be stiff and more difficult to work with.
Baked thin crust pizza slices also store well. Once fully cooled, place slices in an airtight container or wrap them tightly. Refrigerated slices stay fresh for up to four days.
For reheating, a skillet or oven works best. These methods help restore the crisp texture of the crust. Microwaving is faster but may soften the pizza slightly.
Nutrition and Benefits
Making thin crust pizza dough at home gives you control over ingredients and portions. Using simple pantry staples avoids unnecessary additives. This makes homemade pizza a more mindful option.
Thin crust pizza naturally uses less dough per serving. This can result in a lighter meal compared to thicker crust styles. It allows toppings to play a bigger role in nutrition.
Olive oil adds flavor while contributing healthy fats. These fats improve texture without weighing the dough down. Using moderate amounts keeps the crust crisp and balanced.
Pairing thin crust pizza with vegetables and lean proteins creates a well-rounded meal. The lighter base supports balance and variety. This makes it suitable for regular family dinners.
Recipe FAQ
Can I make thin crust dough ahead of time?
Yes, thin crust dough can be made ahead and refrigerated after the first rise. This can actually improve flavor. Just let it rest at room temperature before rolling.
Why does my dough shrink when I roll it?
Shrinking usually means the gluten is tight. Letting the dough rest for a few minutes helps it relax. This makes rolling easier.
Can I bake this dough without toppings first?
Yes, you can par-bake the crust briefly before adding toppings. This helps ensure crispness. Bake for a few minutes until just set.
Is thin crust dough supposed to be chewy?
Thin crust should be crisp with a slight chew. The balance depends on rolling thickness and baking time. Avoid overbaking to prevent dryness.
Can I use a pizza stone with this dough?
Yes, a pizza stone works very well for thin crust. Preheat it thoroughly for best results. High heat improves crispness.
What toppings work best with thin crust?
Light toppings work best to maintain crisp texture. Too many heavy toppings can weigh the crust down. Balance is key.
Does thin crust pizza reheat well?
Yes, thin crust reheats nicely in a skillet or oven. These methods restore crispness. It often tastes just as good the next day.
A Crisp and Reliable Pizza Favorite
Thin crust pizza dough brings a light, satisfying option to homemade pizza nights. It highlights toppings while keeping the meal balanced. That simplicity makes it easy to enjoy often.
This recipe shows that great texture doesn’t require complicated steps. With basic ingredients and thoughtful handling, the results feel intentional. That reliability builds confidence in the kitchen.
Whether served fresh or reheated later, thin crust pizza fits into everyday life. It’s crisp, flavorful, and dependable. That combination makes it a recipe worth returning to again and again.