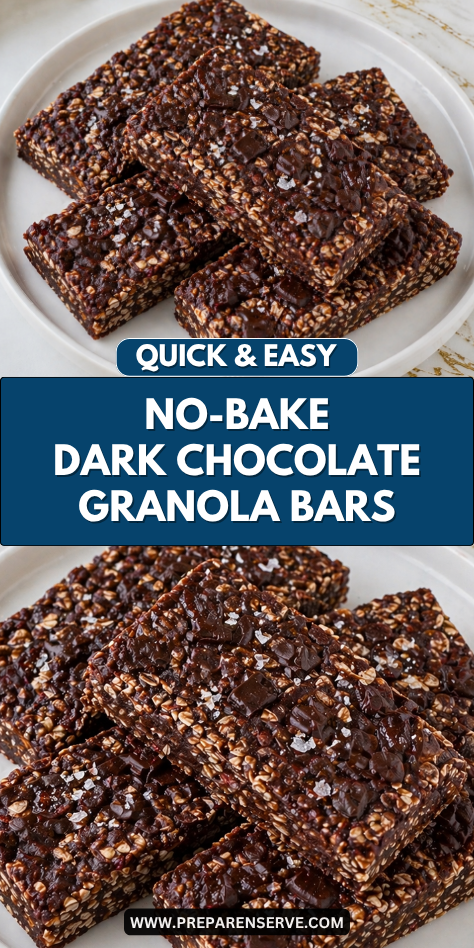
I make these No-Bake Dark Chocolate Granola Bars when I want a snack that feels a little special but is still simple enough for everyday life. They come together quickly, use pantry staples, and do not require any oven time.
I like keeping a batch in the fridge for afternoons when everyone wants something sweet and filling. The rich dark chocolate flavor with chewy oats makes them feel comforting and satisfying.
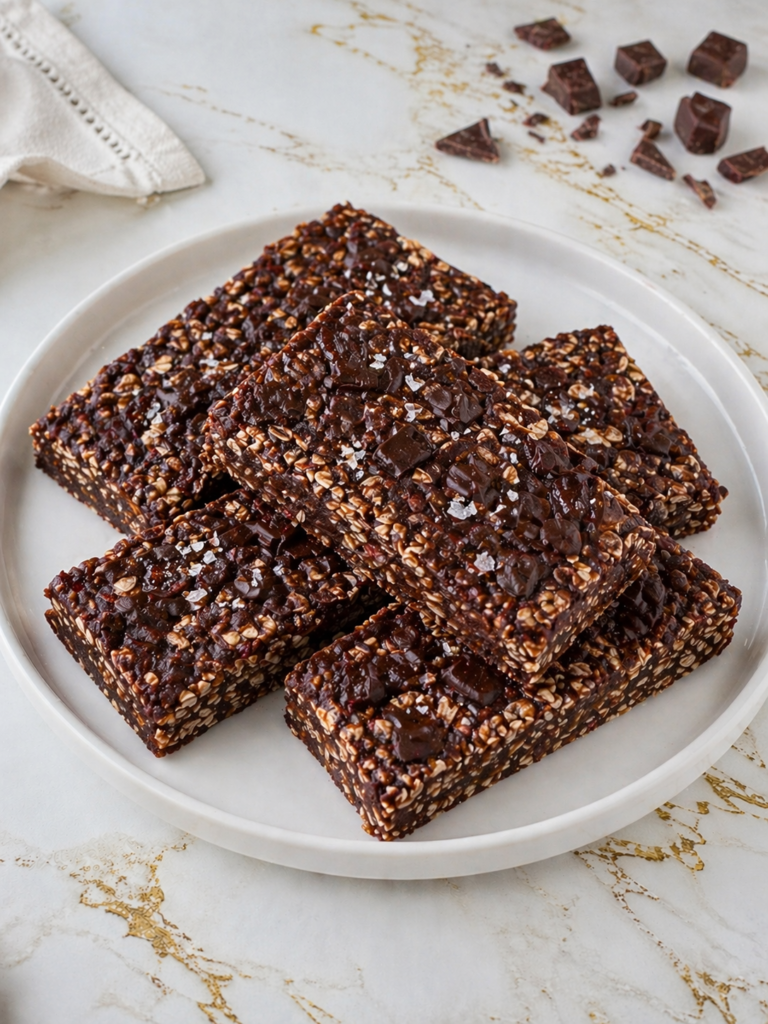
What I enjoy most about these bars is how practical they are. They are easy to slice, simple to pack, and sturdy enough to travel well in lunch boxes or bags. The balance of hearty oats and chocolate keeps them from feeling too heavy.
Once I made them the first time, they quickly became one of the most requested homemade snacks in my kitchen.
Why You’ll Love This Recipe
These bars have the perfect mix of rich chocolate flavor and hearty texture. Oats give them a chewy bite, while dark chocolate adds a deep cocoa taste that feels a little more grown-up but is still family-friendly. Each square feels like a treat while still being filling enough for snack time.
They are also wonderfully easy to make. There is no baking, no mixer, and no complicated prep involved. You simply warm the sticky ingredients, stir everything together, press the mixture into a pan, and chill until firm.
Another reason to love them is how flexible they are. You can add nuts, seeds, coconut, or dried fruit depending on what you have on hand. They work well for breakfast on busy mornings, after-school snacks, or a simple sweet bite after dinner.
Serves: 12 people
This recipe makes about 12 medium bars, depending on how you cut them. If you prefer smaller snack portions, you can slice them into 16 squares instead. The recipe also doubles easily if you want to prep a larger batch for the week.
Ingredients You’ll Need
- 3 cups old-fashioned rolled oats
- 1/2 cup creamy peanut butter or almond butter
- 1/2 cup honey
- 1/4 cup pure maple syrup
- 2 tablespoons coconut oil or unsalted butter
- 1 teaspoon vanilla extract
- 1/3 cup unsweetened cocoa powder
- 1/2 teaspoon ground cinnamon
- 1/4 teaspoon fine salt
- 3/4 cup chopped dark chocolate or dark chocolate chips, divided
- 1/4 cup chopped walnuts or pecans (optional)
- 2 tablespoons chia seeds or flaxseed (optional)
- 1/4 cup unsweetened shredded coconut (optional)
Pro Tips
- Use good dark chocolate. Since chocolate is the main flavor, choose one you enjoy eating on its own. Better chocolate gives richer results.
- Sift the cocoa powder. This helps prevent small lumps in the mixture. A smooth cocoa blend coats the oats more evenly.
- Warm gently. Heat the honey, syrup, nut butter, and cocoa mixture over low heat only until smooth. Overheating can make the bars firmer than needed.
- Press firmly into the pan. Compacting the mixture well is one of the best ways to keep the bars from crumbling later.
- Reserve some chocolate for the top. Sprinkle a little chopped chocolate over the pressed mixture for a nicer finish and extra chocolate in each bite.
- Chill completely before slicing. Cold bars cut more cleanly and hold their shape better.
Tools You’ll Need
- 8×8-inch square pan
- Parchment paper
- Large mixing bowl
- Medium saucepan or microwave-safe bowl
- Silicone spatula or wooden spoon
- Fine mesh strainer (optional for cocoa powder)
- Measuring cups and measuring spoons
- Sharp knife
- Cutting board
- Refrigerator space for chilling
Substitutions and Variations
Swap the Nut Butter
Use almond butter, cashew butter, or sunflower seed butter instead of peanut butter. Each option keeps the bars rich while slightly changing the flavor.
Make Them Dairy-Free
Use coconut oil instead of butter and dairy-free dark chocolate. The bars stay smooth and delicious with very little change.
Add More Crunch
Stir in chopped nuts, pumpkin seeds, or toasted coconut. These simple additions add texture and make the bars more filling.
Lighten the Sweetness
Use extra-dark chocolate or reduce the honey slightly. The bars will still have a rich flavor without tasting overly sweet.
Make Them Heartier
Add a few extra tablespoons of oats or flaxseed. This creates a thicker, more filling bar that works well for breakfast.
Make Ahead Tips
These No-Bake Dark Chocolate Granola Bars are ideal for making ahead because they store well and taste even better after chilling. I often prepare a batch in the evening, then let it rest overnight so the bars are firm and ready to slice the next day. The flavors settle together nicely, and the chocolate becomes richer once fully cooled.
You can also measure the dry ingredients in advance and keep them in a covered bowl or container. When you are ready to make the bars, all that is left is warming the sticky ingredients and stirring everything together. This saves time on busy weekdays.
For longer storage, wrap individual bars and freeze them in a freezer-safe container. This makes them easy to grab for lunch boxes, road trips, or afternoon snacks. Let a frozen bar sit at room temperature for 15 to 20 minutes before eating for the best texture.
Instructions
Step 1: Prepare the Pan
Line an 8×8-inch square pan with parchment paper, leaving extra paper hanging over two sides. This helps you lift the bars out cleanly after chilling.
Step 2: Combine the Dry Ingredients
In a large bowl, add the rolled oats, salt, cinnamon, optional nuts, seeds, and coconut. Stir well so everything is evenly mixed.
Step 3: Warm the Wet Ingredients
Place the peanut butter, honey, maple syrup, coconut oil, and cocoa powder in a medium saucepan over low heat. Stir for 2 to 3 minutes until smooth, glossy, and fully blended.
Step 4: Add Vanilla
Remove the pan from the heat and stir in the vanilla extract. Mixing it in after heating keeps the flavor fresh and balanced.
Step 5: Mix Everything Together
Pour the warm chocolate mixture over the oat mixture. Stir thoroughly until all the oats are coated and no dry patches remain.
Step 6: Add the Chocolate Pieces
Let the mixture cool for 2 to 3 minutes, then fold in half of the chopped dark chocolate. This gives little chocolate pockets throughout the bars.
Step 7: Press into the Pan
Transfer the mixture to the prepared pan. Press it down firmly with a spatula or the back of a measuring cup into an even layer.
Step 8: Top and Chill
Sprinkle the remaining chopped dark chocolate over the top and press lightly. Refrigerate for at least 2 hours, or until fully firm.
Step 9: Slice and Serve
Lift the chilled slab out using the parchment paper. Place on a cutting board and slice into 12 bars or smaller squares.
Serving Suggestions
These bars are excellent with coffee or tea when you need a quick breakfast or midday snack. Their rich chocolate flavor pairs nicely with warm drinks.
Pack one into lunch boxes for school or work. They travel well and feel like a special homemade treat.
Serve them after dinner with a glass of milk or a bowl of berries. It makes a simple dessert without much effort.
They are also great for road trips, hikes, or long errands. Wrap them individually so they are easy to grab and enjoy.
For an extra treat, drizzle a little melted dark chocolate over the top before serving. It adds a bakery-style finish with very little work.
Leftovers and Storage
Store sliced bars in an airtight container in the refrigerator for the best texture. They will stay fresh for up to 7 days and remain firm and chewy while chilled. If stacking them, place parchment paper between layers to keep them from sticking.
These bars can sit at room temperature for a short time, especially in cooler weather. In warmer kitchens, refrigeration is best because the chocolate and sticky mixture soften quickly.
To freeze, wrap each bar individually in parchment paper or plastic wrap and place them in a freezer-safe container or bag. Freeze for up to 3 months. Thaw overnight in the refrigerator or leave one on the counter for 15 to 20 minutes before eating.
If the bars feel too firm straight from the fridge, let them rest at room temperature for a few minutes. They soften slightly and become even chewier.
Nutrition and Benefits
- Oats provide fiber that can help support steady energy and keep you feeling full longer.
- Dark chocolate adds rich flavor and can be a more balanced option than sweeter candy-style snacks.
- Nut butter contributes healthy fats and some protein for a satisfying bite.
- Homemade bars let you choose the sweetness level and ingredients your family prefers.
- These bars are portable and portion-friendly, making them practical for breakfast or snacks.
Recipe FAQ
Why are my bars crumbly?
They may not have been pressed firmly enough into the pan. It can also happen if there are too many dry ingredients. Compacting the mixture tightly usually helps.
Can I use milk chocolate instead?
Yes, milk chocolate can be used if you prefer a sweeter flavor. The bars will taste milder and a bit sweeter than the dark chocolate version.
Are these bars gluten-free?
They can be if you use certified gluten-free oats. Always check labels on all packaged ingredients if needed.
Can I make them nut-free?
Yes, use sunflower seed butter and skip any added nuts. Seeds or coconut make a good texture replacement.
How strong is the chocolate flavor?
The flavor is rich but balanced by oats and honey. If you want a deeper chocolate taste, use darker chocolate or add a little extra cocoa powder.
Can I add protein powder?
Yes, start with 1 to 2 tablespoons. If the mixture feels dry, stir in a little extra nut butter or honey.
Do kids enjoy these bars?
Many do, especially if cut into smaller squares. If your family prefers sweeter snacks, use semisweet chocolate instead of very dark chocolate.
Conclusion
These No-Bake Dark Chocolate Granola Bars are a dependable homemade snack that feels a little special without extra work. They are simple to prepare, easy to store, and give rich, reliable results every time.
With their chewy texture, balanced sweetness, and family-friendly appeal, they are worth making again and again. Keeping a batch in the fridge means a quick snack is always within reach.