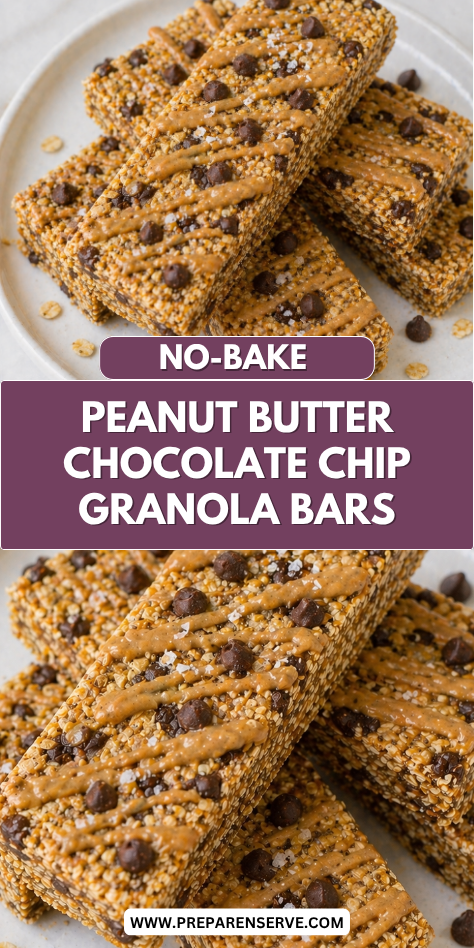
I like keeping homemade snacks ready for busy days, and these No-Bake Peanut Butter Chocolate Chip Granola Bars are one of the easiest favorites to make.
They are soft, chewy, rich with peanut butter flavor, and filled with little bites of chocolate in every bar. Since there is no baking required, they come together quickly with very little cleanup. That makes them a dependable recipe during full weeks.
I make these bars when I need something simple that feels like a treat but still works for breakfast or snack time. Peanut butter and chocolate are always a welcome pair in my kitchen, and oats make them filling enough to keep everyone happy.
They chill in the fridge and stay ready whenever someone needs a quick bite. A batch usually disappears fast in my house.
Why You’ll Love This Recipe
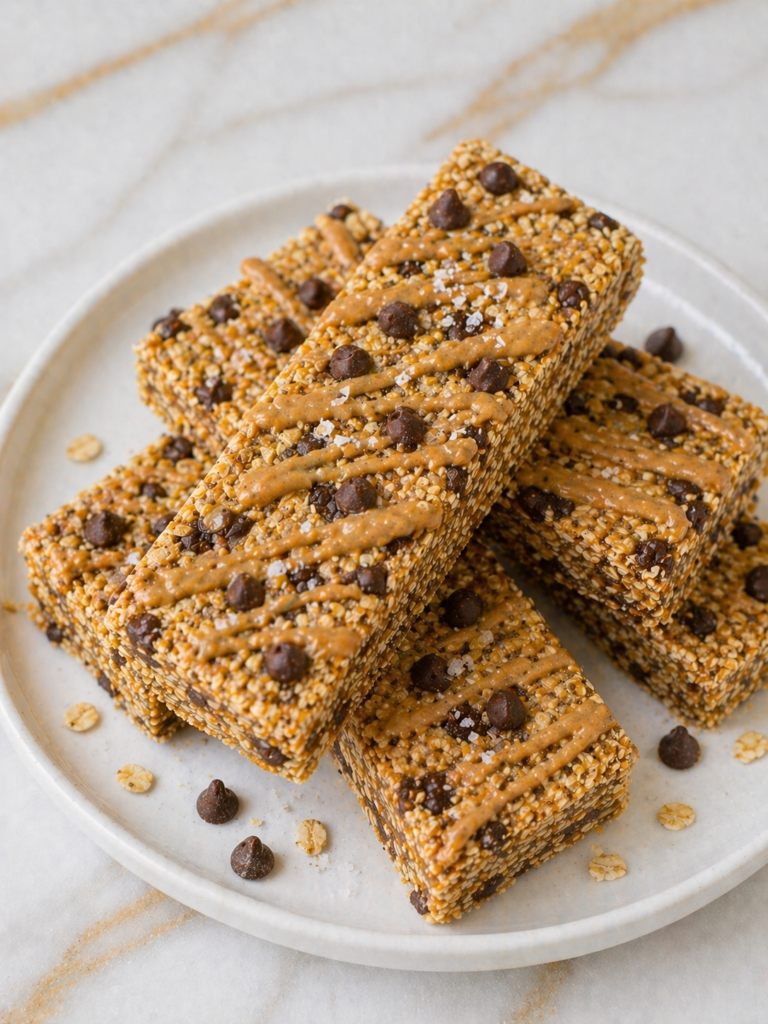
These bars have a satisfying texture with chewy oats, crunchy granola, creamy peanut butter, and chocolate chips throughout. Every bite tastes balanced and comforting without being overly complicated. They feel homemade, hearty, and easy to enjoy. It is the kind of snack people reach for again and again.
The no-bake method makes this recipe easy for any skill level. You only need a bowl, a spoon, and a pan, so cleanup stays simple. There is no need to turn on the oven or watch a timer. That makes these bars especially helpful during warm weather or packed schedules.
They are also easy to customize for your family. You can add seeds, nuts, coconut, or extra chocolate depending on what you have. Slice them into bars for breakfast or smaller squares for lunch boxes. Once you make one batch, it is easy to make them again.
Serves: 12 people
This recipe makes 12 medium bars that work well for breakfast or snacks. If you prefer smaller portions, cut them into 16 squares instead. For meal prep or larger households, double the recipe and use a 9×13-inch pan. Since these bars are filling, even smaller servings can be enough.
Ingredients You’ll Need
Main Ingredients
- 2 cups old-fashioned rolled oats
- 1 cup granola
- 3/4 cup creamy peanut butter
- 1/3 cup honey or maple syrup
- 2 tablespoons coconut oil, melted
- 1 teaspoon vanilla extract
- 1/4 teaspoon fine sea salt
- 1/2 cup mini chocolate chips
Optional Add-Ins
- 2 tablespoons chia seeds
- 2 tablespoons ground flaxseed
- 1/4 cup chopped peanuts
- 2 tablespoons unsweetened shredded coconut
- 1 tablespoon hemp hearts
- 2 tablespoons sunflower seeds
For the Pan
- Parchment paper
- Light cooking spray or thin swipe of oil if needed
Pro Tips
- Use mini chocolate chips so they spread evenly through the bars. Smaller chips also make slicing easier.
- Let the warm peanut butter mixture cool for a minute or two before adding chocolate chips. This helps keep the chips from melting too much.
- Stir natural peanut butter well before measuring. Evenly mixed oils create a smoother binder and better texture.
- Press the mixture firmly into the pan using a spoon or measuring cup. Compact bars are less likely to crumble after chilling.
- Chill the bars fully before slicing. One to two hours gives the best texture and cleaner cuts.
- Add chopped peanuts on top for extra crunch and stronger peanut flavor.
Tools You’ll Need
- Large mixing bowl
- Medium microwave-safe bowl or small saucepan
- Measuring cups
- Measuring spoons
- Silicone spatula or wooden spoon
- 8×8-inch square pan
- Parchment paper
- Spoon or flat measuring cup for pressing mixture
- Sharp knife for slicing
- Refrigerator space for chilling
Substitutions and Variations
Change the Nut Butter
Use almond butter, cashew butter, or sunflower seed butter instead of peanut butter. Each option changes the flavor while still helping the bars hold together.
Make It Dairy-Free
Use dairy-free chocolate chips and check your granola ingredients. This keeps the bars rich and family-friendly without dairy.
Boost the Texture
Add chopped peanuts, coconut, chia seeds, or sunflower seeds. These ingredients add crunch and make the bars feel extra hearty.
Adjust the Chocolate Flavor
Use dark chocolate chips for a richer taste or milk chocolate chips for a sweeter version. A small drizzle of melted chocolate on top also works well.
Make It Lighter or Heartier
For a lighter snack, cut smaller squares and skip extra mix-ins. For a heartier bar, add flaxseed, extra oats, or nuts for more staying power.
Make Ahead Tips
These bars are excellent for make-ahead planning because they need time to chill before slicing. I often prepare them in the evening and cut them the next morning once they are fully firm. That extra time helps the texture settle and gives cleaner edges.
You can also measure the dry ingredients a few days in advance and store them in an airtight container. Keep the chocolate chips separate until mixing time so they stay fresh and do not melt. This makes prep faster during busy weeks.
For easy snacks during the week, slice the bars after chilling and keep them stored in ready-to-grab portions. This helps with breakfast, lunch packing, and after-school snacks. Pre-cut bars also make portion control simple.
If you enjoy meal prep, double the recipe and freeze half. Keep one batch in the refrigerator for the week and save the second for later. Homemade snacks ready to go can make busy days feel smoother.
Instructions
Step 1: Prepare the Pan
Line an 8×8-inch square pan with parchment paper, leaving extra paper hanging over two sides as handles. This makes lifting the bars out much easier later. Lightly grease the paper if desired.
Step 2: Warm the Wet Ingredients
In a microwave-safe bowl or small saucepan, combine the peanut butter, honey or maple syrup, and melted coconut oil. Warm gently until smooth and easy to stir. Do not overheat, since you only need the mixture loosened.
Step 3: Add Flavorings
Stir in the vanilla extract and salt. Mix until glossy and fully blended. This helps spread flavor evenly through the bars.
Step 4: Combine the Dry Ingredients
Place the rolled oats and granola in a large mixing bowl. Add chia seeds, flaxseed, chopped peanuts, coconut, hemp hearts, or sunflower seeds now if using. Stir well so everything is evenly mixed.
Step 5: Mix Everything Together
Pour the warm peanut butter mixture over the dry ingredients. Stir until everything is coated and no dry pockets remain. Let the mixture cool for two to three minutes, then fold in the mini chocolate chips.
Step 6: Press into the Pan
Transfer the mixture to the lined pan. Press it down firmly and evenly using the back of a spoon or flat measuring cup. Taking time here helps the bars stay compact after slicing.
Step 7: Add Optional Toppings
Sprinkle extra chocolate chips, chopped peanuts, or coconut over the top if desired. Press toppings lightly into the surface so they stay in place. Keep toppings light for easier cutting.
Step 8: Chill Until Firm
Place the pan in the refrigerator for at least 1 to 2 hours. The bars should feel firm and cool before slicing. If your kitchen is warm, allow extra chilling time.
Step 9: Slice and Serve
Use the parchment handles to lift the slab from the pan. Place it on a cutting board and cut into 12 bars or 16 squares. Serve chilled or let sit at room temperature for a few minutes for a softer bite.
Serving Suggestions
These bars make a simple breakfast with fruit and a glass of milk. They are especially useful on mornings when time is short.
Pack one into lunch boxes with apple slices or grapes. They hold their shape well and feel like a homemade treat.
Serve a bar after school with yogurt or a smoothie. It is a quick snack that helps everyone make it to dinner happily.
Enjoy one in the afternoon with coffee or tea. The peanut butter chocolate flavor pairs especially well with warm drinks.
Crumble a bar over Greek yogurt for a quick parfait. It adds texture and turns a plain snack into something more complete.
Bring a few bars on road trips or weekend outings in a cooler bag. They are neat, convenient, and easy to share.
Leftovers and Storage
Store the bars in an airtight container in the refrigerator for the best texture. They usually keep well for up to one week when chilled properly. The cool temperature helps them stay firm and easy to handle.
Place parchment paper between layers if stacking them. This prevents sticking and keeps the bars looking neat. It also makes grabbing one piece quick and simple.
If you prefer a softer bite, let a chilled bar sit at room temperature for five to ten minutes before eating. The peanut butter softens slightly and the chocolate becomes more tender. Many people enjoy them this way.
For freezing, wrap bars individually or place them in a freezer-safe container with parchment between layers. Freeze for up to three months. Thaw overnight in the refrigerator or for about fifteen minutes at room temperature.
Avoid leaving the bars out in a warm room for long periods. They can soften too much and become harder to handle. Chilled storage gives the most reliable results.
Nutrition and Benefits
- Rolled oats provide fiber and steady energy, helping these bars feel hearty and satisfying. They also create a pleasant chewy texture.
- Peanut butter adds healthy fats and plant-based protein. This helps make the bars filling enough for breakfast or snack time.
- Chocolate chips add sweetness and rich flavor in every bite. Using mini chips helps spread the flavor through the whole batch.
- Optional seeds and nuts can add minerals, crunch, and extra staying power. Small additions can boost nutrition easily.
- Homemade bars can be pre-cut for convenient portions. Keeping them ready may help during busy mornings and afternoons.
Recipe FAQ
Can I use crunchy peanut butter?
Yes, crunchy peanut butter works well and adds extra texture. The bars may be slightly firmer. It is a great option if your family likes more crunch.
Can I use quick oats instead of rolled oats?
Yes, quick oats can be used if needed. The bars will be softer and slightly denser. Rolled oats usually give the best chewy texture.
Why did my chocolate chips melt?
The mixture was likely too warm when the chips were added. Let it cool for a few minutes first. Then gently fold in the chocolate.
Are these bars good for breakfast?
They can be a practical breakfast on busy mornings. Pair one with fruit, yogurt, or milk for a more balanced meal. Many families enjoy them this way.
Can I use less sweetener?
Yes, but the bars may be less cohesive and slightly drier. Start by reducing only a small amount first. You can adjust after trying one batch.
Do I need coconut oil?
No, but it helps the bars firm up and slice neatly. You can leave it out or replace it with extra peanut butter if preferred. Texture may vary slightly.
Can children help make these?
Yes, this is a family-friendly recipe because there is no baking required. Children can measure ingredients, stir, and help press the mixture into the pan. Adult help is best for warming ingredients and slicing.
A Family Favorite Worth Making Again
No-Bake Peanut Butter Chocolate Chip Granola Bars are easy to make, simple to store, and helpful on the busiest days. They bring together everyday ingredients in a snack that both kids and adults can enjoy.
The chewy texture, classic flavor, and dependable results make them worth making again. Keeping a batch in the fridge can make breakfast, lunch packing, and afternoon snack time feel much easier all week long.