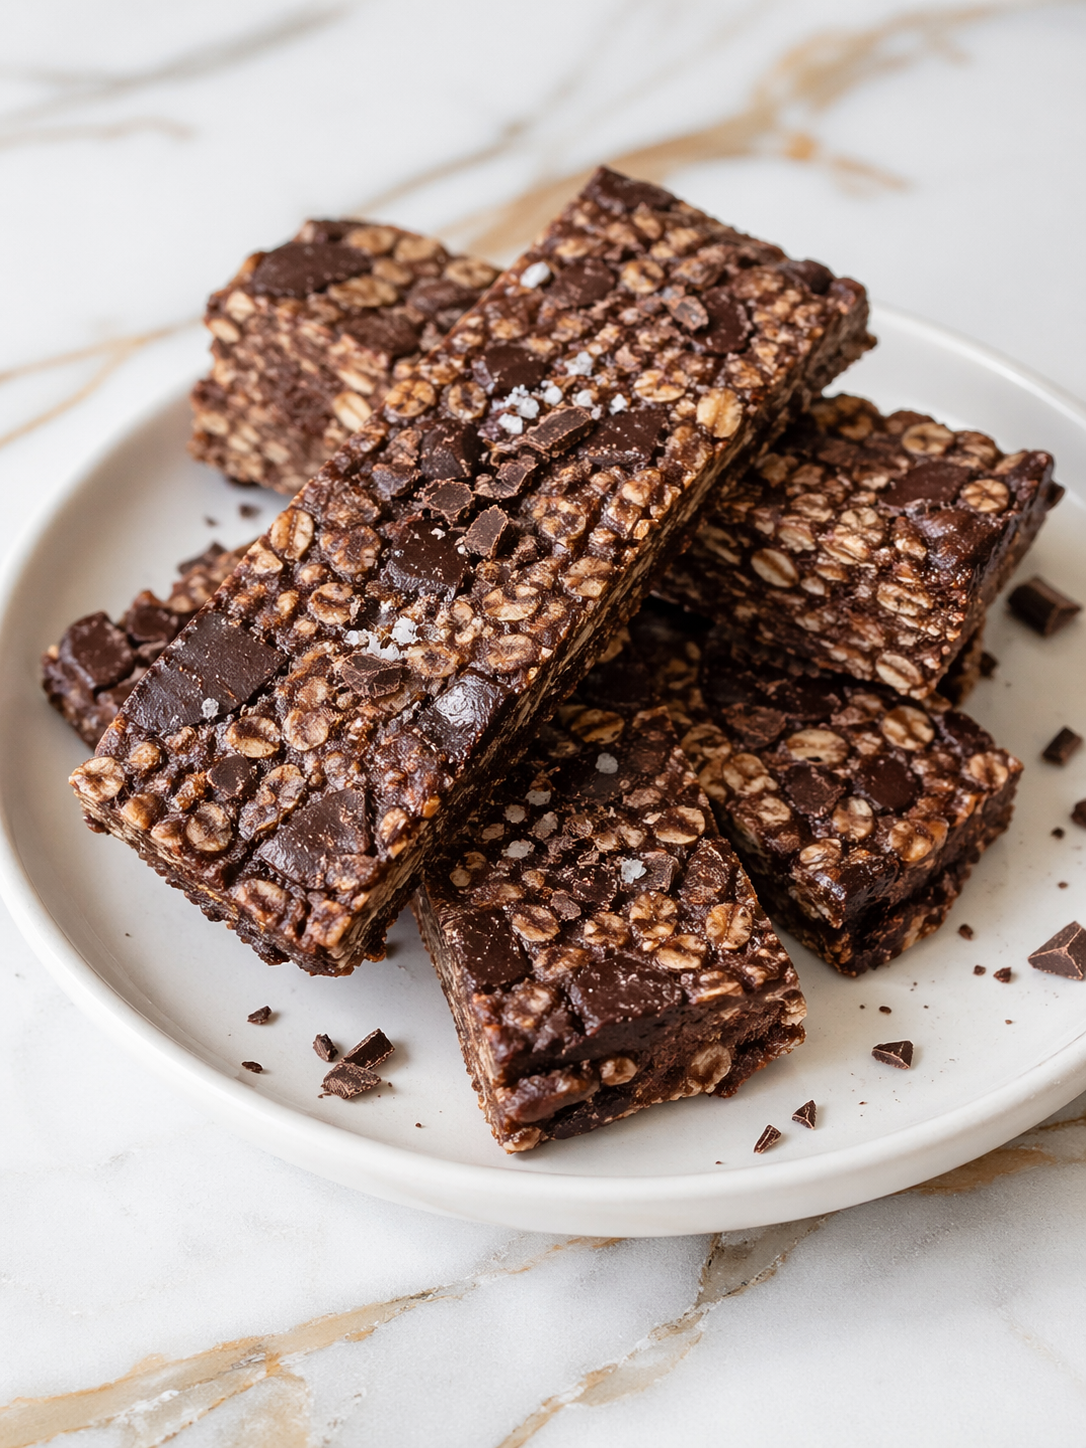
I make Dark Chocolate Granola when I want something crunchy, chocolatey, and homemade that still feels practical for busy mornings. It is the kind of recipe I like to keep in a jar on the counter for quick breakfasts, snack bowls, or a little handful when someone needs something sweet but not too heavy.
I love this granola because it has deep cocoa flavor, crisp oat clusters, and just enough sweetness to feel like a treat. It works with milk, yogurt, fruit, smoothie bowls, or lunch box snacks, and it always feels a little more special than plain cereal.
Why You’ll Love This Recipe
Dark Chocolate Granola is rich, crunchy, and easy to make with pantry ingredients. The oats bake with cocoa powder, maple syrup, oil, and a little salt until they turn crisp and fragrant, then dark chocolate is added for that extra chocolate flavor.
This recipe is also family-friendly because it feels like a treat but still has wholesome ingredients. Kids enjoy the chocolate flavor, while adults appreciate the oats, nuts, seeds, and simple homemade texture.
It is flexible enough for breakfast, snacks, or meal prep. You can make it nut-free, add dried fruit, stir in coconut, or keep it simple with big crunchy chocolate clusters.
Serves: 8 people
This recipe makes about 6 cups of granola, which serves around 8 people depending on how you use it. A smaller scoop is perfect over yogurt or smoothie bowls, while a larger bowl with milk can work as a quick breakfast.
If your family loves granola, you may want to double the batch. It stores well in an airtight container, making it helpful for busy mornings, after-school snacks, or easy lunch box add-ins.
Ingredients You’ll Need
For the Dark Chocolate Granola
- 3 cups old-fashioned rolled oats
- 1 cup chopped almonds or walnuts
- 1/2 cup unsweetened shredded coconut
- 1/3 cup pumpkin seeds
- 1/4 cup chia seeds or ground flaxseed
- 1/3 cup unsweetened cocoa powder
- 1/2 teaspoon kosher salt
- 1/2 teaspoon ground cinnamon
- 1/2 cup maple syrup or honey
- 1/3 cup melted coconut oil or avocado oil
- 2 teaspoons vanilla extract
- 1/2 cup dark chocolate chips or chopped dark chocolate
- 1/2 cup dried cranberries, dried cherries, or raisins, optional
Optional for Serving
- Greek yogurt or regular yogurt
- Milk or dairy-free milk
- Fresh berries
- Sliced bananas
- Smoothie bowls
- Peanut butter or almond butter drizzle
Pro Tips
Use old-fashioned rolled oats, not quick oats. Rolled oats give the granola better texture and help create those crisp clusters that make homemade granola so good.
Press the granola firmly onto the baking sheet before baking. This helps the oats stick together and form bigger pieces instead of turning into loose crumbs.
Stir only once during baking if you like larger clusters. Too much stirring breaks the granola apart before it has time to set.
Let the granola cool completely on the baking sheet. It will crisp as it cools, so do not rush this step even if it looks a little soft when it comes out of the oven.
Add the dark chocolate after baking, not before. The warm granola will soften the chocolate slightly, but adding it after baking keeps it from burning or turning bitter.
Keep dried fruit out of the oven. Stir it in after the granola cools so it stays chewy instead of becoming hard or overly dry.
Tools You’ll Need
- Large rimmed baking sheet
- Parchment paper
- Large mixing bowl
- Small mixing bowl
- Measuring cups
- Measuring spoons
- Whisk
- Rubber spatula or wooden spoon
- Small saucepan or microwave-safe bowl for melting coconut oil
- Cooling rack, optional
- Airtight storage jar or container
Substitutions and Variations
Make It Nut-Free
Leave out the almonds or walnuts and use extra pumpkin seeds, sunflower seeds, or coconut instead. This keeps the granola crunchy while making it safer for nut-free homes or school snacks.
Change the Sweetener
Use maple syrup for a deep, cozy flavor or honey for a slightly thicker, sweeter granola. Both work well, but honey may help the clusters stick together a little more.
Add More Texture
Stir in cacao nibs, puffed rice cereal, crushed pretzels, or extra seeds after baking. These add crunch and make each bite more interesting without changing the chocolate oat base.
Make It More Dessert-Like
Add extra dark chocolate chips, mini chocolate chips, or a small handful of white chocolate chips after the granola cools. This makes it feel more like a sweet snack while still keeping the oat base.
Make It Lighter or Heartier
For a lighter version, reduce the chocolate and serve small portions over yogurt with fruit. For a heartier breakfast, add extra nuts, seeds, and a spoonful of nut butter when serving.
Make Ahead Tips
Dark Chocolate Granola is one of my favorite make-ahead recipes because it keeps well and makes busy mornings easier. You can bake a batch at the start of the week and store it in an airtight container for quick breakfasts, snack bowls, or lunch box extras.
Let the granola cool completely before storing it. If it is still warm, steam can get trapped in the container and make the granola soft instead of crunchy.
You can also measure the dry ingredients ahead of time and keep them in a sealed bag or container. When you are ready to bake, all you need to do is mix the wet ingredients, stir everything together, and spread it on the baking sheet.
For longer storage, freeze the cooled granola in a freezer-safe bag or container. It thaws quickly at room temperature and keeps its texture well when sealed tightly.
Instructions
Step 1: Prepare the Baking Sheet
Preheat the oven to 325°F. Line a large rimmed baking sheet with parchment paper so the granola does not stick.
Make sure the baking sheet has a rim because the oat mixture needs to be spread out evenly. A rim also makes it easier to stir the granola without spilling.
Step 2: Mix the Dry Ingredients
In a large mixing bowl, combine 3 cups old-fashioned rolled oats, 1 cup chopped almonds or walnuts, 1/2 cup unsweetened shredded coconut, 1/3 cup pumpkin seeds, and 1/4 cup chia seeds or ground flaxseed.
Add 1/3 cup unsweetened cocoa powder, 1/2 teaspoon kosher salt, and 1/2 teaspoon ground cinnamon. Stir until the cocoa coats the oats, nuts, seeds, and coconut evenly.
Step 3: Mix the Wet Ingredients
In a small bowl, whisk together 1/2 cup maple syrup or honey, 1/3 cup melted coconut oil or avocado oil, and 2 teaspoons vanilla extract. The mixture should look smooth and pourable.
If the coconut oil starts to firm up, warm it gently for a few seconds. This helps it mix evenly into the oats.
Step 4: Combine the Mixture
Pour the wet mixture over the dry ingredients. Use a rubber spatula or wooden spoon to stir until all the oats are evenly coated.
Take your time with this step because the cocoa powder can hide dry spots. The mixture should look dark, glossy, and evenly moistened.
Step 5: Spread and Press
Transfer the granola mixture to the prepared baking sheet. Spread it into an even layer from corner to corner.
Press the mixture down firmly with the back of a spatula. This helps the granola bake into clusters instead of staying loose.
Step 6: Bake the Granola
Bake the granola at 325°F for 18 minutes. Remove the baking sheet from the oven and gently stir the outer edges toward the center.
Press the granola back down into an even layer. Return it to the oven and bake for another 8 to 12 minutes, until it smells toasted and the edges look dry.
Step 7: Let It Cool Completely
Place the baking sheet on a cooling rack or heat-safe surface. Let the granola cool completely on the pan without stirring.
This is when the clusters firm up and become crisp. It may look soft at first, but it will harden as it cools.
Step 8: Add the Chocolate
Once the granola is mostly cool but still just slightly warm, sprinkle 1/2 cup dark chocolate chips or chopped dark chocolate over the top. Let the chocolate soften slightly, or stir it in once the granola is fully cool if you want firm chocolate pieces.
If you like little melted chocolate pockets, add the chocolate while the granola is warm. If you want the chips to stay whole, wait until everything is completely cool.
Step 9: Add the Dried Fruit
Stir in 1/2 cup dried cranberries, dried cherries, or raisins if you are using them. Break the granola into clusters as large or small as your family likes.
Dried fruit adds chewy sweetness that pairs well with the dark chocolate flavor. Add it after baking so it stays soft and pleasant to eat.
Step 10: Store and Serve
Transfer the cooled granola to an airtight jar or container. Store it at room temperature in a cool, dry spot.
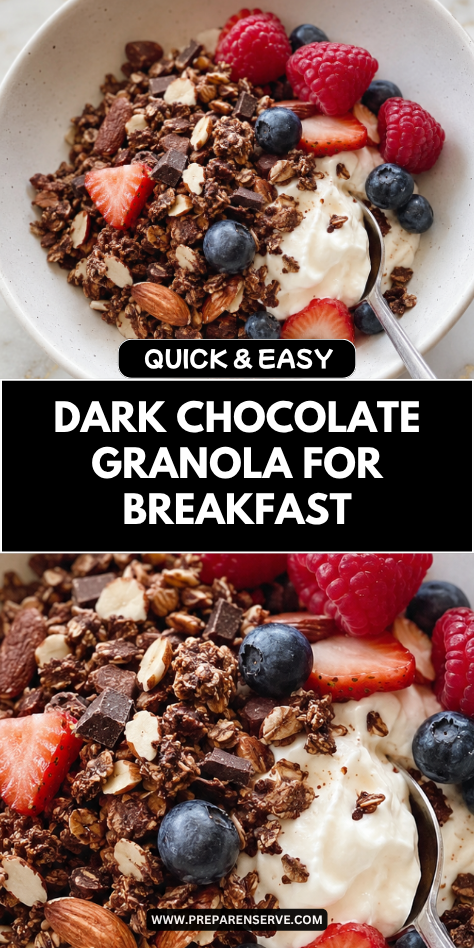
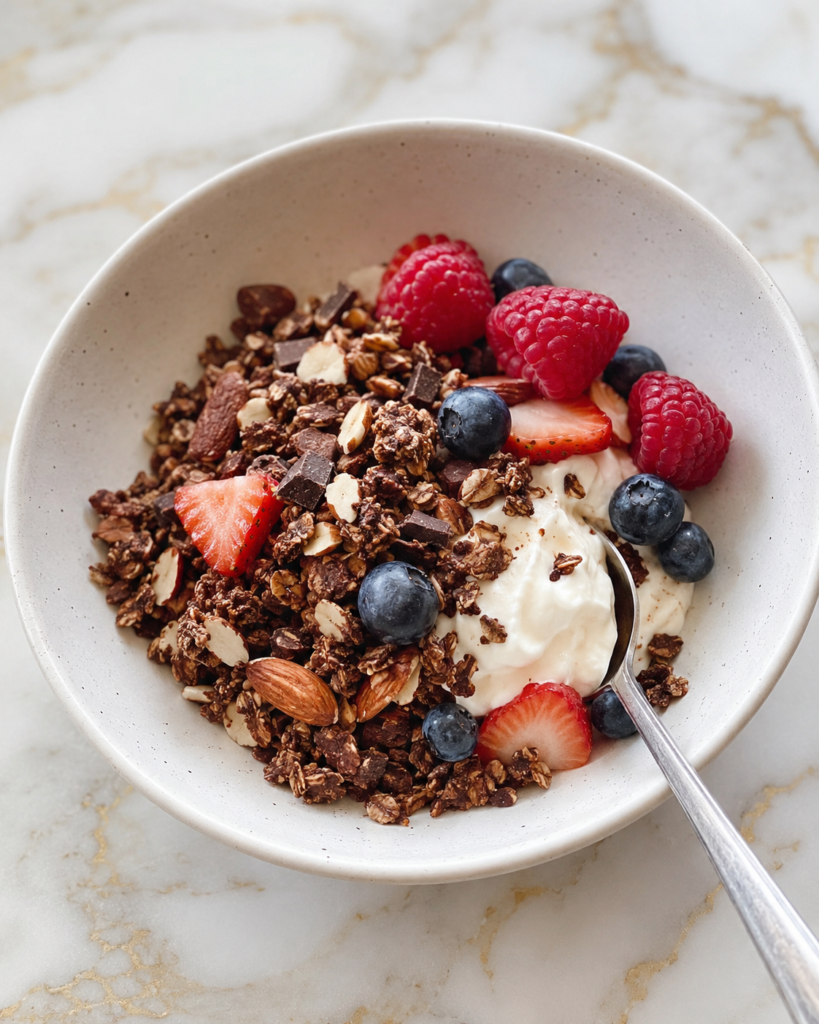
Serve it with yogurt, milk, dairy-free milk, fresh berries, sliced bananas, smoothie bowls, or a drizzle of peanut butter or almond butter. It also works well as a crunchy snack straight from the jar.
Serving Suggestions
Dark Chocolate Granola is wonderful over plain or vanilla yogurt. The creamy yogurt balances the cocoa flavor and makes the crunchy clusters feel like a simple breakfast treat.
It also tastes great with cold milk or dairy-free milk. This is an easy cereal-style option for busy mornings when you need something quick but still homemade.
For a fruitier bowl, serve it with sliced bananas, strawberries, raspberries, or blueberries. Fresh fruit adds brightness and keeps the chocolate flavor from feeling too heavy.
You can sprinkle it over smoothie bowls for extra crunch. It works especially well with banana, berry, peanut butter, or chocolate smoothies.
For snack time, portion the granola into small containers or bags. It is easy to pack for school, work, errands, or after sports.
You can also use it as a dessert topping. Spoon it over ice cream, pudding, baked apples, or whipped cream with berries for a quick sweet treat.
Leftovers and Storage
Store Dark Chocolate Granola in an airtight container at room temperature for up to 2 weeks. Keep it in a cool, dry place so the clusters stay crisp.
Make sure the granola is completely cool before closing the container. Even a little warmth can create steam, which can make the oats soften.
If your kitchen is very warm, the chocolate may soften in the jar. You can store the granola in the refrigerator if needed, though it may become a little firmer.
For longer storage, freeze the granola for up to 3 months. Place it in a freezer-safe bag or container, press out extra air, and thaw it at room temperature before serving.
If the granola loses some crunch, spread it on a baking sheet and warm it in a 300°F oven for 5 to 7 minutes. Let it cool again before storing or serving.
Nutrition and Benefits
- Old-fashioned oats provide fiber and make the granola hearty enough for breakfast or snacks. They also help create a chewy-crisp texture that feels satisfying.
- Dark chocolate and cocoa powder bring rich flavor, so a small serving can feel like a treat. Using dark chocolate keeps the sweetness balanced and gives the granola a deeper taste.
- Nuts and seeds add crunch, healthy fats, and plant-based protein. They help make the granola more filling than a plain sweet snack.
- Maple syrup or honey adds sweetness while helping the oats bake into clusters. You can adjust the amount slightly based on how sweet your family likes granola.
- Serving this granola with yogurt, milk, or fruit can make it feel more balanced. It works well for breakfast, snack bowls, or a small homemade treat.
Recipe FAQ
Can I use quick oats instead of rolled oats?
Rolled oats are best because they give the granola a better texture and more crunch. Quick oats can work in a pinch, but the granola may be softer and less clustered. Avoid steel-cut oats because they will not bake the same way.
How do I get big granola clusters?
Press the granola firmly onto the baking sheet before baking and again after stirring. Let it cool completely before breaking it apart. The less you stir after baking, the larger the clusters will be.
Can I make this granola nut-free?
Yes, leave out the almonds or walnuts and use extra pumpkin seeds, sunflower seeds, or coconut. This keeps the granola crunchy without nuts. Be sure to check chocolate and other labels if you need it safe for allergies.
Can I use honey instead of maple syrup?
Yes, honey works well and can help the granola form nice clusters. It gives the granola a slightly sweeter flavor than maple syrup. Either option works, so use what your family likes best.
Why is my granola soft after baking?
Granola crisps as it cools, so it may feel soft when it first comes out of the oven. Let it cool fully on the baking sheet before judging the texture. If it is still soft after cooling, bake it a few more minutes next time.
When should I add the chocolate?
Add the chocolate after baking so it does not burn. For melted chocolate pockets, add it while the granola is still slightly warm. For firm chocolate chips, wait until the granola has cooled completely.
Can I freeze homemade granola?
Yes, homemade granola freezes well. Store it in a freezer-safe bag or container for up to 3 months. Let it thaw at room temperature before serving so it returns to a crunchy texture.
A Crunchy Chocolate Staple for Busy Mornings
Dark Chocolate Granola is a simple homemade recipe that makes breakfast and snack time feel a little more special. The crisp oat clusters, rich cocoa flavor, nuts, seeds, and dark chocolate come together in a way that feels both cozy and practical.
I love keeping a jar ready for yogurt bowls, quick cereal, lunch box snacks, or small treats during the day. It stores well, tastes dependable, and gives the whole family something crunchy and chocolatey to enjoy again and again.