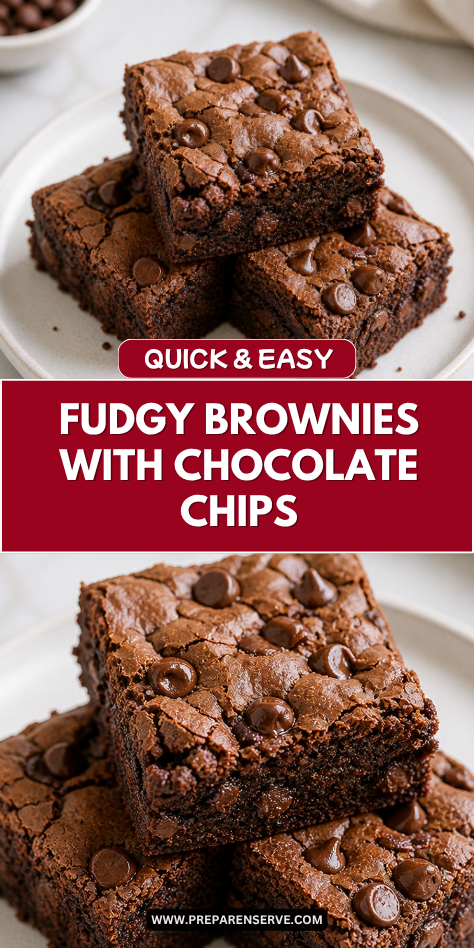
I make Classic Fudgy Brownies with Chocolate Chips when I want a dessert that feels rich, simple, and deeply comforting. They have crackly tops, soft centers, chewy edges, and little pockets of melted chocolate in every bite.
I like this recipe because it does not need frosting, layers, or special decorating to feel special. A warm brownie from the pan is enough to make an ordinary day feel a little sweeter, whether it is for a family dessert, lunch box treat, bake sale, or weekend baking project.
Why You’ll Love This Recipe
Classic Fudgy Brownies with Chocolate Chips are rich, chocolatey, and easy to make with pantry baking ingredients. The texture is dense and moist, with just enough chew at the edges to make every square satisfying.
This recipe is simple enough for beginner bakers, and it is a great one to make with kids. The batter comes together in one main bowl, and the chocolate chips make the brownies feel extra special without adding extra work.
These brownies are also flexible for many occasions. You can serve them plain, dust them with powdered sugar, warm them with ice cream, or pack them into lunch boxes once they are fully cooled.
Serves: 16 people
This recipe makes 16 brownie squares from an 8×8-inch baking pan. The brownies are rich and fudgy, so one square is usually enough for a sweet snack or dessert.
If you want smaller bites for a party tray or lunch boxes, cut the pan into 20 small pieces. For a bigger crowd, you can double the recipe and bake it in a 9×13-inch pan, though the baking time may need a small adjustment.
Ingredients You’ll Need
For the Brownies
- 1/2 cup unsalted butter, melted
- 1 cup granulated sugar
- 1/2 cup packed light brown sugar
- 2 large eggs, room temperature
- 2 teaspoons vanilla extract
- 3/4 cup unsweetened cocoa powder
- 3/4 cup all-purpose flour
- 1/2 teaspoon fine salt
- 1/4 teaspoon baking powder
- 1 tablespoon brewed coffee or milk, optional
- 1 cup semi-sweet chocolate chips, divided
Optional Toppings
- 1/4 teaspoon flaky sea salt, optional for sprinkling
- 2 tablespoons powdered sugar, optional for dusting
- 1/2 cup chopped walnuts or pecans, optional
Pro Tips
Use melted butter for a fudgy texture. Melted butter helps create a dense, rich brownie instead of a cakey one. Let it cool slightly before mixing so it does not scramble the eggs.
Whisk the sugars well with the butter. Stirring the melted butter, granulated sugar, and brown sugar together helps create a shiny top. This small step also helps the brownies taste smooth and evenly sweet.
Do not overmix after adding flour. Once the flour goes in, stir only until you do not see dry streaks. Overmixing can make brownies tougher and less tender.
Use good cocoa powder. Since cocoa is the main chocolate flavor, choose one you like. Unsweetened natural cocoa powder works well, but Dutch-process cocoa can give a darker, smoother flavor.
Pull the brownies out before they look fully firm. Fudgy brownies should still have a few moist crumbs on a toothpick. If the toothpick comes out completely clean, the brownies may be overbaked.
Cool before cutting. Warm brownies taste wonderful, but they slice much more neatly once cooled. If you want clean squares, let the pan cool fully before using a sharp knife.
Tools You’ll Need
- 8×8-inch baking pan
- Parchment paper
- Nonstick baking spray or butter for greasing
- Large mixing bowl
- Medium microwave-safe bowl or small saucepan
- Whisk
- Rubber spatula
- Measuring cups
- Measuring spoons
- Toothpick or cake tester
- Cooling rack
- Sharp knife
- Cutting board
- Fine mesh sieve, optional for dusting powdered sugar
Substitutions and Variations
Use a Different Chocolate
Swap semi-sweet chocolate chips for dark chocolate chips, milk chocolate chips, white chocolate chips, or chopped chocolate bars. Chopped chocolate melts into softer pockets, while chips hold their shape and give the brownies a classic texture.
Make Them Dairy-Free
Use dairy-free butter and dairy-free chocolate chips in place of the regular butter and chocolate chips. The brownies will still bake up rich and fudgy as long as the substitutes are made for baking.
Add More Texture
Stir in chopped walnuts, pecans, crushed pretzels, or toffee bits with the chocolate chips. Keep the add-ins to about 1/2 cup so the brownies stay dense and fudgy.
Try a Flavor Twist
Add 1/2 teaspoon espresso powder, a pinch of cinnamon, or a few drops of peppermint extract to the batter. These small changes make the chocolate taste deeper while keeping the brownies easy and familiar.
Make Them Extra Special
Swirl 1/3 cup peanut butter, caramel sauce, or chocolate hazelnut spread over the top before baking. Use a butter knife to make gentle swirls so the brownies still bake evenly and keep their fudgy center.

Make Ahead Tips
Classic Fudgy Brownies with Chocolate Chips are a great make-ahead dessert because they stay moist and rich for several days. You can bake the brownies 1 day ahead, let them cool completely, and store them tightly covered at room temperature. The texture often becomes even fudgier after the brownies have had time to rest.
You can also measure the dry ingredients ahead of time. Whisk together the cocoa powder, flour, salt, and baking powder, then store the mixture in a covered container until you are ready to bake. This makes the recipe faster when you want brownies without pulling out every ingredient.
For parties, lunch boxes, or bake sales, bake and cool the brownies fully before slicing. Clean slices are easier to wrap, pack, and serve. If you want the neatest squares, chill the brownies for about 30 minutes before cutting, then let them come back to room temperature before serving.
Instructions
Step 1: Prepare the Oven and Pan
Preheat the oven to 350°F. Line an 8×8-inch baking pan with parchment paper, leaving a little overhang on two sides so the brownies are easy to lift out later.
Lightly grease the parchment paper and any exposed sides of the pan. This helps the fudgy brownies release cleanly after cooling.
Step 2: Melt the Butter
Melt 1/2 cup unsalted butter in a microwave-safe bowl or small saucepan. Let it cool for a few minutes so it is warm but not hot.
Warm butter blends smoothly with the sugars and helps create a rich brownie batter. If the butter is too hot, it can affect the eggs when they are added.
Step 3: Mix the Butter and Sugars
In a large mixing bowl, whisk together the melted butter, 1 cup granulated sugar, and 1/2 cup packed light brown sugar. Whisk for about 1 minute, until the mixture looks glossy and smooth.
This step helps dissolve some of the sugar and supports that classic shiny brownie top. The brown sugar also adds moisture and chewiness.
Step 4: Add the Eggs and Vanilla
Add 2 large room temperature eggs, one at a time, whisking well after each addition. Stir in 2 teaspoons vanilla extract until the mixture looks thick, smooth, and shiny.
If using 1 tablespoon brewed coffee or milk, add it here. Coffee deepens the chocolate flavor, while milk keeps the flavor mild and family-friendly.
Step 5: Add the Dry Ingredients
Add 3/4 cup unsweetened cocoa powder, 3/4 cup all-purpose flour, 1/2 teaspoon fine salt, and 1/4 teaspoon baking powder to the bowl. Stir gently with a rubber spatula until just combined.
The batter will be thick and dark. Stop mixing as soon as no dry streaks remain so the brownies stay tender and fudgy.
Step 6: Fold in the Chocolate Chips
Fold in 3/4 cup semi-sweet chocolate chips. Save the remaining 1/4 cup chocolate chips for sprinkling on top.
If using 1/2 cup chopped walnuts or pecans, fold them in at this stage. Stir just enough to spread the chocolate and nuts evenly through the batter.
Step 7: Spread the Batter in the Pan
Spoon the brownie batter into the prepared 8×8-inch pan. Use a rubber spatula to spread it into an even layer, pushing it gently into the corners.
Sprinkle the remaining 1/4 cup chocolate chips over the top. Add a small pinch of flaky sea salt if you like a sweet-salty finish.
Step 8: Bake the Brownies
Bake at 350°F for 28 to 34 minutes. The edges should look set, and the center should look slightly soft but not wet.
Test with a toothpick near the center. It should come out with a few moist crumbs, not completely clean, for the best fudgy texture.
Step 9: Cool Before Slicing
Place the pan on a cooling rack and let the brownies cool completely. This helps the center set and makes slicing much easier.
Use the parchment paper overhang to lift the brownies from the pan. Cut into 16 squares with a sharp knife, wiping the blade between cuts for cleaner edges.
Step 10: Serve and Finish
Serve the brownies plain, dusted with 2 tablespoons powdered sugar, or warmed slightly with ice cream. They are rich enough on their own but easy to dress up for a special dessert.
If you want a softer texture, warm a brownie in the microwave for about 8 to 10 seconds. This makes the chocolate chips melty again and gives the brownie a fresh-baked feel.
Serving Suggestions
Classic Fudgy Brownies with Chocolate Chips are delicious served at room temperature when the centers are set and chewy. They are easy to cut, stack, and serve on a simple dessert plate.
For a cozy dessert, warm each brownie slightly and add a scoop of vanilla ice cream. The cold ice cream melts into the fudgy brownie and makes the whole plate feel extra comforting.
A drizzle of chocolate sauce, caramel sauce, or warm peanut butter also works well. Keep the topping light so the brownie’s deep chocolate flavor still stands out.
For lunch boxes, cut the brownies into smaller squares and wrap them once fully cooled. They are sturdy enough to pack and sweet enough to feel like a special treat.
Serve them with cold milk for kids or coffee for adults. The simple pairing balances the rich chocolate flavor and makes each bite feel classic.
For parties or bake sales, place the brownies in paper liners after cutting. This keeps them neat, easy to grab, and simple to share.
Leftovers and Storage
Let the brownies cool completely before storing them. Place them in an airtight container at room temperature for up to 4 days. Keep parchment paper between layers if you need to stack them.
For a fudgier texture, store the brownies in the refrigerator for up to 1 week. Let them sit at room temperature for a few minutes before serving, or warm them briefly if you like a softer center. Refrigerated brownies can taste extra dense and chocolatey.
Brownies also freeze well for up to 2 months. Wrap individual squares tightly in plastic wrap, then place them in a freezer-safe bag or container. Thaw at room temperature, or microwave a frozen brownie in short bursts until just softened.
Nutrition and Benefits
- Rich chocolate flavor: Cocoa powder and chocolate chips give these brownies a deep, satisfying taste. A small square feels like a full dessert because the flavor is bold and fudgy.
- Simple homemade ingredients: This recipe uses common baking staples like butter, sugar, eggs, flour, cocoa, and chocolate chips. It is easy to make without a boxed mix or special tools.
- Easy to portion: Brownies are simple to cut into squares for lunch boxes, parties, bake sales, or family dessert. You can make larger pieces for dessert plates or smaller bites for sharing.
- Make-ahead friendly: These brownies stay moist for several days and freeze well. That makes them helpful for busy weeks, school treats, and planned gatherings.
- Flexible for add-ins: Nuts, caramel, peanut butter, pretzels, or different chocolate chips can all work in this recipe. You can adjust the flavor while keeping the classic fudgy brownie base.
Recipe FAQ
How do I know when fudgy brownies are done?
Fudgy brownies are done when the edges are set and the center no longer looks wet. A toothpick inserted near the center should come out with moist crumbs. If it comes out completely clean, the brownies may be more cakey than fudgy.
Why are my brownies dry?
Brownies usually turn dry when they are overbaked or when too much flour is added. Measure the flour carefully by spooning it into the cup and leveling it off. Start checking the brownies near the lower end of the baking time.
Can I double this recipe?
Yes, you can double the recipe and bake it in a 9×13-inch pan. The brownies may need a few extra minutes in the oven. Check for moist crumbs with a toothpick before removing them.
Can I use Dutch-process cocoa powder?
Yes, Dutch-process cocoa powder can be used in this recipe. It gives the brownies a darker color and smoother chocolate flavor. Natural cocoa powder also works well and gives a more classic brownie taste.
Can I make these brownies without chocolate chips?
Yes, you can leave out the chocolate chips if needed. The brownies will still be rich and fudgy from the cocoa powder. You can also replace them with chopped chocolate, nuts, or toffee bits.
Why did my brownies sink in the middle?
Brownies can sink a little if they are underbaked or if too much air was whisked into the batter. Make sure the center is set enough before removing the pan from the oven. A slight dip is normal for very fudgy brownies.
Should brownies be refrigerated?
They do not have to be refrigerated if you plan to eat them within a few days. Store them covered at room temperature for the softest texture. Refrigerate them if you want them to last longer or prefer a denser, fudgier bite.
A Chocolate Treat Worth Keeping Close
Classic Fudgy Brownies with Chocolate Chips are simple, rich, and comforting in the way only homemade brownies can be. The crackly top, soft center, chewy edges, and melted chocolate chips make each square feel dependable and satisfying.
I like this recipe for lunch boxes, family desserts, bake sales, and quiet nights when something chocolatey sounds just right. It is easy to make, easy to store, and worth baking again whenever you want a sweet treat that feels warm and familiar.