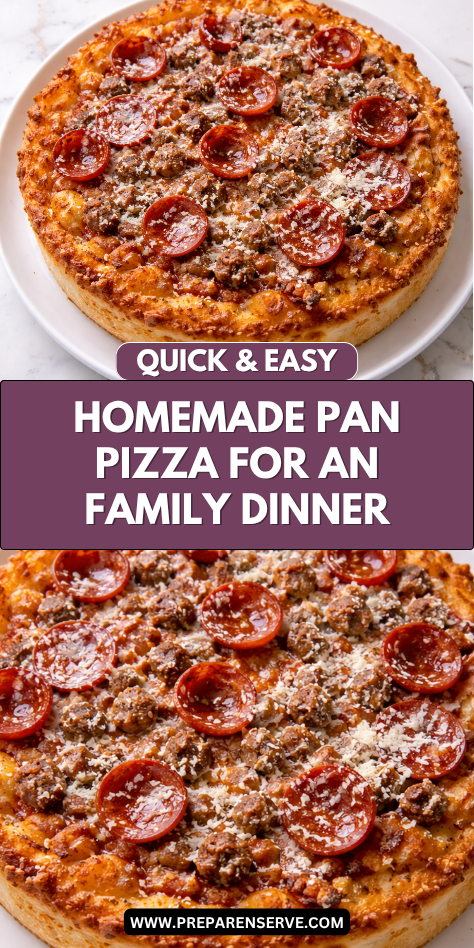
Pan pizza has always felt like the most comforting version of pizza to me. There’s something special about a thick, golden crust that’s crisp on the outside and soft and airy inside.
The first time I made pan pizza at home, I realized it offered a completely different experience from thin crust or traditional round pizzas.
This recipe came into my life during a season when we wanted cozy, filling meals that felt a little indulgent. The deep pan holds the dough as it rises and bakes, creating that signature fluffy interior and crispy bottom. Every slice feels hearty and satisfying.
Over time, pan pizza became our go-to for weekends and relaxed family dinners. It feels intentional and homemade in a way that makes pizza night slow down just a bit. That comforting rhythm is what makes this recipe so special in my kitchen.
Why You’ll Love This Recipe
This pan pizza recipe delivers everything people love about thick-crust pizza. The crust bakes up soft and pillowy on the inside while developing a golden, crisp bottom. That contrast in texture makes every bite especially satisfying.
Another reason this recipe stands out is how forgiving it is. Pan pizza dough is easier to shape and doesn’t require precise stretching. The pan does most of the work, which makes it approachable for beginners.
Families love this recipe because it feels hearty and filling. A few slices go a long way, making it perfect for shared meals. This pan pizza recipe fits beautifully into cozy nights at home.
It’s also incredibly versatile. You can customize toppings easily without worrying about weighing down the crust. That flexibility makes it a reliable favorite.
Serves: 2 people
This recipe makes one small pan pizza that comfortably serves two people. The portions are generous and satisfying. It can be doubled and baked in a larger pan if needed.
Ingredients You’ll Need
Dough
- 1 1/2 cups all-purpose flour
- 1 teaspoon instant yeast
- 3/4 teaspoon salt
- 1 tablespoon olive oil
- 1/2 cup warm water
Pan and Assembly
- 1 tablespoon olive oil for the pan
Toppings Base
- 1/2 cup pizza sauce
- 1 1/2 cups shredded mozzarella cheese
Pro Tips
Use a metal or cast-iron pan for best results. These conduct heat well and help create a crisp bottom crust. Nonstick pans also work but may be less crisp.
Generously oil the pan before adding the dough. This prevents sticking and helps fry the bottom of the crust slightly. That oil is key to pan pizza texture.
Let the dough rest in the pan before baking. This allows it to relax and rise slightly. The result is a softer, thicker crust.
Press the dough gently toward the edges instead of stretching it aggressively. Pan pizza dough is meant to be pressed, not pulled. If it resists, let it rest briefly.
Use low-moisture mozzarella for even melting. Fresh mozzarella can release too much moisture in pan pizza. Shredded cheese works best here.
If cooking with kids, let them help press the dough into the pan. This step is easy and fun. It helps them feel involved.
Tools You’ll Need
- Mixing bowl
- Measuring cups
- Measuring spoons
- Wooden spoon
- 9-inch round or square pan
- Spoon or spatula
Substitutions and Variations
Bread flour can be used instead of all-purpose flour for a chewier crust. The dough may need a small splash of extra water. Adjust gradually.
You can use store-bought pizza dough if short on time. Press it directly into the oiled pan. Let it rest before topping.
Marinara sauce can replace pizza sauce if preferred. Choose a thick sauce to avoid sogginess. Use a light layer.
Different cheeses work well in pan pizza. Mozzarella blends, provolone, or a little parmesan add depth. Avoid overly wet cheeses.
You can add herbs like dried oregano or basil to the dough or sauce. These add subtle flavor. Keep additions simple to maintain balance.
Make Ahead Tips
Pan pizza dough is very friendly when it comes to making it ahead of time. After mixing the dough, you can let it complete its first rise and then refrigerate it for up to 24 hours. This slow rest actually improves flavor and makes the dough easier to press into the pan.
If you want to prep even further ahead, the dough can be lightly oiled, wrapped tightly, and refrigerated overnight. When you’re ready to bake, let it sit at room temperature for about 30 minutes before pressing it into the pan. This rest helps the dough relax and rise evenly.
You can also prep toppings ahead of time to make pizza night smoother. Shred the cheese, measure the sauce, and prepare any toppings you plan to use. Having everything ready makes assembly quick and stress-free.
Instructions
Step 1: Mix the Dough
In a large mixing bowl, combine the flour, instant yeast, and salt. Stir gently to evenly distribute the dry ingredients. This ensures consistent rising and flavor throughout the dough.
Add the olive oil and warm water to the bowl. Stir with a wooden spoon until a shaggy dough forms. The dough should come together easily without being overly sticky.
Step 2: Knead the Dough
Turn the dough out onto a lightly floured surface. Knead by pressing it forward with the heel of your hand, folding it back, and rotating slightly. Continue this motion steadily.
Knead for about 6 to 8 minutes until the dough becomes smooth and elastic. It should feel soft and slightly tacky. Add small amounts of flour only if the dough sticks excessively.
Step 3: First Rise
Shape the dough into a smooth ball. Lightly oil the mixing bowl and place the dough inside, turning once to coat. Cover loosely with a clean kitchen towel.
Place the bowl in a warm, draft-free area. Let the dough rise for about 60 minutes, or until doubled in size. This rise gives the dough structure and lightness.
Step 4: Prepare the Pan
Generously coat the bottom and sides of a 9-inch pan with olive oil. Make sure the oil reaches the edges and corners. This step is essential for a crisp, golden crust.
Transfer the risen dough into the oiled pan. Gently turn it once so both sides are lightly coated with oil. This prevents sticking and improves texture.
Step 5: Press and Rest the Dough
Using your fingertips, gently press the dough outward toward the edges of the pan. If it resists, stop and let it rest for 5 to 10 minutes. Resting relaxes the gluten and makes pressing easier.
Once the dough reaches the edges, cover the pan loosely. Let it rest for another 20 minutes. This short rise helps create a thicker, softer crust.
Step 6: Preheat the Oven
Preheat your oven to 475°F while the dough finishes resting. A fully heated oven is important for proper rise and browning. High heat gives pan pizza its signature texture.
If using a metal or cast-iron pan, place it on the lower oven rack. This helps crisp the bottom crust. Positioning matters for even baking.
Step 7: Add Sauce and Cheese
Spoon the pizza sauce evenly over the dough, leaving a small border around the edges. Use a light, even layer to avoid sogginess. Pan pizza benefits from balanced toppings.
Sprinkle the shredded mozzarella evenly over the sauce. Make sure the cheese reaches close to the edges. This creates that classic pan pizza look and texture.
Step 8: Bake the Pizza
Place the pan in the preheated oven. Bake for 14 to 18 minutes, until the cheese is melted and bubbly and the crust is golden. Baking time may vary slightly by oven.
Check the bottom of the crust near the end of baking. It should be crisp and well browned. If needed, bake for a few extra minutes.
Step 9: Rest and Slice
Remove the pan pizza from the oven and let it rest for 3 to 5 minutes. Resting allows the cheese to set slightly. This makes slicing cleaner.
Carefully lift the pizza out of the pan and place it on a cutting board. Slice into squares or wedges. Serve while warm for best texture.
Serving Suggestions
Pan pizza pairs well with a simple green salad. Crisp greens help balance the richness of the thick crust and cheese. A light dressing works best.
Serve with roasted vegetables or a bowl of soup for a comforting meal. The hearty crust makes the pizza especially filling. This pairing works well for cooler evenings.
For family-style dinners, cut the pizza into square slices. This makes serving easy and relaxed. Pan pizza is ideal for sharing.
You can also serve pan pizza as part of a casual gathering. Smaller slices work well for grazing. It holds up nicely on the table.
Leftover slices make a satisfying next-day lunch. The thick crust reheats well in the oven or skillet. Many people enjoy it even more the next day.
Leftovers and Storage
Pan pizza stores very well and often tastes just as satisfying the next day. Allow any leftover slices to cool completely before transferring them to an airtight container. Stored in the refrigerator, pan pizza will keep fresh for up to four days.
For reheating, the oven or a skillet works best to restore texture. These methods help bring back the crisp bottom crust while warming the cheese evenly. Reheat just until warmed through to avoid drying out the dough.
Microwaving is convenient but can soften the crust. If you use the microwave, reheat briefly and avoid overheating. Finishing the slice in a hot skillet can help bring back some crispness.
Because pan pizza has a thicker crust, it holds up especially well to reheating. The interior stays soft while the exterior regains structure. This makes leftovers something to look forward to.
Nutrition and Benefits
Pan pizza offers a hearty and satisfying meal when enjoyed in moderation. The thick crust provides carbohydrates that supply energy and help keep the meal filling. This makes it especially comforting for busy or active days.
Mozzarella cheese contributes protein and calcium, supporting muscle and bone health. Using quality cheese enhances both flavor and nutritional value. Moderation helps maintain balance.
Pizza sauce adds tomatoes, which provide vitamins and antioxidants. These nutrients support overall wellness while adding flavor. Simple ingredients make it easier to enjoy pizza mindfully.
Making pan pizza at home allows you to control portion size and ingredient quality. You can adjust cheese, sauce, or toppings based on preference. That flexibility is one of the biggest benefits of homemade pizza.
Recipe FAQ
Why is pan pizza thicker than regular pizza?
Pan pizza dough is allowed to rise in the pan, creating a fluffy interior. The pan supports the dough as it bakes. This results in a thicker, softer crust.
Do I need a cast-iron pan for pan pizza?
No, a regular metal pan works well. Cast iron creates excellent browning but is not required. The key is generous oiling and high heat.
Why is my pan pizza greasy?
Pan pizza uses oil to create a crisp bottom crust. Using too much oil or cheese can increase greasiness. A balanced amount works best.
Can I add toppings to this pan pizza?
Yes, pan pizza handles toppings very well. Just avoid overloading the pizza. Too many toppings can affect baking and texture.
Does pan pizza reheat well?
Yes, pan pizza reheats especially well due to its thick crust. The oven or skillet gives the best results. Many people enjoy it even more the next day.
Can I make pan pizza dough ahead of time?
Yes, the dough can be made a day in advance and refrigerated. This can improve flavor. Let it come to room temperature before using.
Is pan pizza kid-friendly?
Pan pizza is often a hit with kids because of its soft, fluffy crust. The thick slices are filling and familiar. Simple toppings keep it approachable.
A Comforting Pizza That Feels Like Home
Pan pizza is the kind of recipe that brings warmth and comfort to the table. The thick, golden crust and melted cheese make every bite feel satisfying. It’s a style of pizza that encourages slowing down and enjoying the moment.
This recipe shows how simple ingredients can create something deeply comforting. With a little patience and the right pan, the results feel special and homemade. That balance makes pan pizza a favorite worth repeating.
Whether shared on a relaxed weekend or enjoyed as leftovers the next day, pan pizza fits seamlessly into everyday life. It’s hearty, dependable, and always welcome. That timeless appeal is what makes it a true classic.