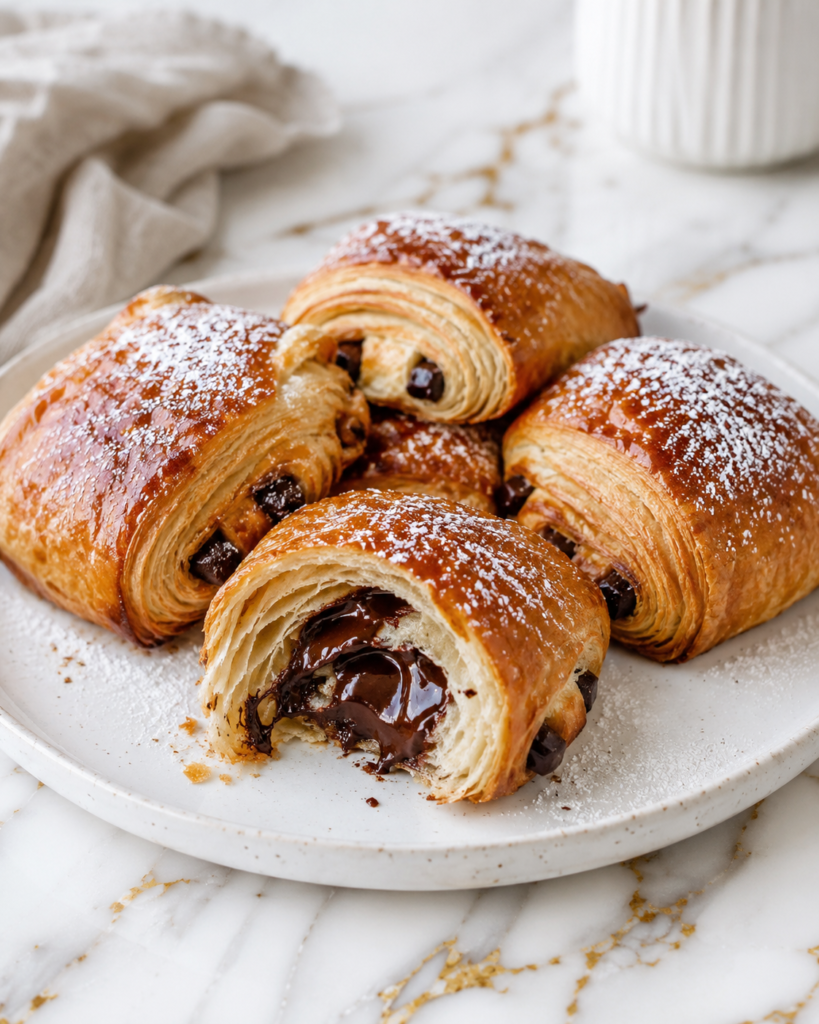
I make Homemade Chocolate Croissants when I want a baking project that feels special, comforting, and worth the little bit of extra time. There is something so satisfying about pulling a tray of golden, flaky pastries from the oven and seeing the chocolate tucked inside.
Pain au Chocolat may sound fancy, but at home it is really about patience, simple ingredients, and a steady process. I love making these for a slow weekend breakfast, a cozy brunch, or a homemade treat that makes the kitchen smell like a bakery.

Why You’ll Love This Recipe
Homemade Chocolate Croissants are buttery, flaky, and filled with rich chocolate in every bite. The outside bakes up crisp and golden, while the inside stays soft, layered, and tender.
This recipe is a great way to learn laminated dough in a calm, approachable way. You do not need to be a professional baker, but you do need to give the dough time to chill, rest, and rise properly.
It is also a wonderful family recipe for weekends or holidays because everyone gets excited when chocolate croissants are on the table. Kids can help place the chocolate on the dough, brush on the egg wash, or watch the pastries puff in the oven.
Serves: 12 people
This recipe makes 12 homemade chocolate croissants, which is usually enough for 12 people if serving one pastry each. If you are serving them as part of a larger brunch with fruit, eggs, or coffee, you may even have a few left for later.
If your family loves pastries, you can serve two smaller croissants per person or freeze part of the batch before baking. The recipe is also easy to plan ahead because the dough can rest overnight in the refrigerator.
Ingredients You’ll Need
For the Dough
- 4 cups all-purpose flour, plus more for rolling
- ¼ cup granulated sugar
- 2 ¼ teaspoons active dry yeast, or 1 standard packet
- 1 ½ teaspoons kosher salt
- 1 cup whole milk, cold
- ¼ cup water, cold
- 3 tablespoons unsalted butter, softened
For the Butter Block
- 1 cup unsalted European-style butter, cold but pliable
For the Chocolate Filling
- 8 ounces dark chocolate batons, semi-sweet baking chocolate, or chopped dark chocolate
- 1 tablespoon all-purpose flour, optional for dusting chocolate if chopped
For the Egg Wash
- 1 large egg
- 1 tablespoon whole milk
For Finishing
- 1 tablespoon powdered sugar, optional
- 1 pinch flaky sea salt, optional
Pro Tips
Use cold ingredients and keep the dough cool while working. If the butter gets too soft, it can melt into the dough instead of creating those flaky layers.
Choose European-style butter if you can find it. It has a higher butterfat content, which helps create a richer flavor and better pastry layers.
Do not rush the chilling times. The dough needs time to relax so it rolls out without springing back, and the butter needs time to firm up between folds.
Roll with gentle, even pressure instead of pressing too hard. This keeps the butter from breaking through the dough and helps the layers stay neat.
Use chocolate batons if you want the classic bakery look. Chopped chocolate works too, but try to cut it into long, narrow pieces so it rolls evenly inside the dough.
Proof the shaped croissants until they look puffy and slightly jiggly. If they are under-proofed, they may bake up dense instead of light and tender.
Tools You’ll Need
- Large mixing bowl
- Measuring cups
- Measuring spoons
- Kitchen scale, optional but helpful
- Stand mixer with dough hook, optional
- Rolling pin
- Ruler or measuring tape
- Bench scraper or sharp knife
- Parchment paper
- Plastic wrap
- Baking sheets
- Pastry brush
- Small bowl for egg wash
- Cooling rack
- Instant-read thermometer, optional
- Offset spatula, optional
Substitutions and Variations
Use Bread Flour for More Chew
You can replace the all-purpose flour with bread flour if you want a slightly chewier pastry. The croissants will still be flaky, but the texture may feel a bit stronger and more bakery-style.
Make Them Sweeter
Use milk chocolate instead of dark chocolate for a softer, sweeter filling. This is a nice option for kids or anyone who prefers a less intense chocolate flavor.
Add a Nutty Filling
Spread a very thin layer of almond paste, hazelnut spread, or peanut butter under the chocolate before rolling. Keep the layer light so the pastries still bake evenly and hold their classic shape.
Make Mini Chocolate Croissants
Cut the dough into smaller rectangles and use less chocolate in each one. Mini pastries are great for brunch trays, lunch box treats, or smaller hands.
Add a Bakery-Style Finish
Sprinkle the baked croissants with powdered sugar or a tiny pinch of flaky sea salt. This adds a pretty finish and gives the chocolate filling a little extra balance.
Make Ahead Tips
Homemade Chocolate Croissants are a perfect make-ahead baking project because the dough needs resting time anyway. You can make the dough the day before, complete the folds, then let it chill overnight before shaping and baking the next morning.
You can also shape the croissants the night before and place them on parchment-lined baking sheets. Cover them loosely with plastic wrap and refrigerate overnight, then let them sit at room temperature until puffy before baking.
For the best texture, do not rush the final proof after refrigeration. The croissants need time to warm slightly and rise until they look soft, airy, and a little jiggly when the pan is gently moved.
Unbaked shaped croissants can also be frozen before the final proof. Place them on a baking sheet until firm, then transfer them to a freezer-safe bag or container for up to 1 month.
When you are ready to bake, thaw the frozen croissants overnight in the refrigerator. Let them proof at room temperature until puffy, brush with egg wash, and bake as directed.
Instructions
Step 1: Mix the Dough
In a large mixing bowl, combine the all-purpose flour, granulated sugar, active dry yeast, and kosher salt. Add the cold whole milk, cold water, and softened unsalted butter.
Mix until a rough dough forms, then knead for 5 to 7 minutes by hand or with a dough hook on low speed. The dough should feel smooth but still firm, not sticky or overly soft.
Step 2: Chill the Dough
Shape the dough into a flat rectangle and wrap it tightly in plastic wrap. Place it in the refrigerator for at least 1 hour, or until well chilled.
This rest helps the dough relax and makes it much easier to roll later. A cold dough also helps keep the butter from melting during the folding process.
Step 3: Make the Butter Block
Place the cold European-style butter between two sheets of parchment paper. Use a rolling pin to tap and roll it into a neat 7-by-7-inch square.
The butter should be cool but bendable, not hard and cracking. If it gets too soft, chill it for 10 to 15 minutes before using.
Step 4: Lock in the Butter
Roll the chilled dough into a 10-by-10-inch square on a lightly floured surface. Place the butter block in the center of the dough like a diamond, with the corners pointing toward the sides of the dough.
Fold the corners of the dough over the butter so it is fully covered. Pinch the seams gently to seal the butter inside.
Step 5: Complete the First Fold
Roll the dough into a long rectangle about 8 by 20 inches. Use gentle, even pressure so the butter spreads into a thin layer without breaking through.
Fold the dough into thirds like a letter. Wrap it in plastic wrap and chill for 30 minutes.
Step 6: Complete the Second and Third Folds
Remove the dough from the refrigerator and place it with the folded edge facing to the side. Roll it again into an 8-by-20-inch rectangle.
Fold it into thirds again, wrap, and chill for 30 minutes. Repeat this process one more time for a total of three folds, then chill the dough for at least 1 hour before shaping.
Step 7: Roll and Cut the Dough
Roll the chilled laminated dough into a large rectangle about 10 by 24 inches. Trim the edges lightly with a sharp knife or bench scraper so the layers are clean and even.
Cut the dough into 12 rectangles, each about 4 by 5 inches. Try to keep the pieces even so the croissants bake at the same pace.
Step 8: Add the Chocolate
Place one piece of chocolate near the short edge of each dough rectangle. Roll the dough over the chocolate once, then add a second piece of chocolate if using batons or narrow chocolate strips.
Continue rolling until the seam is underneath the pastry. The chocolate should be tucked inside, and the pastry should look like a small, neat log.
Step 9: Proof the Croissants
Place the shaped chocolate croissants on parchment-lined baking sheets, leaving space between each one. Cover them loosely with plastic wrap or a clean kitchen towel.
Let them rise at room temperature for 1 ½ to 2 ½ hours, depending on the warmth of your kitchen. They are ready when they look puffy, slightly wobbly, and visibly larger.
Step 10: Add Egg Wash and Bake
Preheat the oven to 400°F. In a small bowl, whisk together the egg and whole milk until smooth.
Brush the croissants gently with the egg wash, being careful not to press down on the layers. Bake for 18 to 22 minutes, or until deeply golden brown, puffed, and crisp.
Step 11: Cool and Finish
Transfer the baked croissants to a cooling rack and let them rest for at least 10 minutes. The chocolate inside will be very hot right out of the oven.
Dust with powdered sugar or add a tiny pinch of flaky sea salt if you like. Serve warm or at room temperature.
Serving Suggestions
Homemade Chocolate Croissants are lovely served warm with coffee, tea, or a cold glass of milk. The buttery pastry and melted chocolate make a simple breakfast feel extra comforting.
For brunch, serve them with fresh berries, orange slices, scrambled eggs, or yogurt. The fruit adds freshness and keeps the plate from feeling too heavy.
They also make a sweet lunch box treat when served at room temperature. Pack one with fruit and a simple protein so it feels balanced and special.
For a cozy weekend snack, warm a croissant for a few minutes and serve it with hot cocoa. This is especially nice on cold mornings or quiet afternoons at home.
You can also slice a cooled croissant in half and add a small spoonful of whipped cream or sliced strawberries. It turns the pastry into an easy dessert without much extra work.
If you are hosting, place the croissants on a platter with napkins and small plates. They look beautiful on their own and do not need much dressing up.
Leftovers and Storage
Store leftover Homemade Chocolate Croissants in an airtight container at room temperature for up to 2 days. Let them cool completely before storing so steam does not soften the flaky layers.
To reheat, place the croissants in a 325°F oven for 5 to 8 minutes. This helps bring back the crisp outside and warms the chocolate gently.
Avoid microwaving if you want to keep the pastry flaky. The microwave will warm the chocolate, but it can make the croissant soft or chewy instead of crisp.
For longer storage, freeze baked croissants in a freezer-safe bag or container for up to 2 months. Wrap each one well so the pastry does not dry out or pick up freezer smells.
Reheat frozen croissants straight from the freezer in a 325°F oven for 12 to 15 minutes. They should be warm in the center and crisp on the outside.
Nutrition and Benefits
- Comforting homemade treat: These croissants are rich, buttery, and satisfying, making them a special breakfast or snack to enjoy in smaller portions.
- Made with simple ingredients: Flour, butter, milk, yeast, sugar, salt, eggs, and chocolate come together to create bakery-style pastries at home.
- Good for shared meals: This recipe makes a full batch, which is helpful for brunch, holidays, family mornings, or make-ahead baking.
- Customizable sweetness: You can choose dark, semi-sweet, or milk chocolate depending on your family’s taste.
- Skill-building recipe: Laminated dough teaches rolling, folding, chilling, and proofing in a hands-on way that can help build baking confidence.
Recipe FAQ
Can I make chocolate croissants without European-style butter?
Yes, you can use regular unsalted butter, but European-style butter gives the best flavor and flakiest texture. Regular butter has more water, so the layers may be a little less crisp. Keep the butter cold and pliable for the best results.
Why did butter leak out while baking?
A little butter leakage can happen, especially with homemade laminated dough. It usually means the croissants were too warm, under-proofed, or the butter broke through the dough during rolling. Chilling well between folds and proofing until puffy helps reduce this.
Can I use store-bought puff pastry?
Yes, store-bought puff pastry can make a quick version, but the texture will be different from classic croissant dough. Puff pastry does not contain yeast, so it will be crisp and flaky but less soft and bread-like inside. It is still a helpful shortcut for busy days.
How do I know when the croissants are proofed?
The croissants should look puffed, airy, and slightly larger than when shaped. When you gently move the baking sheet, they should have a soft wobble. If they still look tight and firm, give them more time.
Can I freeze the croissants before baking?
Yes, shaped unbaked croissants freeze well before the final proof. Freeze them on a baking sheet first, then store them in a freezer-safe bag or container. Thaw overnight in the refrigerator before proofing and baking.
What chocolate is best for pain au chocolat?
Chocolate batons are traditional because they hold their shape and roll neatly into the dough. Semi-sweet or dark baking chocolate also works well if cut into narrow pieces. Avoid chocolate chips if possible, since they do not spread as evenly.
Why are my croissants dense instead of flaky?
Dense croissants are often caused by under-proofing, warm butter melting into the dough, or pressing too hard while rolling. Give the dough enough time to chill and the shaped pastries enough time to rise. The layers need both cold butter and proper proofing to bake up light.
A Buttery Bakery Treat to Make at Home
Homemade Chocolate Croissants are a special baking project that brings warmth, comfort, and a little bakery magic into the kitchen. The flaky layers, soft center, and rich chocolate filling make them feel worth every quiet step of rolling, folding, and waiting.
They are perfect for slow breakfasts, family brunches, lunch box treats, or a cozy make-ahead weekend bake. Once you taste them warm from the oven, this is the kind of recipe you will be glad to make again.