I started making this when I wanted a breakfast that could feed everyone at the table without requiring me to stand at the stove managing multiple things at once.
Crispy hashbrowns layered with eggs, cheese, and savory mix-ins bake into something golden and satisfying that holds together well and tastes like a proper morning meal.
It goes together the night before if needed, which makes it one of my most reached-for recipes for holidays and weekend brunches.
I’ll show you how to layer everything and bake it so the top comes out golden and the inside stays rich and custardy all the way through. It’s a reliable, crowd-pleasing casserole that makes breakfast feel worth getting up for.
Why You’ll Love This Recipe
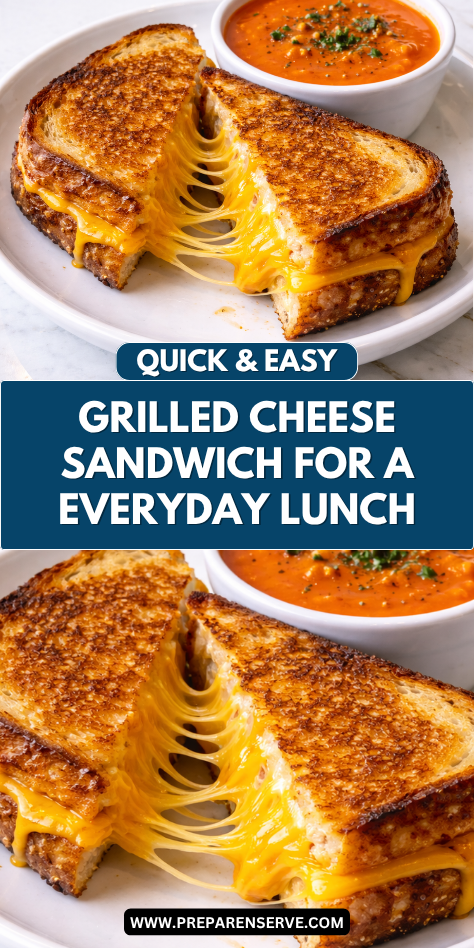
Grilled Cheese Sandwich Recipe is loved for its simplicity and versatility. The combination of buttery, toasted bread and melted cheese delivers both texture and flavor in every bite.
This recipe is quick to prepare and can be customized with a variety of cheeses, breads, and optional add-ins like tomatoes, bacon, or herbs. It’s a flexible recipe that can be as simple or as gourmet as you like.
Families enjoy this recipe because it’s approachable, kid-friendly, and always satisfying. The crispy exterior and gooey interior are universally appealing, making it a dish that is perfect for both children and adults.
Serves: 2 people
This recipe is designed to serve two people generously, with each sandwich providing a hearty portion of melty cheese and toasted bread. The recipe can easily be doubled or tripled to serve more people or to prepare for gatherings. Leftovers are best enjoyed immediately, but sandwiches can also be wrapped and reheated for a quick snack later.
Ingredients You’ll Need
Basic Grilled Cheese
- 4 slices of bread (white, whole wheat, sourdough, or your choice)
- 4 slices of cheese (cheddar, American, Swiss, or your favorite melting cheese)
- 2 tablespoons butter, softened
Optional Add-Ins
- Tomato slices
- Cooked bacon strips
- Fresh herbs (like basil or parsley)
- Caramelized onions
- Avocado slices
Pro Tips
Use high-quality bread and cheese for the best flavor. Thick slices of bread and good melting cheese make a noticeable difference.
Butter the outside of the bread generously and evenly. This creates a golden, crispy crust that enhances both flavor and texture.
Cook the sandwich over medium-low heat. This allows the cheese to melt thoroughly while the bread crisps without burning.
Press lightly with a spatula during cooking to ensure the bread makes full contact with the pan and the cheese melts evenly.
Experiment with cheese combinations for different flavors. Mixing cheddar with mozzarella or adding a slice of Swiss can create a richer, more complex taste.
Tools You’ll Need
- Non-stick skillet or frying pan
- Spatula
- Knife for slicing bread and cheese
- Cutting board
- Butter knife for spreading butter
- Plate for serving
Substitutions and Variations
Bread options: Use white, whole wheat, sourdough, rye, or even brioche for different textures and flavors.
Cheese options: Cheddar, American, Swiss, Gruyère, mozzarella, or a combination for unique melting and flavor profiles.
Add-ins: Tomato, bacon, avocado, caramelized onions, or fresh herbs can enhance flavor and texture.
Healthier options: Use whole-grain bread, reduced-fat cheese, or substitute butter with olive oil or a light spread.
Cooking method: Oven or panini press can be used for larger batches or for evenly cooked sandwiches.
This Grilled Cheese Sandwich Recipe is versatile, quick, and always comforting. It works perfectly for a simple weekday lunch, a snack, or a cozy dinner.

Make Ahead Tips
Grilled Cheese Sandwich Recipe is perfect for preparing ahead of time, making it ideal for busy weekdays, lunchboxes, or casual gatherings. You can slice cheese and prepare optional add-ins like tomatoes, bacon, or caramelized onions ahead of time and store them separately in airtight containers. This saves time when you’re ready to assemble the sandwiches.
Bread can also be prepped in advance. Slice it evenly and store in a breadbox or airtight container to keep it fresh. For slightly thicker sandwiches, consider slicing your own loaf to control thickness and texture.
Butter can be softened in advance for easy spreading. Make sure it is at room temperature for smooth, even coverage across the bread slices.
If preparing multiple sandwiches, you can assemble them ahead of time without cooking. Wrap the sandwiches tightly in plastic wrap or parchment paper and store in the refrigerator for up to 2 hours. This ensures the bread doesn’t become soggy while the ingredients stay fresh.
For larger batches or meal prep, pre-cook add-ins like bacon or caramelized onions and store them in separate containers. Add these just before cooking the sandwich for maximum flavor and freshness.
Instructions
Step 1: Assemble the Sandwich
Lay out slices of bread on a clean surface. Spread softened butter evenly on one side of each slice. This will create the golden, crispy exterior when cooked.
Place your chosen cheese slices on the unbuttered side of one slice of bread. Add any optional toppings, such as tomato slices, cooked bacon, caramelized onions, or fresh herbs. Top with the second slice of bread, buttered side facing out.
Press lightly on the sandwich to ensure the layers are evenly distributed. This helps the cheese melt evenly and the sandwich cook uniformly.
Step 2: Preheat the Pan
Preheat a non-stick skillet or frying pan over medium-low heat. Preheating allows the bread to toast evenly and helps the cheese melt slowly, avoiding burnt edges.
Test the pan by sprinkling a few drops of water. If the water sizzles and evaporates quickly, the pan is ready.
Step 3: Cook the Sandwich
Place the assembled sandwich in the preheated skillet. Cook for 3–5 minutes on one side, pressing gently with a spatula. The bread should turn golden brown and crispy.
Flip the sandwich carefully using the spatula. Cook for an additional 3–5 minutes on the other side, pressing lightly to encourage even browning and cheese melting. Adjust heat if the bread is browning too quickly before the cheese melts.
Step 4: Check for Melty Perfection
Carefully lift the sandwich with the spatula and check that the cheese has melted completely. If the bread is golden but the cheese is not fully melted, cover the pan with a lid for 1–2 minutes to trap heat and complete the melting process.
Step 5: Serve Immediately
Remove the sandwich from the skillet and place it on a plate. Let it rest for 1–2 minutes to allow the cheese to settle slightly.
Slice diagonally or into halves for easy serving. Add optional garnishes like fresh herbs or a light drizzle of hot sauce for extra flavor.
Serve alongside tomato soup, fresh salad, or chips for a classic, comforting meal. Grilled Cheese Sandwich works for lunch, dinner, or a snack, making it versatile and satisfying.
Step 6: Storing Leftovers
Store leftover sandwiches in an airtight container in the refrigerator for up to one day. Reheat gently in a skillet or toaster oven to restore crispiness and melt the cheese. Avoid microwaving, as it may make the bread soggy.
Optional: Wrap sandwiches in foil and reheat in the oven at 350°F for 5–10 minutes for even crisping and warmth.
Serving Suggestions
Grilled Cheese Sandwich Recipe pairs well with classic sides:
- Tomato soup for a traditional combination.
- Fresh green salad or roasted vegetables for a lighter option.
- French fries, chips, or sweet potato fries for a hearty meal.
- Pickles, olives, or a side of coleslaw for extra crunch and flavor.
Optional toppings and add-ins enhance the sandwich:
- Tomatoes and fresh basil for a Caprese-style twist.
- Crispy bacon and caramelized onions for richness.
- Avocado slices or spinach for added texture and nutrition.
- A variety of cheeses mixed together for a more complex flavor.
Grilled Cheese Sandwich works for casual lunches, weeknight dinners, and comfort-food cravings. Preparing ingredients ahead of time allows you to cook multiple sandwiches quickly, making it perfect for families, meal prep, or small gatherings.
This classic sandwich is versatile, approachable, and universally loved. The combination of crisp, buttery bread and melty cheese makes it a comfort food that never goes out of style.
Leftovers and Storage
Grilled Cheese Sandwich Recipe is best enjoyed fresh, but leftovers can still be delicious if stored properly. Allow the sandwich to cool completely before placing it in an airtight container. Store sandwiches in the refrigerator for up to one day to maintain texture and flavor.
To reheat, avoid the microwave, which can make the bread soggy and the cheese rubbery. Instead, reheat in a non-stick skillet over medium heat or in a toaster oven. Place the sandwich in a preheated skillet, pressing lightly with a spatula, and cook for 2–3 minutes per side until the bread is crisp and the cheese is fully melted.
For multiple sandwiches, wrap them in foil and reheat in an oven at 350°F for 5–10 minutes. This method restores the crispiness of the bread while keeping the cheese melted and gooey.
Optional add-ins like tomato slices or avocado are best added fresh during reheating. Preheated vegetables may release moisture that softens the bread, so add them last for maximum texture and freshness.
Leftover grilled cheese can also be repurposed creatively:
- Slice and serve on top of tomato soup for a hearty open-faced version.
- Chop into cubes and toss with a fresh salad for a crunchy, cheesy element.
- Cut into strips for dipping into sauces like marinara, ranch, or even leftover barbecue sauce.
Keeping components separate or reheating carefully ensures the sandwich maintains its signature crispy exterior and melty interior.
Nutrition and Benefits
Grilled Cheese Sandwich Recipe provides a satisfying combination of protein, carbohydrates, and fat. Cheese offers high-quality protein and calcium, supporting bone health and muscle function.
Bread supplies carbohydrates for energy and fiber if using whole grain or multigrain varieties. Using thick, hearty bread adds texture and improves the sandwich’s overall nutritional value.
Butter or alternative spreads contribute fat, which enhances flavor and helps the bread crisp during cooking. Olive oil can be used for a slightly healthier option while maintaining a golden exterior.
Optional add-ins like tomatoes, spinach, avocado, or fresh herbs boost vitamins, minerals, and antioxidants. These ingredients provide additional nutrients such as vitamin C, vitamin K, potassium, and healthy fats.
Cheese combinations can be customized to balance flavor and nutritional profile. Mixing cheeses like cheddar with mozzarella or Swiss can increase protein content and create richer flavor.
Serving the sandwich with fresh vegetables, salad, or a light soup increases fiber and vitamins, creating a balanced, satisfying meal that is both indulgent and wholesome.
Recipe FAQ
Can I make Grilled Cheese Sandwich Recipe ahead of time?
Yes, assemble the sandwich ahead of time but do not cook. Wrap it tightly in plastic wrap and store in the refrigerator for up to 2 hours. Cook just before serving to ensure crisp, golden bread and melty cheese.
Can I use different breads?
Absolutely. White, whole wheat, sourdough, rye, brioche, or multigrain breads all work. Each bread type offers a unique texture and flavor, so choose according to preference.
Can I use different cheeses?
Yes, feel free to use cheddar, American, Swiss, Gruyère, mozzarella, or a combination for flavor and meltability. Mixing cheeses can create richer flavor profiles.
How do I prevent the bread from burning before the cheese melts?
Cook over medium-low heat, pressing gently with a spatula to ensure even heat distribution. Covering the pan briefly can help the cheese melt without over-toasting the bread.
Can I add vegetables or proteins?
Yes, tomatoes, spinach, avocado, cooked bacon, or caramelized onions make excellent add-ins. Add them after cooking if using delicate ingredients to maintain freshness and prevent sogginess.
Is this recipe kid-friendly?
Absolutely. Grilled cheese is a classic comfort food that appeals to all ages. Adjust add-ins and spices according to taste preferences.
Can I make multiple sandwiches at once?
Yes, you can cook sandwiches in batches. Keep finished sandwiches warm in a low oven at 200°F while cooking remaining ones.
A Classic Comfort Food That Brings Everyone Together
Grilled Cheese Sandwich Recipe is a timeless, comforting dish that delivers crispy, buttery bread and gooey, melty cheese in every bite. Each sandwich can be customized with different breads, cheeses, and optional add-ins to suit every palate.
Serve alongside tomato soup, fresh salad, or chips for a complete, satisfying meal. Perfect for lunch, dinner, or a quick snack, this recipe is simple, approachable, and universally loved.
This Grilled Cheese Sandwich Recipe is a staple comfort food that combines ease of preparation with indulgent flavor, making it a favorite for every home cook.