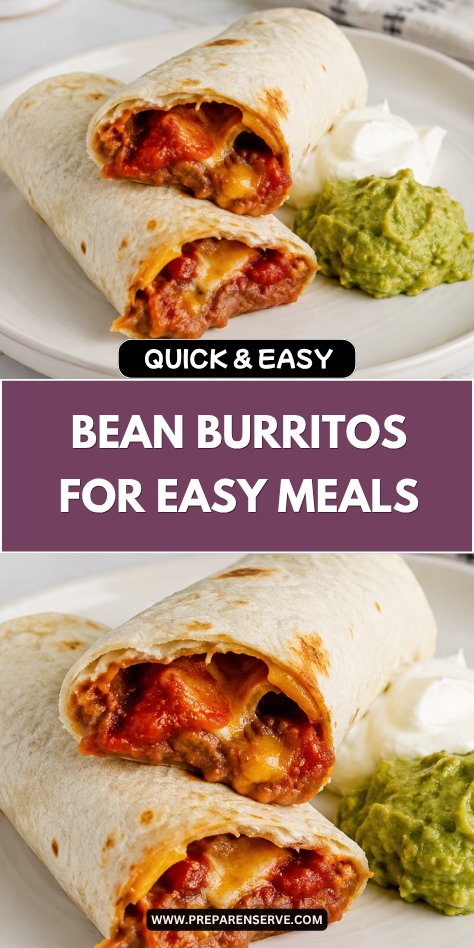
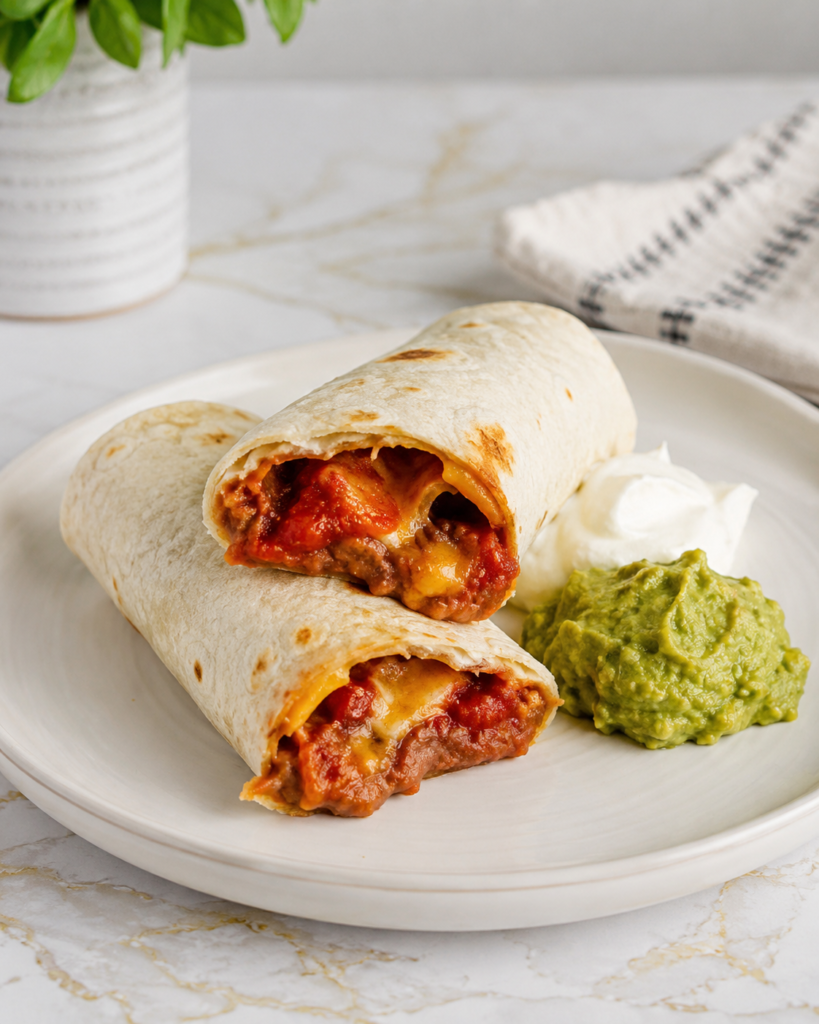
I make cheap and easy bean burritos when I need a filling meal that does not ask much from me. They are simple, warm, and dependable, which is exactly what I want on busy weeknights or slow weekends when everyone still needs to eat.
I love that these burritos use basic pantry ingredients and still feel like a real meal. A soft tortilla, creamy beans, melted cheese, and a few simple seasonings can turn into something comforting without a lot of work or a big grocery bill.
Why You’ll Love This Recipe
Cheap and easy bean burritos are one of those meals that make life feel a little easier. They come together fast, use simple ingredients, and can be changed based on what your family likes or what you already have in the kitchen.
The flavor is cozy and satisfying without being heavy or complicated. The beans become creamy and seasoned, the cheese melts into the filling, and the tortilla holds everything together in a neat, kid-friendly way.
This is also a great recipe for families because everyone can make their burrito their own. You can keep it plain for picky eaters, add salsa for more flavor, or serve toppings on the side so each person can build the plate they like best.
Serves: 6 people
This recipe makes 6 medium burritos, which is a good amount for a small family meal. If you are feeding younger kids, one burrito may be enough for each child, while adults may want one large burrito or two smaller ones.
You can easily double the recipe if you are feeding a bigger group or want leftovers for lunch. Bean burritos also freeze well, so making extra is a smart way to have an easy meal ready for another day.
Ingredients You’ll Need
- 6 large flour tortillas, about 10 inches each
- 2 cans refried beans, 16 ounces each
- 1 tablespoon olive oil or vegetable oil
- 1/2 cup finely diced yellow onion
- 2 cloves garlic, minced
- 1 teaspoon chili powder
- 1/2 teaspoon ground cumin
- 1/2 teaspoon smoked paprika
- 1/4 teaspoon salt, plus more to taste
- 1/4 teaspoon black pepper
- 1/3 cup water or vegetable broth
- 1 1/2 cups shredded cheddar cheese or Mexican blend cheese
- 1/2 cup salsa, plus more for serving
- 1/4 cup chopped fresh cilantro, optional
- 1 tablespoon lime juice, optional
- 1/2 cup sour cream, for serving
- 1 cup shredded lettuce, for serving
- 1/2 cup diced tomatoes, for serving
Pro Tips
Warm the tortillas before filling them. A warm tortilla bends more easily and is less likely to tear when you roll the burrito, especially if you are making these with kids helping at the counter.
Do not skip the onion and garlic if you have them. They add a simple homemade flavor that makes canned refried beans taste richer and more like something cooked from scratch.
Add the water or broth slowly when warming the beans. Some brands of refried beans are thicker than others, so you may need a little more or a little less to get a creamy, spreadable texture.
Keep the filling warm but not too runny. If the beans are too loose, they can leak out of the tortilla and make the burritos harder to eat, especially for younger kids.
Let kids choose their own toppings on the side. This makes the meal feel more fun and helps picky eaters feel comfortable without changing the whole recipe.
Use a dry skillet to toast the rolled burritos if you want a crisp outside. This step is optional, but it gives the burritos a nice texture and helps seal the edges.
Tools You’ll Need
- Large skillet
- Wooden spoon or silicone spatula
- Cutting board
- Sharp knife
- Measuring spoons
- Measuring cups
- Can opener
- Cheese grater, if shredding cheese by hand
- Microwave-safe plate or clean skillet for warming tortillas
- Spoon for spreading the bean filling
- Serving plates
- Foil or parchment paper, optional for wrapping
Substitutions and Variations
Make It Dairy-Free
Use a dairy-free shredded cheese or leave the cheese out completely. The seasoned beans are still creamy and flavorful enough to make the burritos satisfying.
Use Different Beans
Swap refried beans for mashed black beans or mashed pinto beans. Add a little broth, oil, and seasoning so the filling stays soft and easy to spread.
Add More Flavor
Stir in a spoonful of taco sauce, green chiles, or extra salsa while the beans warm in the skillet. This gives the burritos a little more flavor without making the recipe harder.
Boost the Texture
Add cooked rice, corn, diced bell peppers, or shredded lettuce after spreading the beans. These simple add-ins give each bite more texture and can help stretch the meal.
Make It Heartier or Lighter
For a heartier burrito, add cooked rice, scrambled eggs, roasted vegetables, or seasoned ground beef. For a lighter version, use smaller tortillas, less cheese, and extra lettuce or tomatoes on the side.
Make Ahead Tips
Cheap and easy bean burritos are a great make-ahead meal because the filling holds up well and the burritos are easy to warm later. You can cook the bean mixture up to 3 days ahead, let it cool, and store it in an airtight container in the fridge.
If you want to assemble the burritos ahead of time, let the bean filling cool first so the tortillas do not get too soft. Roll each burrito tightly, then wrap it in foil or parchment paper and store it in the fridge for up to 3 days.
For freezer meals, wrap each burrito in parchment paper, then place them in a freezer bag or freezer-safe container. Label the bag with the date so you can grab a quick lunch or dinner when the day gets busy.
I like to freeze them without fresh toppings like lettuce, tomatoes, or sour cream. Those are best added after reheating so the burritos still taste fresh and have a nice texture.
Instructions
Step 1: Cook the Onion and Garlic
Place a large skillet over medium heat and add 1 tablespoon of olive oil or vegetable oil. Once the oil is warm, add 1/2 cup finely diced yellow onion and cook for 3 to 4 minutes, stirring often, until the onion softens.
Add 2 minced garlic cloves and cook for about 30 seconds. The garlic should smell warm and fragrant, but do not let it brown because it can taste bitter.
Step 2: Season the Bean Filling
Add 2 cans of refried beans to the skillet with the onion and garlic. Stir in 1 teaspoon chili powder, 1/2 teaspoon ground cumin, 1/2 teaspoon smoked paprika, 1/4 teaspoon salt, and 1/4 teaspoon black pepper.
Pour in 1/3 cup water or vegetable broth and stir until the beans become smooth and creamy. Let the mixture cook for 4 to 5 minutes, stirring often, until it is warm and easy to spread.
Step 3: Add Salsa and Fresh Flavor
Stir 1/2 cup salsa into the warm bean mixture. Let it cook for 2 more minutes so the flavors blend together and the filling stays thick but creamy.
If you are using cilantro and lime juice, stir in 1/4 cup chopped fresh cilantro and 1 tablespoon lime juice after turning off the heat. Taste the beans and add a little more salt if needed.
Step 4: Warm the Tortillas
Warm the 6 large flour tortillas before filling them so they bend without cracking. You can place them on a microwave-safe plate, cover them with a damp paper towel, and microwave for about 20 to 30 seconds.
You can also warm each tortilla in a dry skillet for about 10 to 15 seconds per side. Keep the tortillas covered with a clean towel while you work so they stay soft.
Step 5: Fill the Burritos
Lay one warm tortilla flat on a clean surface. Spoon about 1/2 cup of the bean filling into the center, spreading it slightly into a short line while leaving space around the edges.
Sprinkle about 1/4 cup shredded cheddar cheese or Mexican blend cheese over the beans. Try not to overfill the tortilla, since a little extra space makes the burrito easier to roll.
Step 6: Roll the Burritos
Fold the sides of the tortilla in toward the center. Then fold the bottom edge up over the filling and roll it forward tightly until the burrito is closed.
Place the burrito seam-side down on a plate while you finish the rest. This helps the tortilla stay closed, especially if the filling is still warm.
Step 7: Toast the Burritos
For a softer burrito, you can serve them right after rolling. For a lightly crisp outside, place the rolled burritos seam-side down in a dry skillet over medium heat.
Toast for 1 to 2 minutes per side until the outside is lightly golden and the cheese inside has melted. Work in batches if needed so the burritos have room to brown evenly.
Step 8: Add Toppings and Serve
Serve the burritos warm with sour cream, shredded lettuce, diced tomatoes, and extra salsa on the side. Keeping toppings separate makes it easier for everyone to choose what they like.
For younger kids, you can cut each burrito in half so it cools faster and is easier to hold. Let the filling rest for a minute before serving because beans can stay very hot inside the tortilla.
Serving Suggestions
These bean burritos are filling on their own, but they also go well with simple sides. I like serving them with tortilla chips and salsa when I need a meal that feels complete without extra cooking.
A scoop of rice makes the plate heartier and helps stretch the meal for a bigger family. Plain white rice, brown rice, or cilantro lime rice all work well with the creamy bean filling.
Fresh toppings make the burritos feel brighter. Shredded lettuce, diced tomatoes, avocado, sliced green onions, or a little lime juice can balance the warm, cheesy filling.
For a kid-friendly dinner, serve the burritos with fruit, corn, or carrot sticks. This keeps the plate simple, colorful, and easy for picky eaters to enjoy.
You can also turn the burritos into a burrito bowl. Slice one open and serve the filling over rice with cheese, salsa, lettuce, and sour cream.
If you are packing them for lunch, wrap the burrito in foil to keep it neat. Add salsa or sour cream in a small container on the side so the tortilla does not get soggy.
Leftovers and Storage
Store leftover bean burritos in an airtight container in the refrigerator for up to 3 days. Let them cool before storing so extra steam does not make the tortillas too soft.
To reheat in the microwave, place one burrito on a microwave-safe plate and cover it with a damp paper towel. Heat for 45 to 90 seconds, depending on the size and how cold it is.
For a better texture, reheat burritos in a skillet over medium-low heat. Turn them a few times until the outside is warm and the filling is heated through.
You can also freeze the burritos for up to 2 months. Wrap each one tightly, then thaw overnight in the fridge or reheat from frozen in the microwave, adding extra time as needed.
Fresh toppings should be stored separately. Lettuce, tomatoes, sour cream, and salsa taste best when added after reheating.
Nutrition and Benefits
- Beans are a budget-friendly source of plant-based protein, which helps make these burritos filling without adding meat. They also bring fiber, which can help keep everyone satisfied longer.
- Refried beans make the filling creamy and hearty, so the burritos feel comforting even with simple ingredients. Using pinto or black beans can also add minerals like iron, magnesium, and potassium.
- Cheese adds calcium and extra protein while helping the filling taste rich and familiar. You can use a little less cheese or choose a lighter option if your family prefers.
- Tortillas make the meal easy to hold, pack, and serve, which is helpful for kids and busy lunches. Whole wheat tortillas can add more fiber if you want a slightly heartier version.
- Adding lettuce, tomatoes, salsa, avocado, or peppers gives the meal more color and freshness. Small toppings can make a simple burrito feel balanced and more complete.
Recipe FAQ
Can I use black beans instead of refried beans?
Yes, black beans work well in this recipe. Drain and rinse them first, then mash them with a fork or potato masher before adding them to the skillet. Add a little broth or water so they become creamy enough to spread.
How do I keep burritos from getting soggy?
Let the bean filling cool slightly before rolling the burritos, especially if you are making them ahead. Avoid adding wet toppings like salsa, tomatoes, or sour cream inside if the burritos will be stored. Serve those toppings on the side instead.
Can I freeze these bean burritos?
Yes, these burritos freeze very well. Wrap each burrito tightly in parchment paper or foil, then place them in a freezer-safe bag. Freeze for up to 2 months for the best taste and texture.
What is the best way to reheat frozen burritos?
Microwave the frozen burrito on a microwave-safe plate, covered with a damp paper towel, until heated through. Start with 2 minutes, then add 30-second bursts as needed. For a crisp outside, finish it in a skillet for a minute or two per side.
Can I make these burritos without cheese?
Yes, you can leave out the cheese and still have a tasty burrito. The seasoned beans are creamy enough on their own. You can add avocado, dairy-free cheese, or extra salsa for more flavor.
How can I make these more filling?
Add cooked rice, roasted vegetables, scrambled eggs, or seasoned ground beef to the filling. Keep the portions small enough so the burritos are still easy to roll. A little extra filling can stretch the recipe and make it more satisfying.
Are these burritos good for lunch boxes?
Yes, they are great for lunch boxes because they are easy to wrap and eat. Let the burrito cool slightly before packing so it does not steam too much inside the wrap. Pack toppings like salsa or sour cream in a separate small container.
A Simple Burrito Dinner to Count On
Cheap and easy bean burritos are the kind of meal that brings comfort without adding stress to the day. They use simple pantry ingredients, roll up neatly, and give you a warm, filling dinner that feels just right for both kids and adults.
I like keeping recipes like this close for busy nights, quick lunches, and easy meal prep. The creamy beans, soft tortillas, and melted cheese make every bite satisfying, and the dependable results make these burritos worth making again and again.