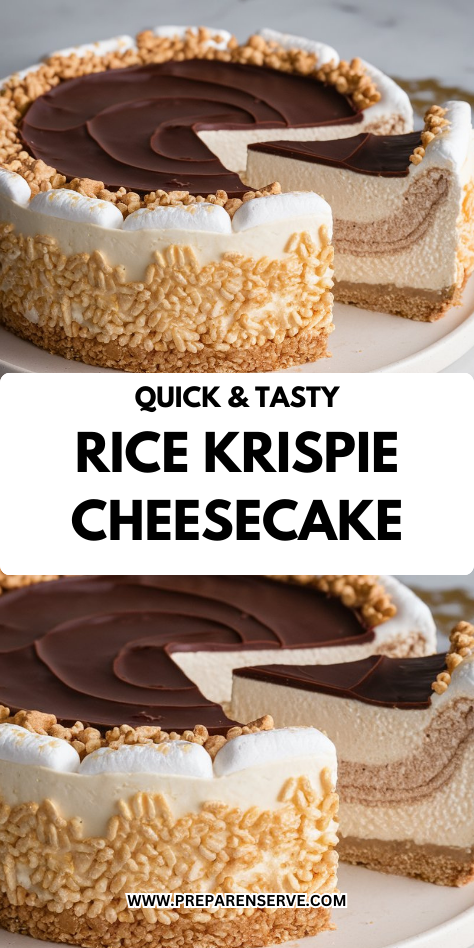
I’ve always believed that the best desserts bring together unexpected elements, and this Creamy Rice Krispie Cheesecake does exactly that.
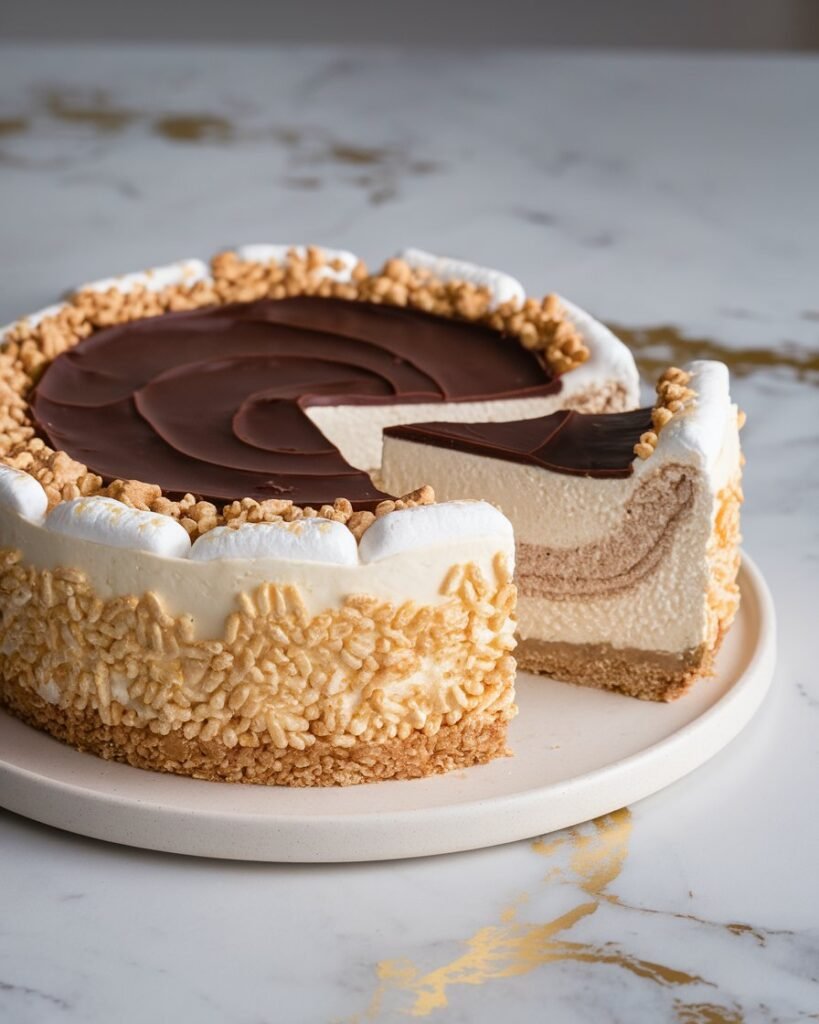
Remember that snap, crackle, pop from childhood breakfast bowls? Now imagine it transformed into a buttery crust holding a velvety cheesecake filling.
The contrast between crunchy and creamy creates something magical that’ll make your guests ask for the recipe.
And don’t worry about complicated techniques—this dessert only looks like it requires professional skills.
What makes this nostalgic treat even more special is how you can customize it to your own taste…
Why You’ll Love this Creamy Rice Krispie Cheesecake
I’m convinced this creamy masterpiece will become your new favorite. The magical combination of childhood cereal and sophisticated cheesecake creates something truly special.
Remember those snap, crackle, pop moments as a kid? They’re transformed into a buttery, marshmallowy crust that perfectly complements the velvety cream cheese filling.
What makes it extraordinary? It’s the contrast of textures—crunchy base with silky filling.
Plus, it’s remarkably simple to make. Need an impressive dessert that doesn’t require professional skills? This is it. The familiar flavors with an elegant twist will win everyone over.
What Ingredients are in Creamy Rice Krispie Cheesecake?
You’ll need just a handful of simple ingredients to create this magical dessert that perfectly balances nostalgic cereal flavors with creamy cheesecake decadence.
- 3 cups Rice Krispies cereal (for that signature crunch)
- ¼ cup butter, melted
- 3 tablespoons marshmallow fluff
- 16 ounces cream cheese, softened to room temperature
- ¾ cup sugar
- 2 eggs
- 1 teaspoon vanilla extract
- ½ cup sour cream
For the best results, make sure your cream cheese is properly softened before mixing, and consider keeping a few extra Rice Krispie treats on hand for decorating the top of your finished cheesecake, as suggested in the recipe tip.
How to Make this Creamy Rice Krispie Cheesecake
Step 1: Prepare the Nostalgic Crust
Mix together 3 cups of Rice Krispies cereal, ¼ cup melted butter, and 3 tablespoons of marshmallow fluff in a large bowl until well combined.
Press this mixture firmly into the bottom of a springform pan to create that perfect cereal treat crust that’ll transport you right back to childhood.
Step 2: Preheat Your Oven
Set your oven to 325°F and give it time to fully preheat while you prepare the cheesecake filling.
A properly preheated oven guarantees even baking and helps prevent those dreaded cheesecake cracks we all try to avoid.
Step 3: Create the Creamy Base
In a large mixing bowl, beat 16 ounces of softened cream cheese and ¾ cup sugar until the mixture becomes light and fluffy.
This might take about 2-3 minutes with an electric mixer—you’re looking for that perfect, cloud-like texture with no cream cheese lumps hiding anywhere.
Step 4: Add the Eggs
Add 2 eggs one at a time, beating well after each addition.
This gradual approach helps incorporate air into the batter while maintaining a smooth, velvety consistency that’ll make your cheesecake absolutely divine.
Step 5: Incorporate the Remaining Ingredients
Stir in 1 teaspoon of vanilla extract and ½ cup of sour cream until just combined.
The vanilla adds that warm, aromatic touch while the sour cream brings a subtle tanginess that balances the sweetness perfectly.
Step 6: Assemble and Bake
Pour your creamy cheesecake mixture over the Rice Krispie treat crust in your springform pan.
Using a springform pan set ensures easy release and beautiful presentation of your finished cheesecake without damaging the delicate crust.
Bake at 325°F for approximately 50 minutes, or until the edges are set but the center still has a slight jiggle when gently shaken.
Step 7: Cool Completely
Allow your cheesecake to cool completely at room temperature before covering and transferring to the refrigerator.
Patience is key here—rushing this step could lead to condensation on top of your beautiful creation.
Step 8: Chill and Decorate
Refrigerate the cheesecake for at least 4 hours, but overnight is even better if you can resist the temptation.
Before serving, consider decorating the top with additional mini Rice Krispie treats cut into fun shapes for that extra wow factor.
What to Serve with Creamy Rice Krispie Cheesecake
This nostalgic treat deserves perfect companions! A drizzle of caramel sauce creates rivers of sweetness that complement the cereal crunch beautifully.
For a revitalizing contrast, serve with fresh berries—strawberries and blueberries bring bright pops of color and tartness.
Coffee lovers will appreciate a strong espresso or cappuccino alongside this rich dessert, as the bitter notes balance the sweetness.
For kiddos (or the young at heart), a cold glass of milk is practically mandatory—isn’t that how we all enjoyed our Rice Krispie treats growing up?
For a truly decadent experience, add a scoop of vanilla bean ice cream that slowly melts into the cheesecake.
Perfect for dessert, but I won’t judge if you sneak a slice for breakfast!
Creamy Rice Krispie Cheesecake Substitutions and Variations
Don’t have exactly what you need? No worries! This cheesecake is super adaptable:
• Cereal Swaps: Any crispy cereal works! Try Cocoa Krispies for a chocolate version or Fruity Pebbles for a colorful twist.
- Dietary Adjustments:
- Gluten-free? Double-check your cereal is certified GF
- Dairy-free? Use plant-based cream cheese, butter, and sour cream
- Lower sugar? Try a natural sweetener like monk fruit (use about half the amount)
- Flavor Boosters:
- Fold mini chocolate chips into the filling
- Add 2 tbsp peanut butter to the crust mixture
- Swirl in 3 tbsp raspberry preserves before baking
- Seasonal Touches:
- Summer: Add lemon zest to the filling
- Fall: Mix in 1 tsp cinnamon and top with caramel
- Holidays: Sprinkle crushed peppermint on top after cooling
- The beauty of this recipe? It’s almost impossible to mess up.
- The cheesecake gods are very forgiving.
Leftovers and Storage for this Creamy Rice Krispie Cheesecake
This cheesecake keeps beautifully in the refrigerator for up to 5 days when stored in an airtight container or covered tightly with plastic wrap.
The flavor actually develops overnight, making day-two slices sometimes even better than day-one!
For longer storage, freeze individual slices: Wrap each piece in plastic wrap, then foil. Store in freezer for up to 3 months
Thaw overnight in the refrigerator before serving
To maintain that perfect texture balance between crispy crust and creamy filling, never microwave leftover slices.
Instead, let refrigerated portions sit at room temperature for 15-20 minutes before enjoying. This prevents the crust from becoming soggy while allowing the filling to soften just enough.
Final Thoughts
This Rice Krispie Treat Cheesecake perfectly marries childhood nostalgia with sophisticated dessert elegance.
The contrast between the crispy, marshmallowy crust and the velvety cream cheese filling creates something truly special—more than just the sum of its parts.
It’s become my go-to recipe for celebrations that need something both impressive and comforting, from birthday gatherings to holiday tables.
The familiar snap-crackle-pop texture paired with rich cheesecake makes it appealing to both kids and adults alike.
When you’re looking to elevate a beloved childhood treat into something memorable, this cheesecake delivers that perfect balance of whimsy and indulgence.