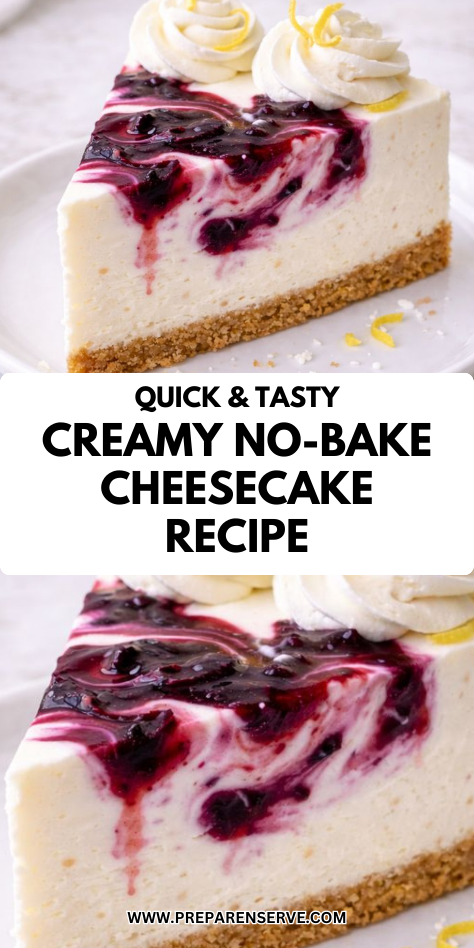
Creamy no-bake cheesecake has always been one of those desserts that feels almost magical. You get all the richness and indulgence of classic cheesecake without turning on the oven or worrying about cracks, water baths, or timing.
In my kitchen, this recipe quickly became a favorite for warm days, busy schedules, and moments when we still want something special.
I first started making no-bake cheesecake when I needed a dependable dessert that felt elegant but stayed simple. Over time, this version became the one I returned to again and again because it was smooth, creamy, and consistently delicious. Every time I make it, I’m reminded that some of the best desserts come together with the least amount of stress.
Why You’ll Love This Recipe
This Creamy No-Bake Cheesecake Recipe delivers a smooth, rich texture with just the right balance of sweetness. The filling is light yet indulgent, with a creamy consistency that melts in your mouth. It tastes classic and comforting without feeling heavy.
The recipe is incredibly approachable and beginner-friendly. There’s no baking, no complicated steps, and no special equipment required. Everything comes together quickly, making it perfect for last-minute desserts or relaxed weekends.
Families love this cheesecake because it’s customizable and crowd-pleasing. Kids enjoy the creamy filling and sweet crust, while adults appreciate how light and refreshing it feels. It’s a dessert that works for almost any occasion.
Serves: 2 people
This recipe makes a small no-bake cheesecake that serves two people generously. It’s perfect for a quiet celebration or a cozy dessert at home. The recipe can easily be doubled for gatherings or special occasions.
Ingredients You’ll Need
Crust
- 3/4 cup graham cracker crumbs
- 2 tablespoons granulated sugar
- 3 tablespoons unsalted butter, melted
Cheesecake Filling
- 8 ounces cream cheese, softened
- 1/3 cup powdered sugar
- 1 teaspoon vanilla extract
- 1/2 cup heavy whipping cream
Optional Toppings
- Fresh berries
- Fruit compote
- Chocolate drizzle
Pro Tips
Make sure the cream cheese is fully softened before mixing. Cold cream cheese can create lumps in the filling. Let it sit at room temperature for smooth results.
Beat the cream cheese and powdered sugar until completely smooth before adding other ingredients. This step ensures a silky texture. Scrape the bowl often to avoid pockets of unmixed cream cheese.
Whip the cream separately until soft peaks form. This helps create a light and airy cheesecake filling. Folding it in gently keeps the texture fluffy.
Chill the cheesecake long enough to fully set. Rushing this step can result in a soft filling. A few extra hours in the refrigerator make a big difference.
Press the crust firmly into the pan. A well-packed crust holds together better when slicing. Use the bottom of a glass or spoon for even pressure.
Tools You’ll Need
- Mixing bowls
- Electric mixer or whisk
- Measuring cups and spoons
- Rubber spatula
- Small springform pan or dish
- Refrigerator
Substitutions and Variations
You can replace graham crackers with crushed cookies like vanilla wafers or digestive biscuits. This changes the flavor slightly while keeping the same texture. Choose a cookie you enjoy.
For a lighter filling, you can use whipped topping instead of heavy cream. This creates a softer texture and slightly sweeter flavor. Fold it in gently to maintain fluffiness.
If you prefer a tangier cheesecake, add a teaspoon of lemon juice to the filling. This brightens the flavor without overpowering it. Lemon pairs especially well with berry toppings.
You can make this recipe dairy-free by using dairy-free cream cheese and coconut cream. Chill the coconut cream before whipping for best results. The texture will still be rich and creamy.
To create a chocolate version, mix a small amount of cocoa powder or melted chocolate into the filling. Keep the addition light to maintain structure. This adds a fun twist to the classic recipe.

Make Ahead Tips
Creamy no-bake cheesecake is an ideal dessert to prepare ahead because it needs time to chill and set. You can make the entire cheesecake up to two days in advance and store it covered in the refrigerator.
This actually improves the texture and flavor as everything firms up and melds together.
If you want to break the process into steps, the crust can be made a day ahead and kept refrigerated. Preparing the crust early makes assembly faster and easier later. A chilled crust also helps the filling set more cleanly.
The cheesecake filling can be mixed several hours before assembling if needed. Keep it covered in the refrigerator and give it a gentle stir before spreading it into the crust. This helps maintain a smooth and creamy consistency.
Toppings are best added just before serving. Fresh fruit stays brighter and sauces look cleaner when added at the last minute. This keeps the finished cheesecake looking fresh and polished.
Instructions
Step 1: Prepare the Crust
In a medium bowl, combine the graham cracker crumbs and granulated sugar. Stir until evenly mixed. This creates a balanced, lightly sweet base.
Pour the melted butter into the crumb mixture. Stir until all crumbs are evenly coated and resemble wet sand. The mixture should hold together when pressed.
Step 2: Press the Crust into the Pan
Transfer the crumb mixture into a small springform pan or dish. Press it firmly into the bottom using the back of a spoon or the bottom of a glass. Make sure the layer is even and tightly packed.
Place the crust in the refrigerator to chill for at least 15 minutes. Chilling helps the crust firm up and hold its shape. This step makes slicing easier later.
Step 3: Beat the Cream Cheese
Place the softened cream cheese in a mixing bowl. Beat on medium speed until completely smooth and creamy. Scrape down the sides of the bowl as needed.
This step is important for removing any lumps. Smooth cream cheese creates a silky final texture. Take your time here for best results.
Step 4: Add Sugar and Vanilla
Add the powdered sugar and vanilla extract to the cream cheese. Beat until fully combined and smooth. The mixture should look thick and glossy.
Make sure the sugar is fully incorporated. This ensures even sweetness throughout the cheesecake. Scraping the bowl helps keep the mixture uniform.
Step 5: Whip the Cream
In a separate bowl, whip the heavy cream until soft peaks form. The cream should hold its shape but still look soft and smooth. Avoid overwhipping.
Soft peaks give the cheesecake its light texture. Overwhipped cream can make the filling dense. Stop whipping as soon as peaks gently form.
Step 6: Fold the Filling Together
Gently fold the whipped cream into the cream cheese mixture. Use a spatula and light strokes to avoid deflating the mixture. Fold until just combined.
The filling should look smooth, fluffy, and uniform. Take care not to overmix. Gentle folding keeps the cheesecake light.
Step 7: Fill the Crust
Remove the chilled crust from the refrigerator. Spoon the cheesecake filling onto the crust and spread it evenly. Smooth the top with a spatula.
Tap the pan lightly on the counter to release air bubbles. This helps create a smooth surface. The cheesecake should look level and neat.
Step 8: Chill the Cheesecake
Cover the cheesecake and place it in the refrigerator. Chill for at least 4 hours, or until fully set. Overnight chilling gives the best texture.
The cheesecake should feel firm to the touch once set. Proper chilling ensures clean slices. Do not rush this step.
Step 9: Add Toppings
Just before serving, add your chosen toppings. Fresh berries, fruit sauce, or chocolate drizzle all work well. Keep toppings light and balanced.
Adding toppings at the end keeps them fresh and vibrant. This also allows customization for different preferences. Serve immediately after topping.
Serving Suggestions
Serve creamy no-bake cheesecake well chilled for the best texture. Cold cheesecake slices cleanly and holds its shape. This makes presentation easier.
This cheesecake pairs beautifully with fresh fruit on the side. Berries add brightness and balance the rich filling. The contrast feels light and refreshing.
For a more indulgent dessert, drizzle with chocolate or caramel sauce. A small amount goes a long way. This adds richness without overpowering the cheesecake.
No-bake cheesecake works well for both casual and special occasions. Serve it as a simple dessert or dress it up with elegant toppings. Its versatility makes it a favorite for any setting.
Leftovers and Storage
Leftover creamy no-bake cheesecake should be stored covered in the refrigerator. Use an airtight container or wrap the pan tightly to keep the cheesecake from absorbing other flavors. It will stay fresh and creamy for up to four days.
For the best texture, keep the cheesecake chilled until ready to serve. Let slices sit at room temperature for just a few minutes before eating if desired. This slightly softens the texture without losing structure.
Freezing is possible but not ideal for the creamiest texture. If needed, freeze individual slices wrapped tightly for up to one month. Thaw overnight in the refrigerator before serving.
Nutrition and Benefits
Creamy no-bake cheesecake is a rich dessert designed to be enjoyed in moderation. It provides fats that contribute to satiety and a smooth, satisfying texture. Small portions often feel indulgent and complete.
Making cheesecake at home allows you to control sweetness and ingredient quality. You can adjust sugar levels or topping choices to suit your preferences. This makes it a more intentional dessert option.
Because this recipe requires no baking, it also reduces stress and preparation time. Less time in the kitchen can make dessert feel more enjoyable. That ease is part of its appeal.
Recipe FAQ
Why is my no-bake cheesecake too soft?
A soft cheesecake usually needs more chilling time. Make sure it chills for at least four hours, preferably overnight. Properly whipped cream also helps it set.
Can I use low-fat cream cheese?
Low-fat cream cheese can be used, but the texture may be softer. Full-fat cream cheese gives the creamiest and most stable result. Texture is best with full-fat versions.
How do I avoid lumps in the filling?
Make sure the cream cheese is fully softened before mixing. Beat it until smooth before adding other ingredients. Scraping the bowl helps ensure even blending.
Can I make this cheesecake without a springform pan?
Yes, you can use a small dish or pie plate. Line it with parchment if you want easier removal. Slicing may be less clean but still delicious.
Can I flavor the filling?
Yes, you can add lemon juice, melted chocolate, or extracts. Add small amounts to avoid affecting texture. Flavor additions should be well mixed.
Is this cheesecake kid-friendly?
Yes, this cheesecake is very kid-friendly. The flavor is mild and creamy. Toppings can be customized for different tastes.
How long does no-bake cheesecake need to set?
It needs at least four hours to set properly. Overnight chilling gives the best results. Patience ensures clean slices and firm texture.
A Creamy Dessert Made Simple
Creamy no-bake cheesecake proves that elegant desserts do not have to be complicated. Its smooth texture and classic flavor make it comforting and satisfying.
Whether served plain or topped with fruit, it’s a dessert that always feels special without the stress.